
Digital Epigraphy (Second Edition)
Chapter 6 - Post Production
Chapter 6, Section 3 - Adding Modifications Digitally
%20-%20Collation%20sheet%20sample.jpg)
MHB 91 (detail) - Collation sheet sample
Once the collation is done and the epigraphers and the artist are all in agreement about the changes to be made to a drawing, the artist has to transfer all these modifications from the collation sheet to the computer. When working on paper, one has very limited options for how to change an inked line: in fact, the only way to do it is by keeping the collation sheet and the drawing next to each other and eyeballing the extent and shape of the change. Once a line is changed, it cannot be seen where the original line was, and therefore the epigrapher has very limited options when verifying the changes during the Transfer Check.
When working digitally, we have an array of tools that help us to make the modifications needed for producing an accurate drawing. First of all, we have to make the collation sheets available as part of the digital drawing, meaning that we have to set them up as layers in Photoshop.
Importing Collation Sheets
Before the artist starts adding the collation sheets to the digital drawing, he/she needs to set up the current stage as a layer for future reference. Later on, when we need a before and after collation comparison, this layer will be the one to which all subsequent changes can be related.
The “Ready for Collation” Layer
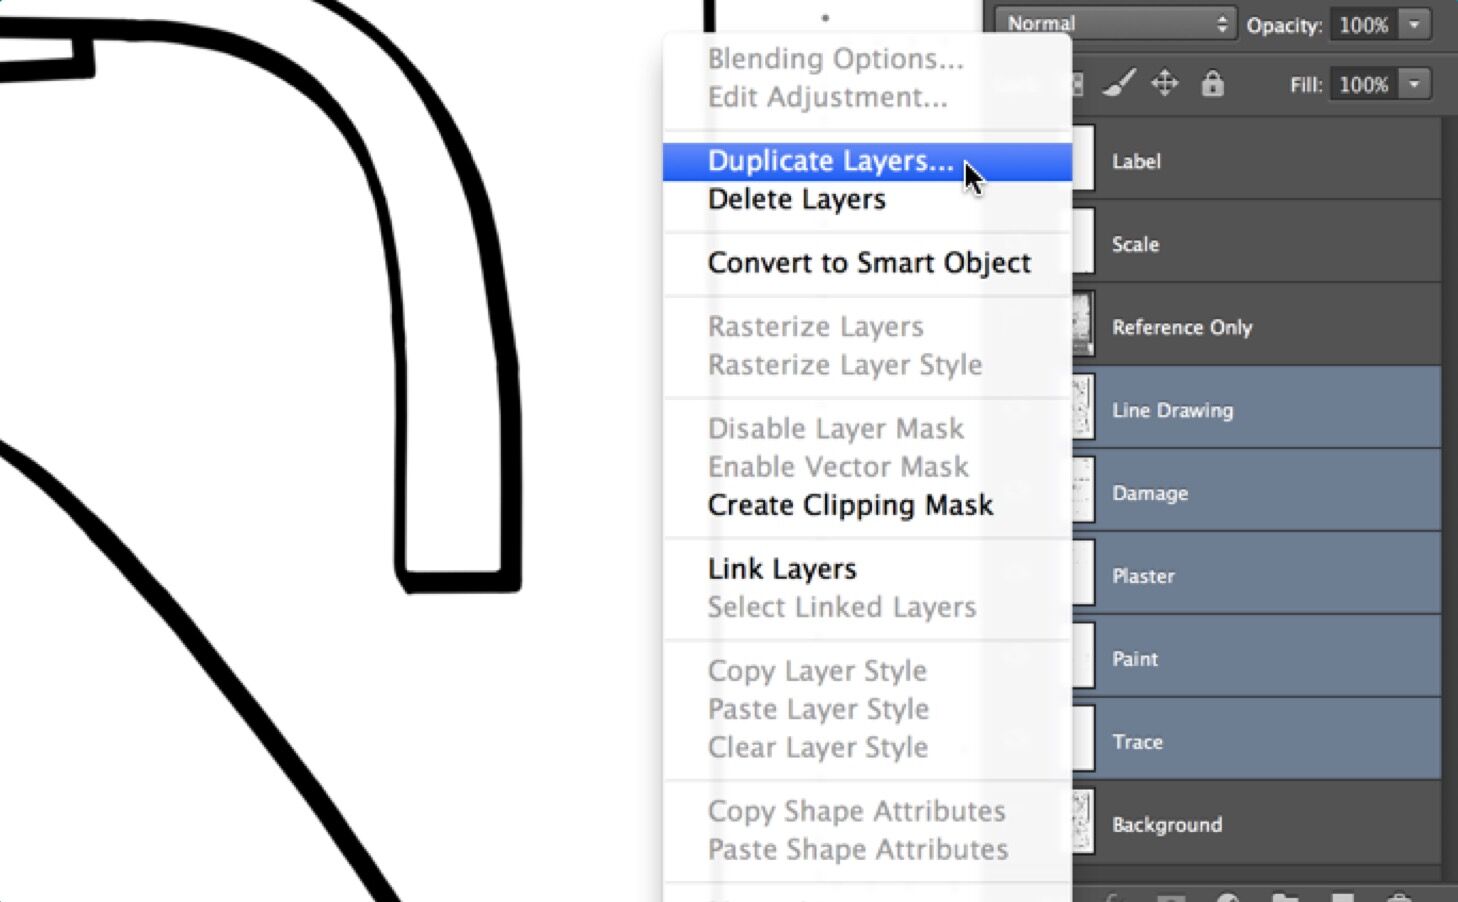
(1) Select all the drawing layers, hit right click (secondary click) and pick Duplicate Layers from the drop-down menu.
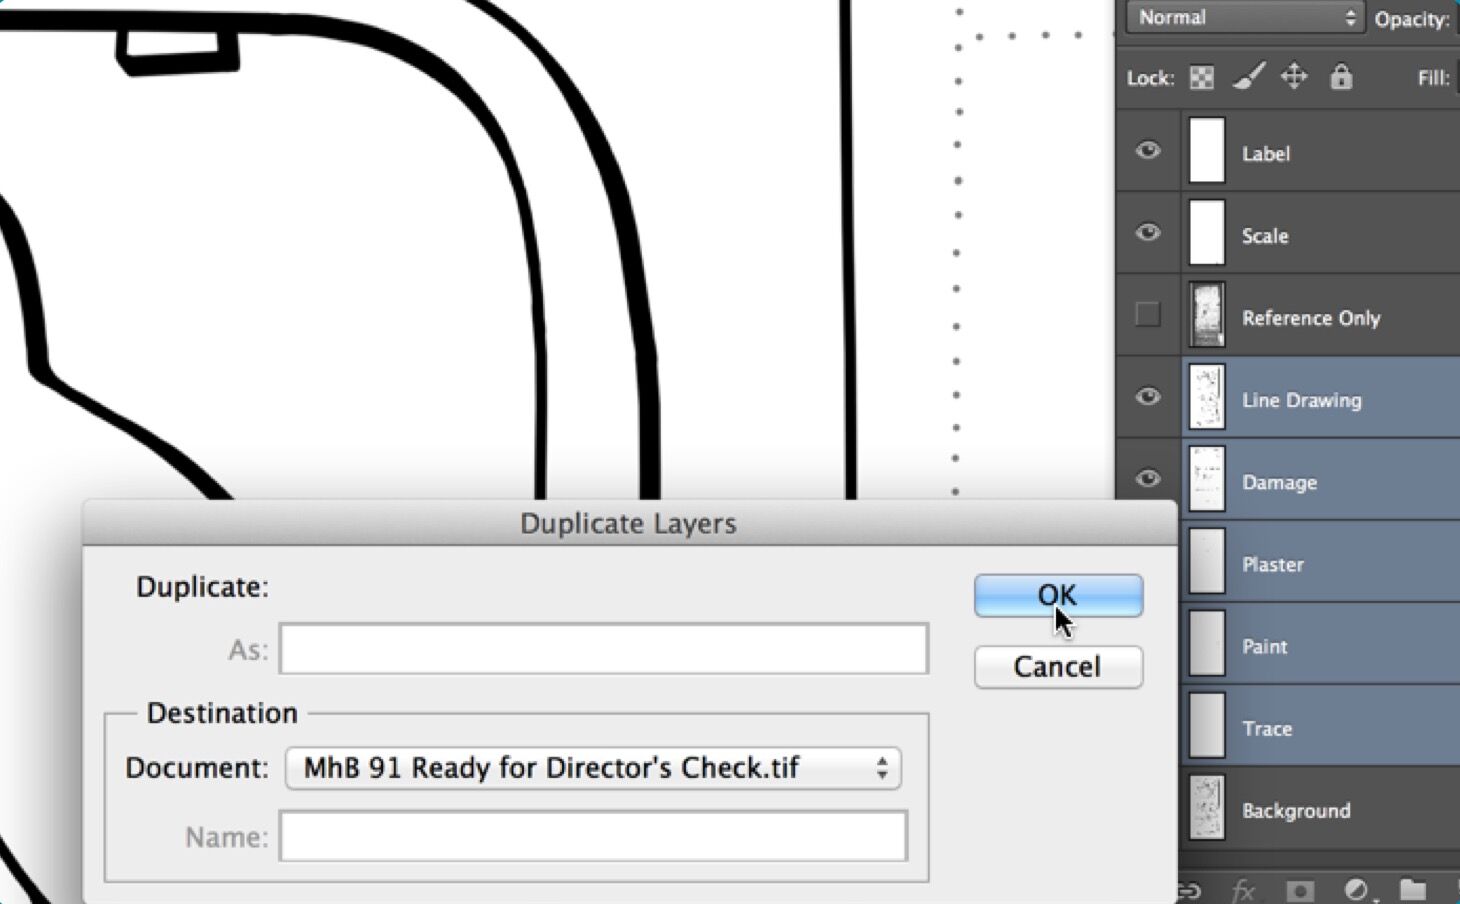
(2) When asked about the destination you’d like to add the new layers, hit OK without changing anything.
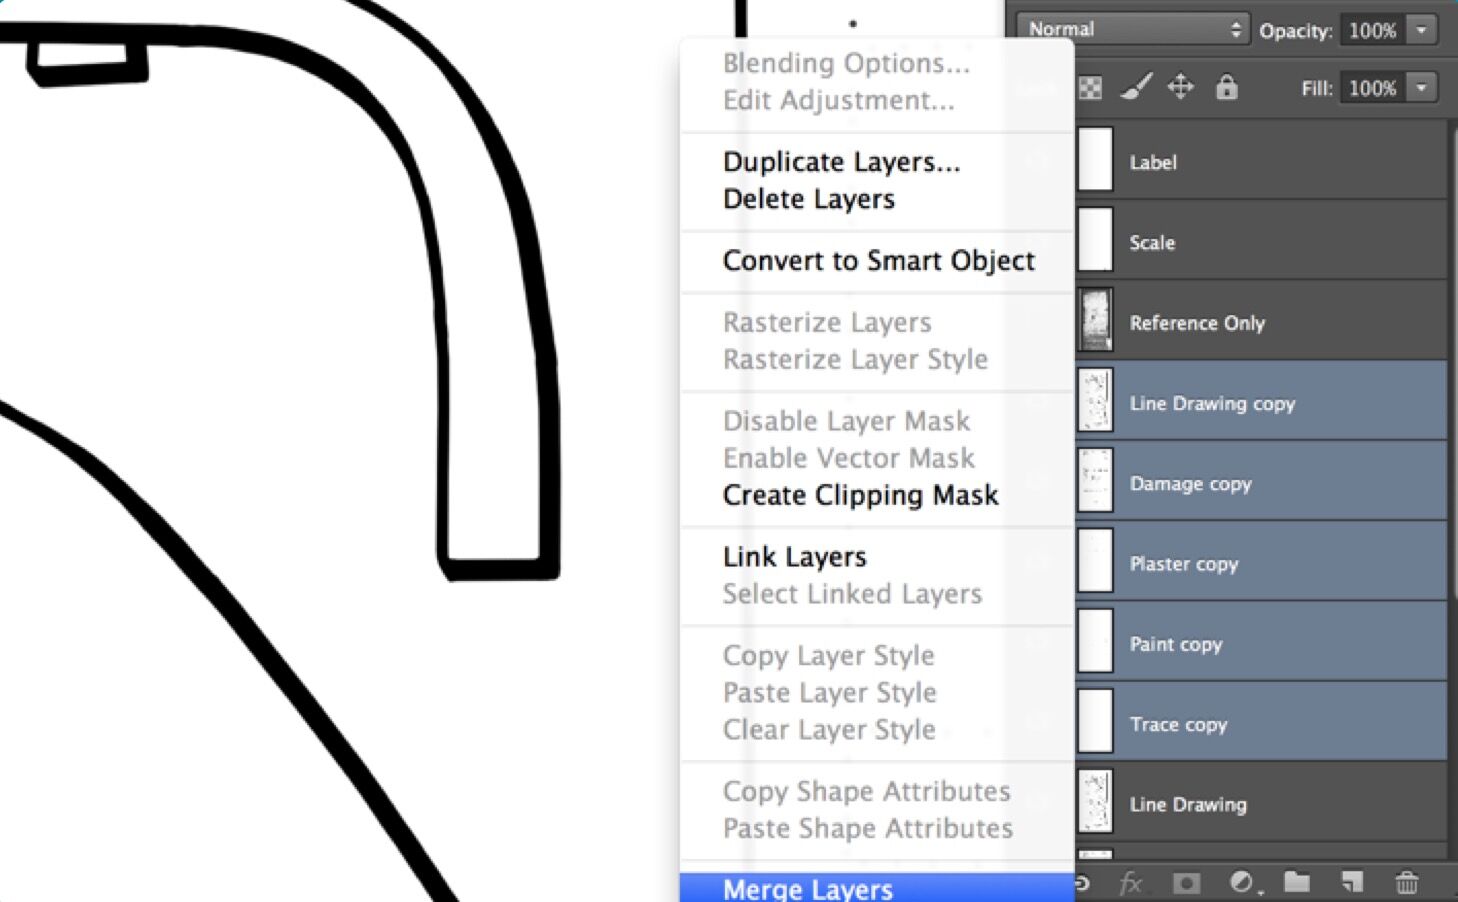
(3) Notice that all the new layers have the same name with “copy” added automatically. Merge your new layers.
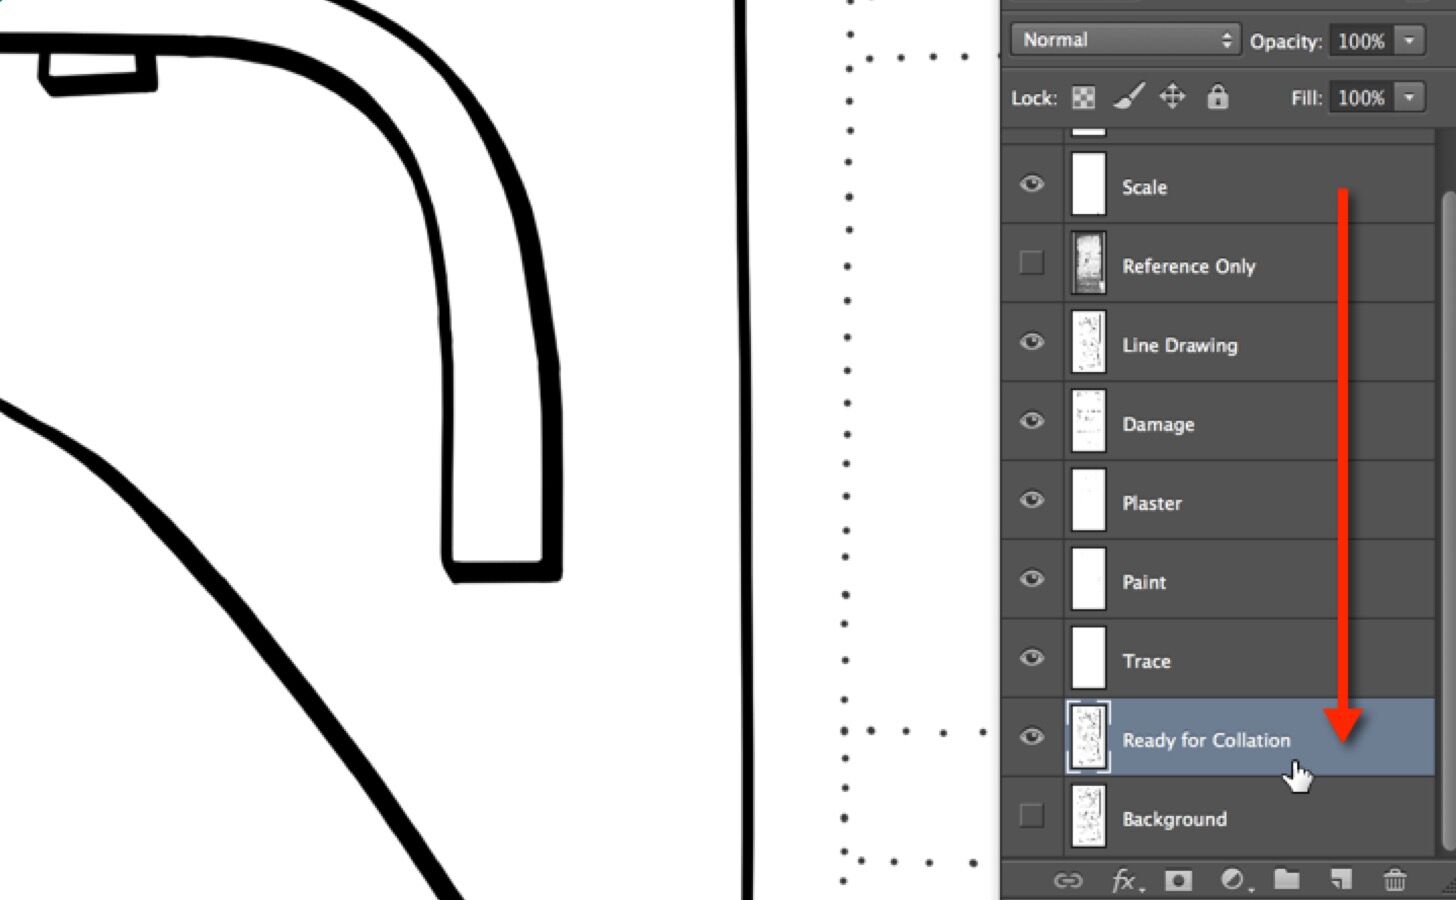
(4) Rename your new layer and move it to the bottom of your stack right above the Background Layer.
Once the “Ready for Collation” layer is created, it should be locked. It needs to be visible only when comparing drawing stages to each other.
Now we are ready to import the first collation sheet to the drawing. Of course it needs to be scanned first, but the scan must not be saved as a tiff file, but rather as jpeg to keep its file size at the minimum (resolution stays at 1200 dpi, image is grayscale scanned in 8-bit mode). If one needs a reminder he/she can find more information about the scanning process in Chapter 4, Section 1. Needless to say, once the sheets are scanned, they have to be saved to their specified folder (see Section 1 in this chapter).
Along with refreshing our scanning skills, we also need to remember how to align layers properly. The Collation Sheet Layer needs to be matched exactly with the drawing, otherwise the changes end up being misaligned. Sometimes moving the layers on top of each other is not enough, and the collation sheet needs to be rotated as well to get the desired result (see Chapter 4, Section 2 for more details about layer alignment). In the meantime, the artist has to remember to lock all the drawing layers while adjusting the collation sheets to avoid accidental modifications.
Setting Up Collation Sheets
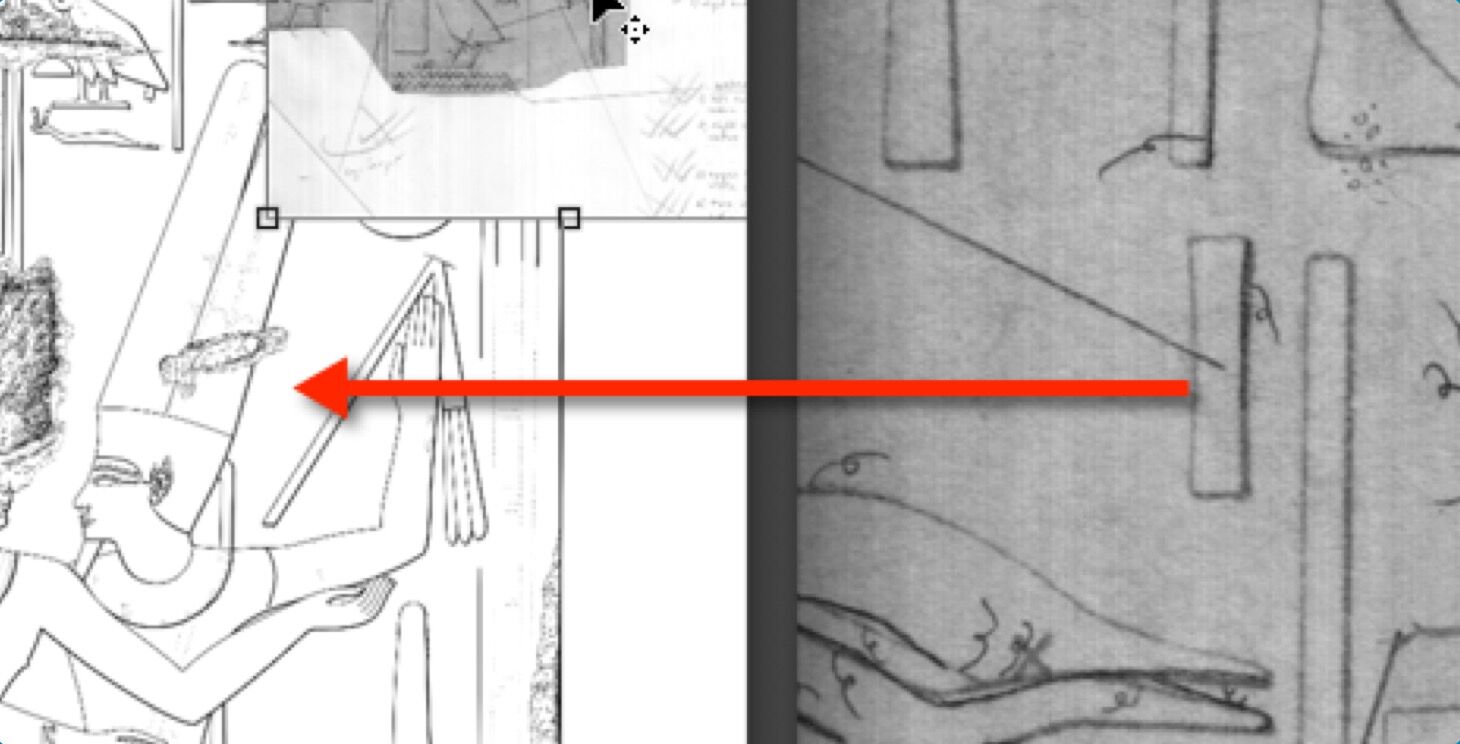
(1) Open both the drawing and the collation sheet in Photoshop, and transfer the sheet to your drawing by moving it over the drawing area.
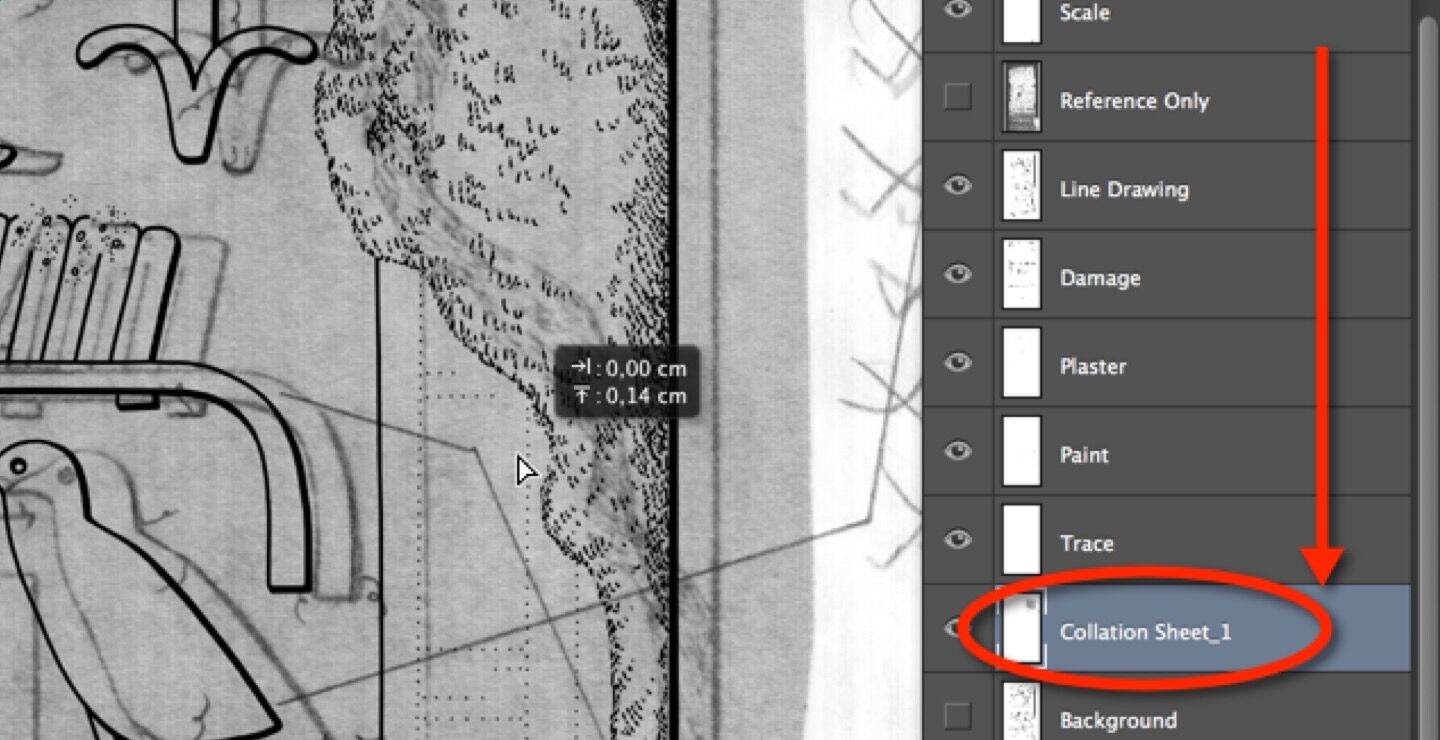
(2) Move your Collation Sheet Layer below the drawing layers. Zoom in and start aligning the collation with the rest of your drawing.
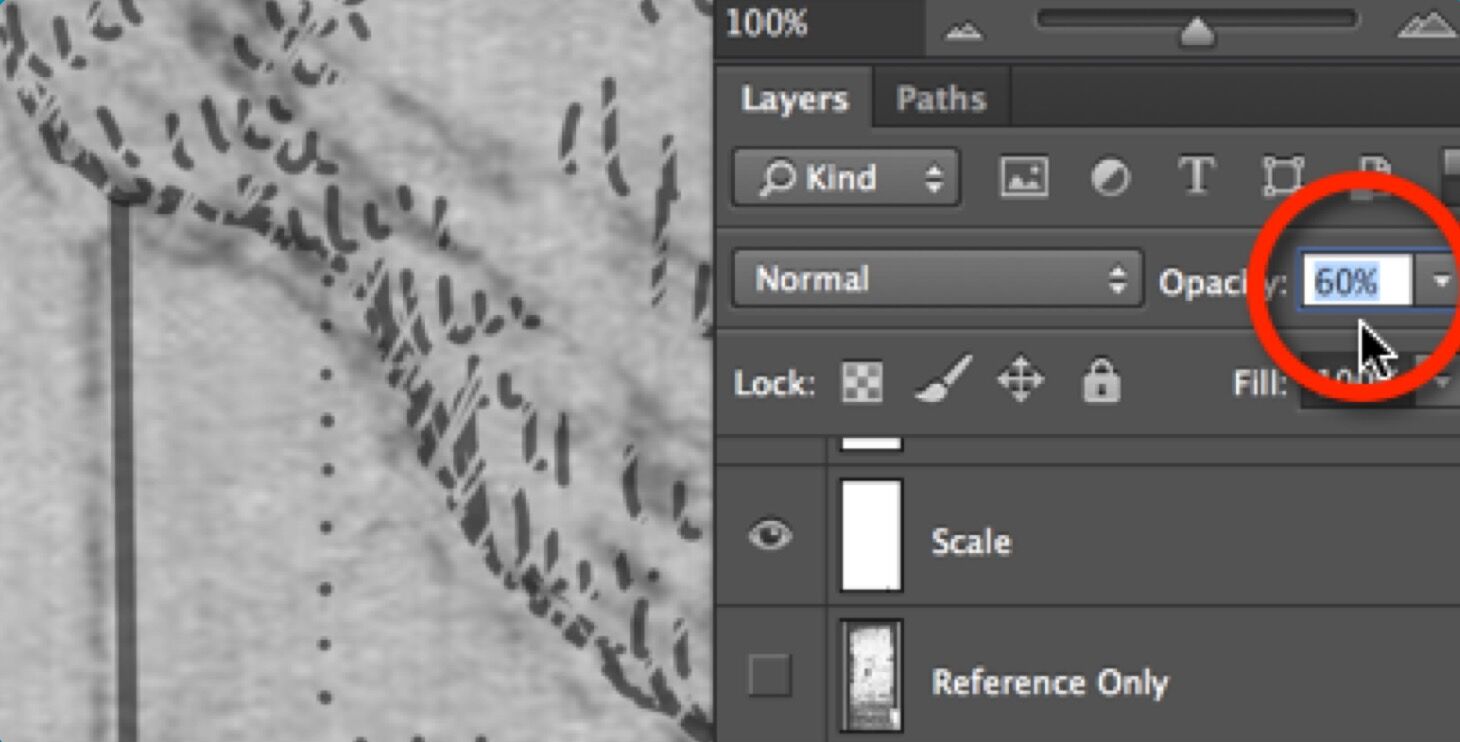
(3) Once the layers are aligned, select all the drawing layers and change their Opacity to 60%. Refine the alignment if necessary.
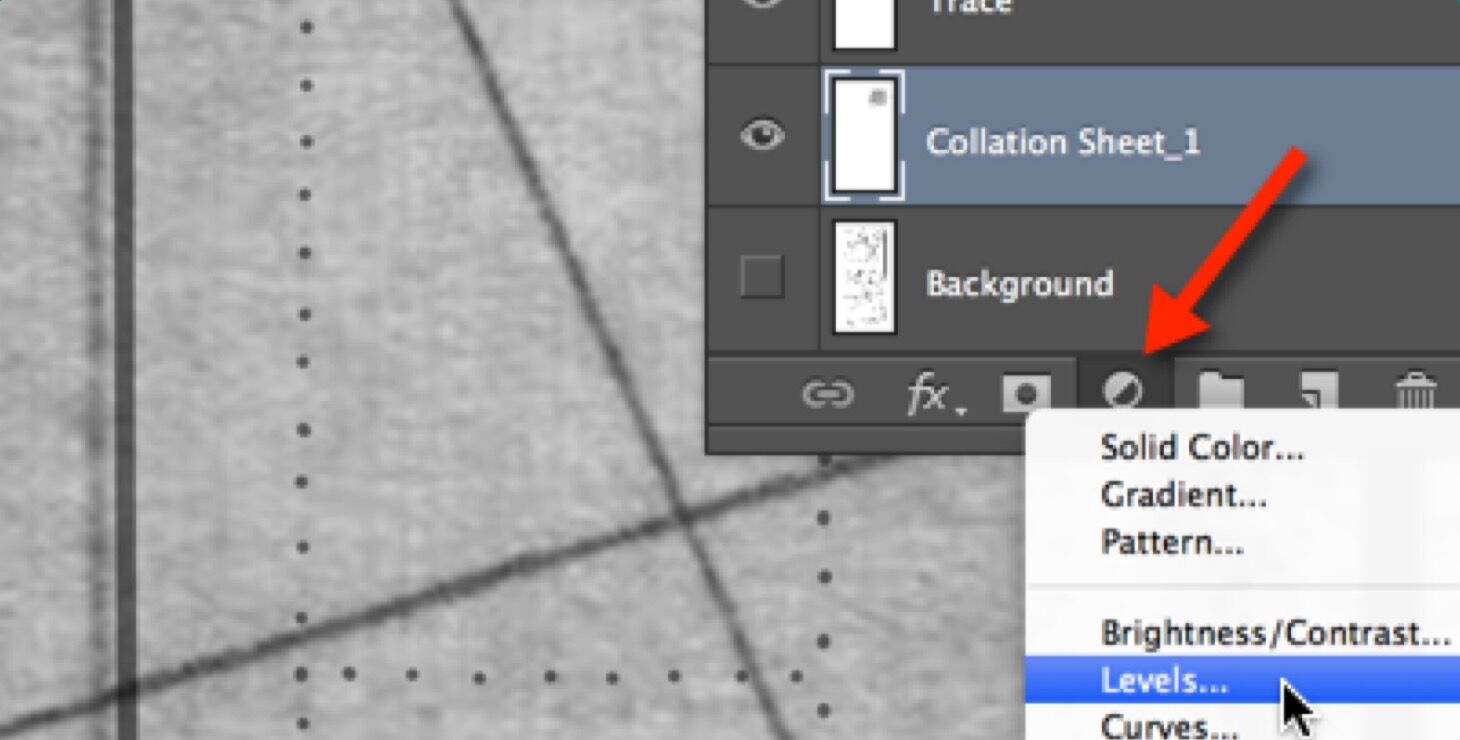
(4) Highlight the Collation Sheet Layer and create an Adjustment Layer on it. Pick Levels from the drop-down menu.
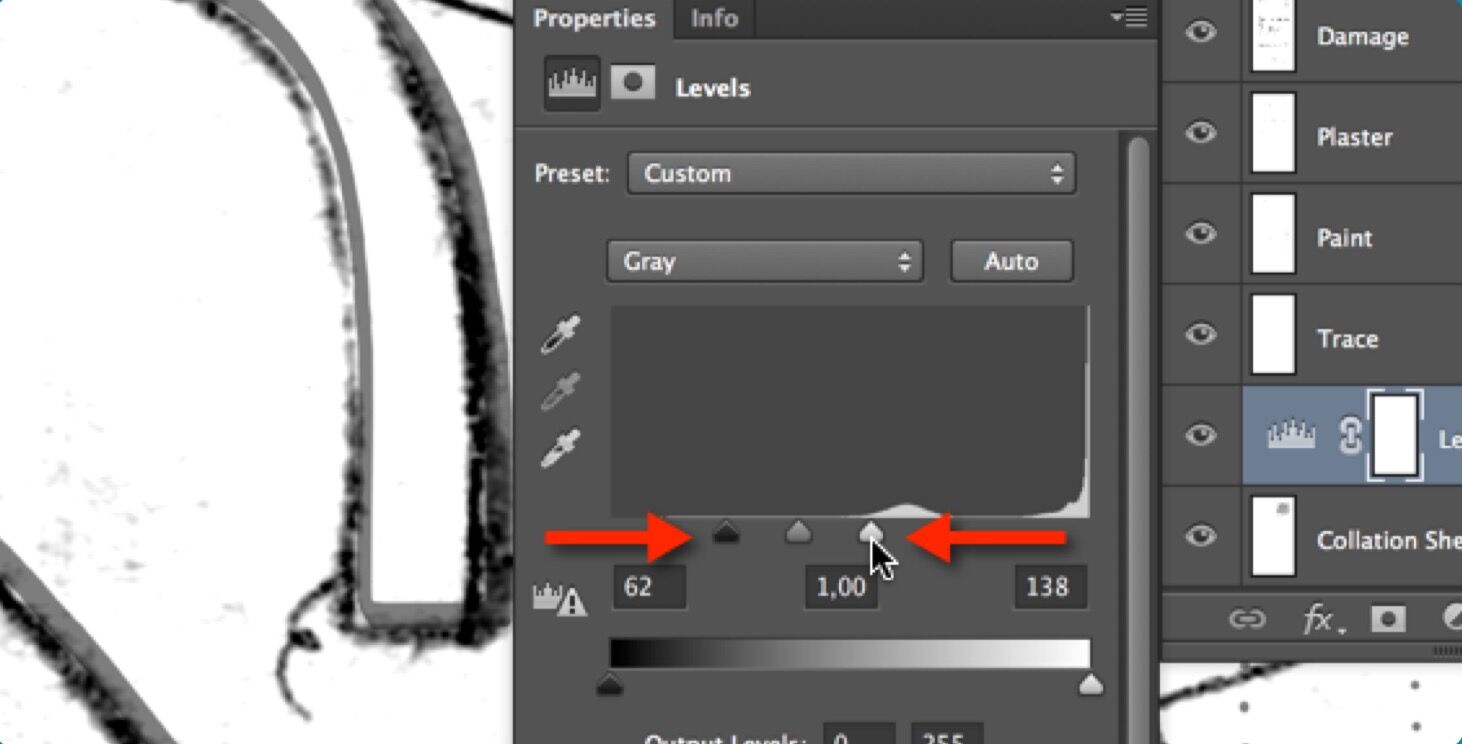
(5) Adjust the Levels on the Collation Sheet by moving the black-and-white levels towards the center. Make sure you don’t lose any details.
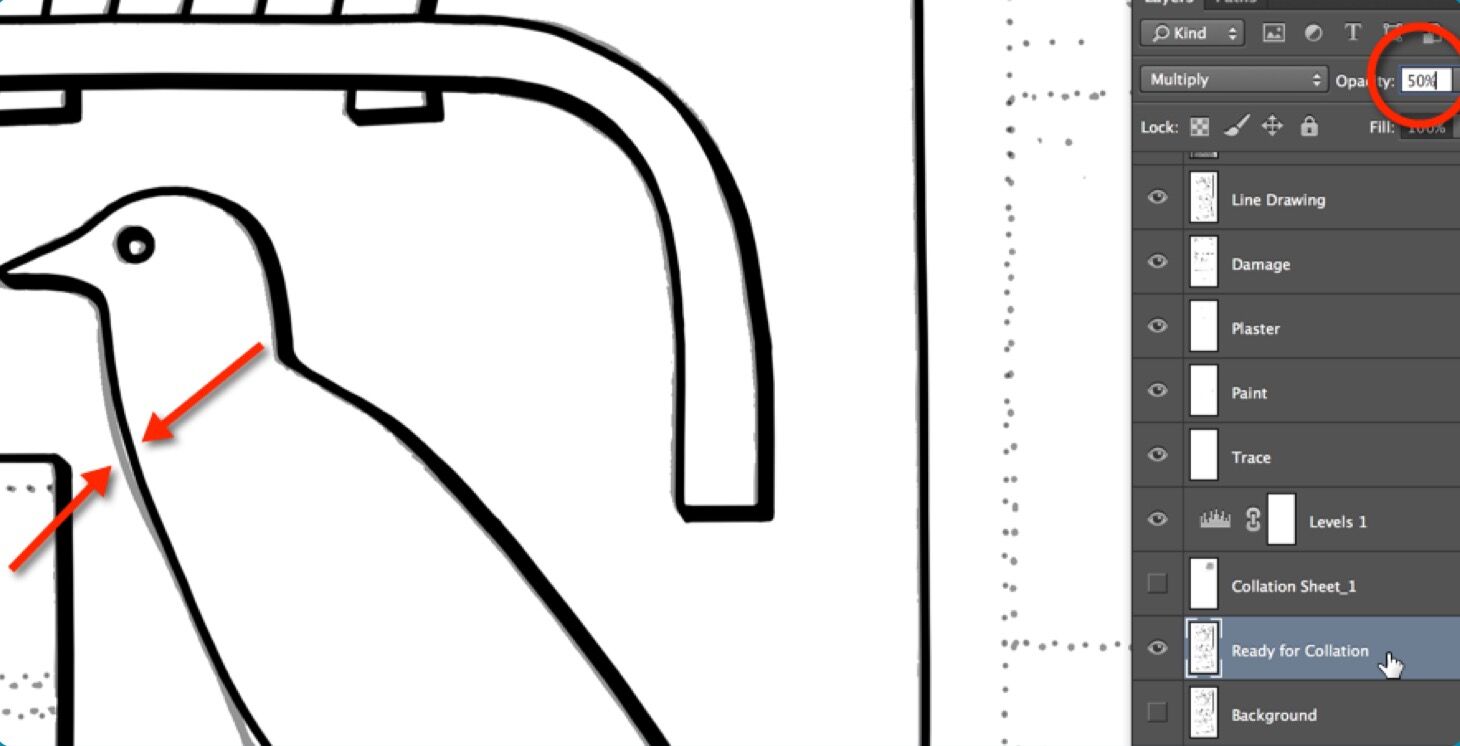
(6) As you’re done adding modifications, compare your changes to the original by making the “Ready for Collation” layer visible at 50%.
Simple Modifications
There are certain types of modifications that can be achieved by selecting an area and manipulating it in a very simple way. Such modifications largely depend on the accuracy of the selection, and therefore everything the artist has learned about selections in Chapter 3, Section 2 proves useful here.
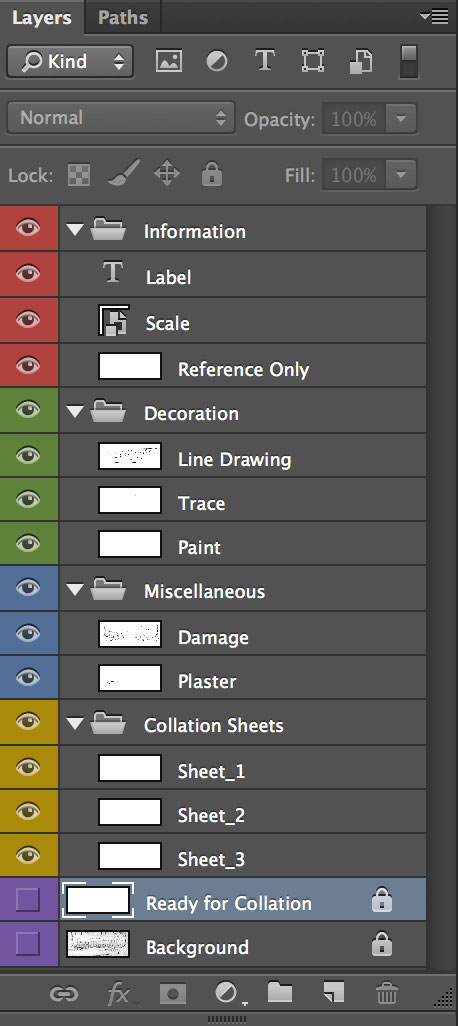
The Layer System at the collation stage
Moving lines in between layers - no matter how careful we are about locking layers, sometimes we realize that we’ve been working on the wrong layer. If this happens, we don’t have to redraw that section; all we have to do is select the area, hover over it, hit the right click (secondary click) and choose Layer Via Cut from the drop-down menu. Our selection becomes a new layer which can be merged with whatever layer we intend our selection to be part of.
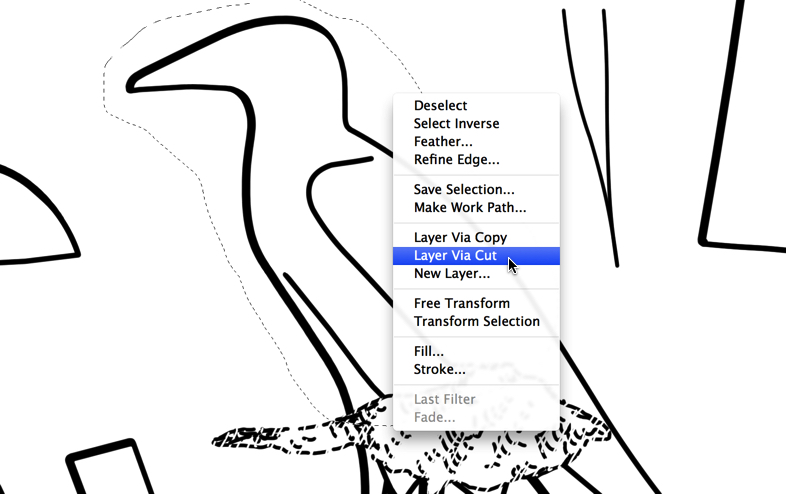
Moving lines in between layers
Deleting large areas - this is probably the simplest of all modifications. Whatever one wants to delete should be selected (this requires being on the right layer) and deleted by hitting Backspace/Delete on the keyboard. Selections can be used for fine deletions as well. When an area is selected, the eraser can do modifications only within the selected portion, therefore one doesn’t have to be that careful when erasing. Furthermore, selections are layer-independent, letting the artist erase the same areas on more than one layer.
Moving entire features - this is yet another simple solution for a difficult problem. When penciling on a photo enlargement, one of the most common mistakes made by the artist is drawing a certain feature with its position slightly misplaced. It can be the result of distortion, deep shadows on the photo, or simply the trick of the eye.
Moving entire features
Shifting entire hieroglyphs on paper would mean deleting and redrawing them properly on a different spot. In Photoshop, however, all we have to do is select the feature and shift it (Tools Bar/Move) to the right place. The artist should use the arrow keys on the keyboard for fine movement. (Guidelines combined with the magnetic effect are also a great help with proper placement).
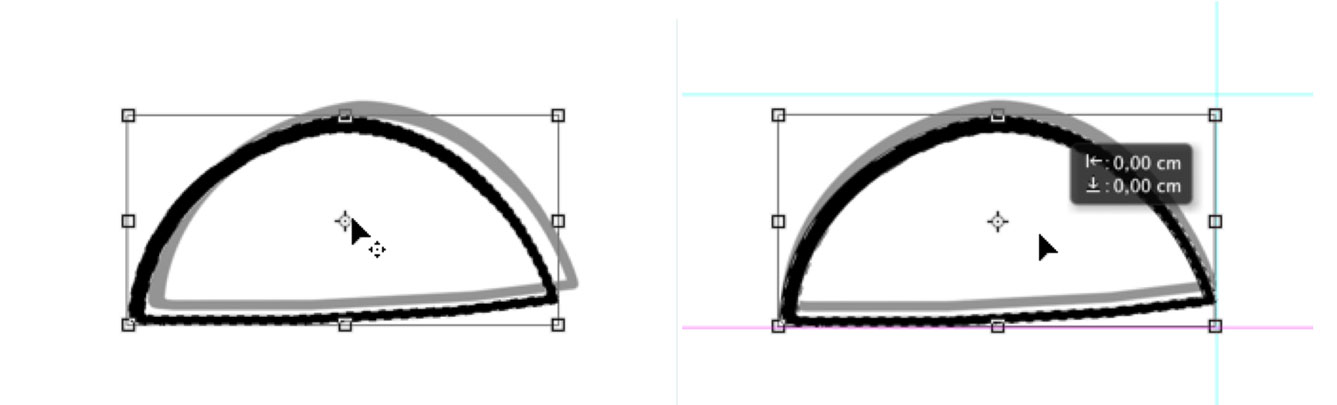
Changing Line Weights - one can add to or deduct from the pixels of all the lines appearing on a layer by changing the stroke option settings on the layer’s Blending Options panel. The artist has to be careful modifying these settings:

setting the Position to Outside and Opacity to 100% adds a certain number of pixels to the line weights,
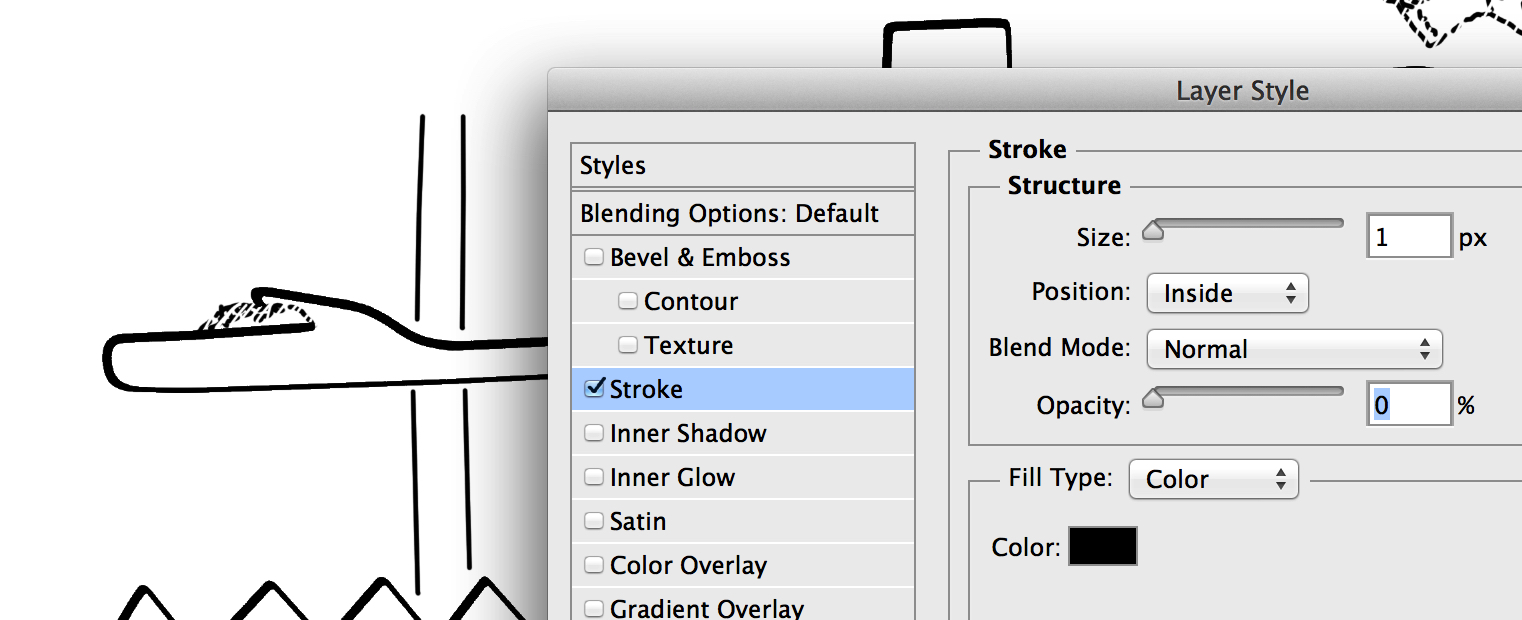
while setting the Position to Inside and Opacity to 0% subtracts a certain number of pixels from the line weights. These changes have an effect on all the lines on a layer, so selecting the desired area and moving it to another layer for modification is strongly advised.
Freehand Modifications - before moving on to the more complex operations, it should be mentioned that in most cases the simplest way to modify a line is by drawing freehand. The artist always has to be able to judge when it’s worth the effort to create selections or more complex paths and guides to accomplish a certain correction.
Complex Modifications
Most of the changes the artist has to make on a drawing require adjusting curves, modifying brush strokes, and adding or deleting certain features.
Using the Pen Tool - Changing the arc of a curved line is just as hard in Photoshop as it is on paper - assuming the artist is drawing freehand. The artist has to pay attention to keeping the smoothness, the thickness, and the sun-shadow transitions of the original line while carefully adding and removing extra brush strokes. It is a painstaking procedure and often doesn’t provide the desired result in terms of quality of line.
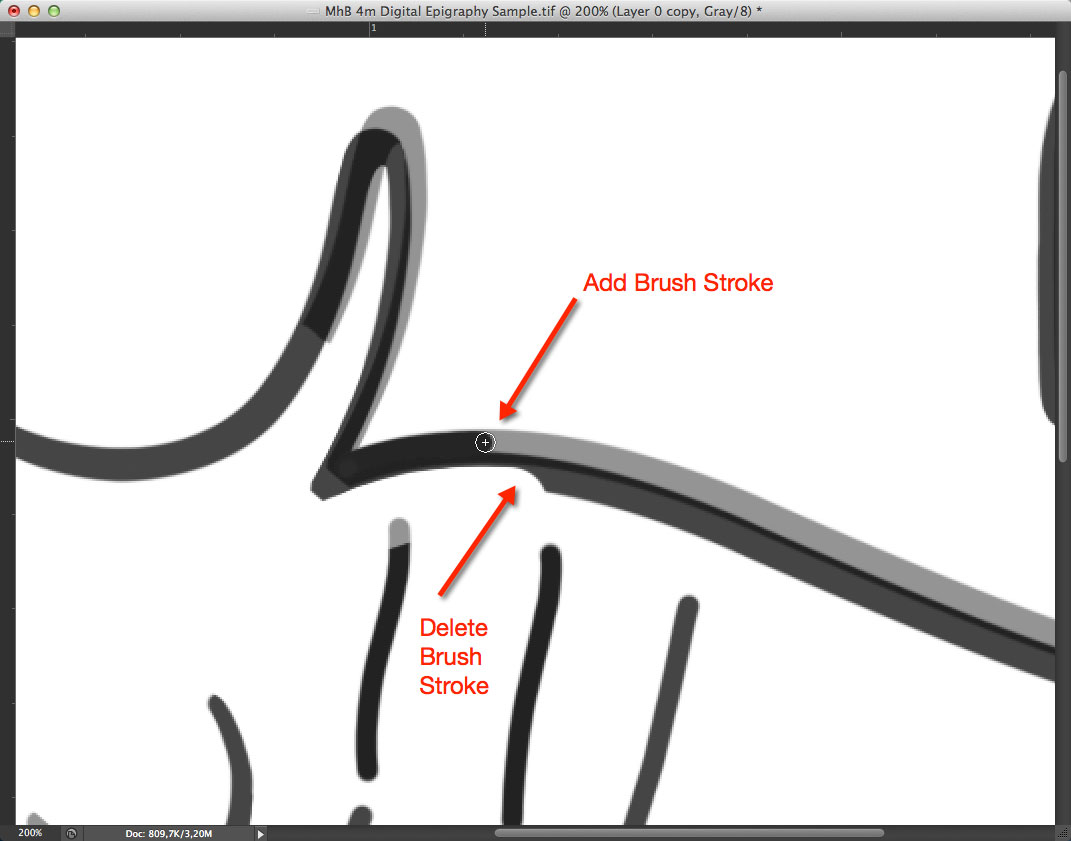
Adding and deleting brush strokes
We’ve already learned how to use the Pen tool as a “digital French curve” for drawing smooth strokes and transitions. As one would expect, we can use the same tool for modifying them:
Adding Modifications with the Pen Tool

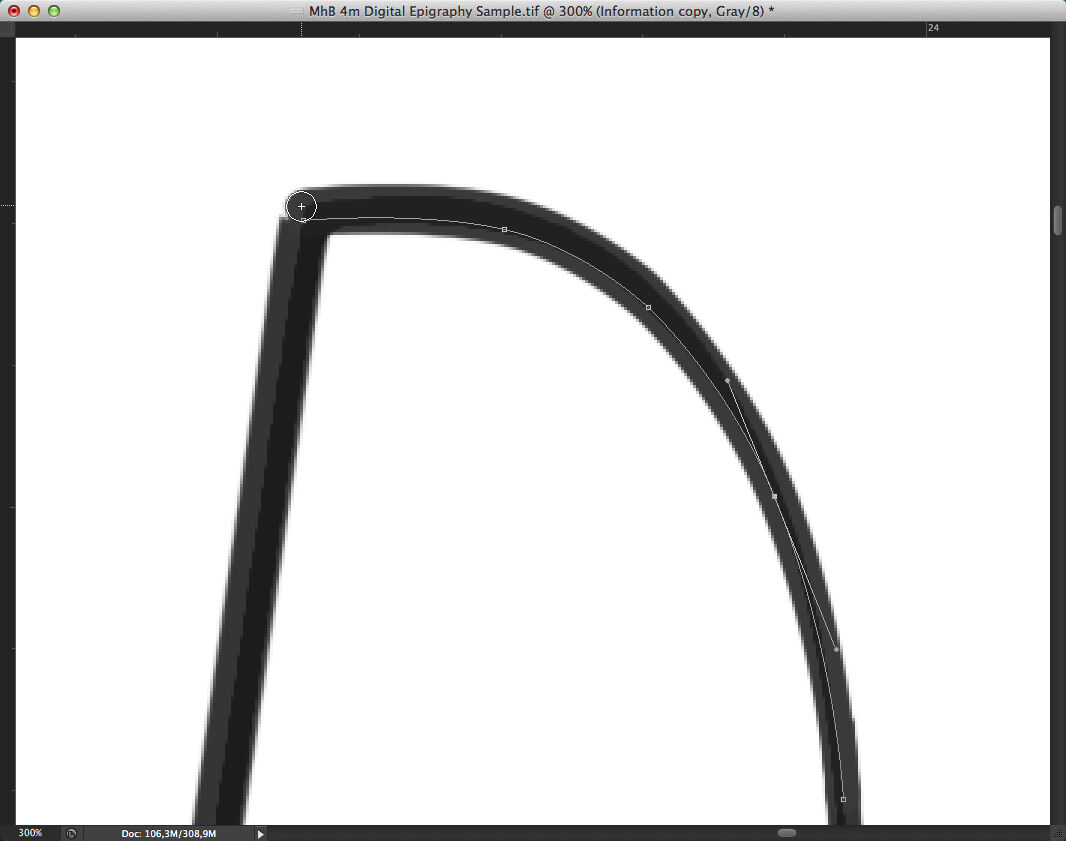
(1) Add a Path to the area to be changed by using the Pen tool. Make sure to extend it in both directions so your new line will blend in.
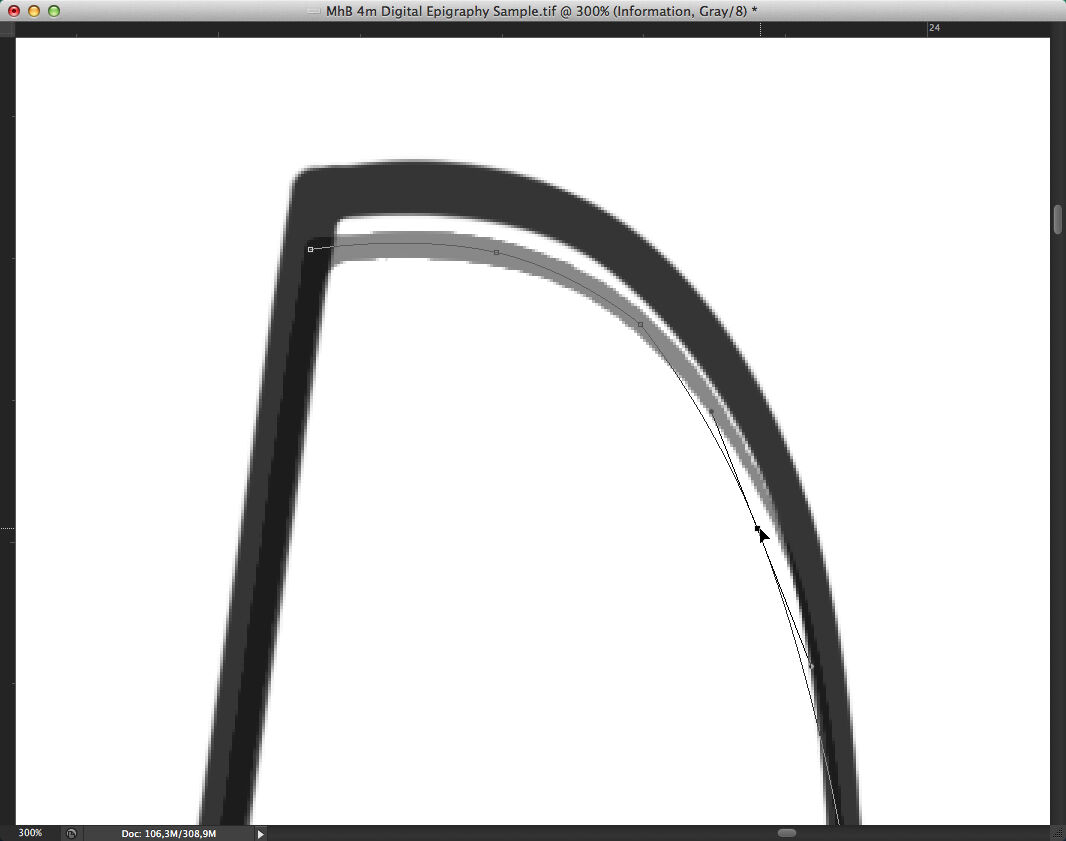
(2) Adjust the Path by adding Anchor Points. Make sure your path curves smoothly into the part that doesn’t have to be changed.

(3) Delete the section that should be changed on the original drawing. Always double-check that you’re working on the right layer.
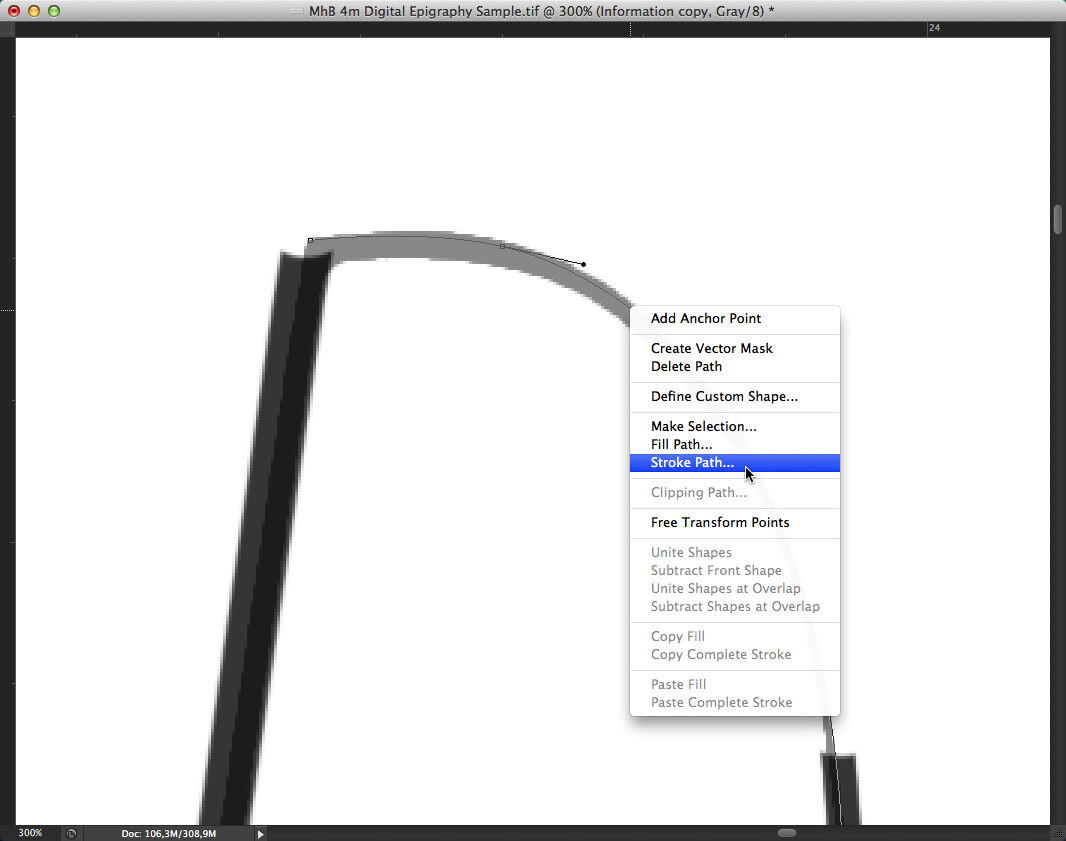
(4) Stroke the path with the appropriate brush thickness set up. For transitions use the sun-weight instead of the shadow-weight.

(5) Move your path slightly to get the desired sun-shadow effect. Check both endpoints of the path to be sure that they blend in with the rest of the lines.
(6) Adjust the brush strokes at your path’s endpoints to make the transition nice…
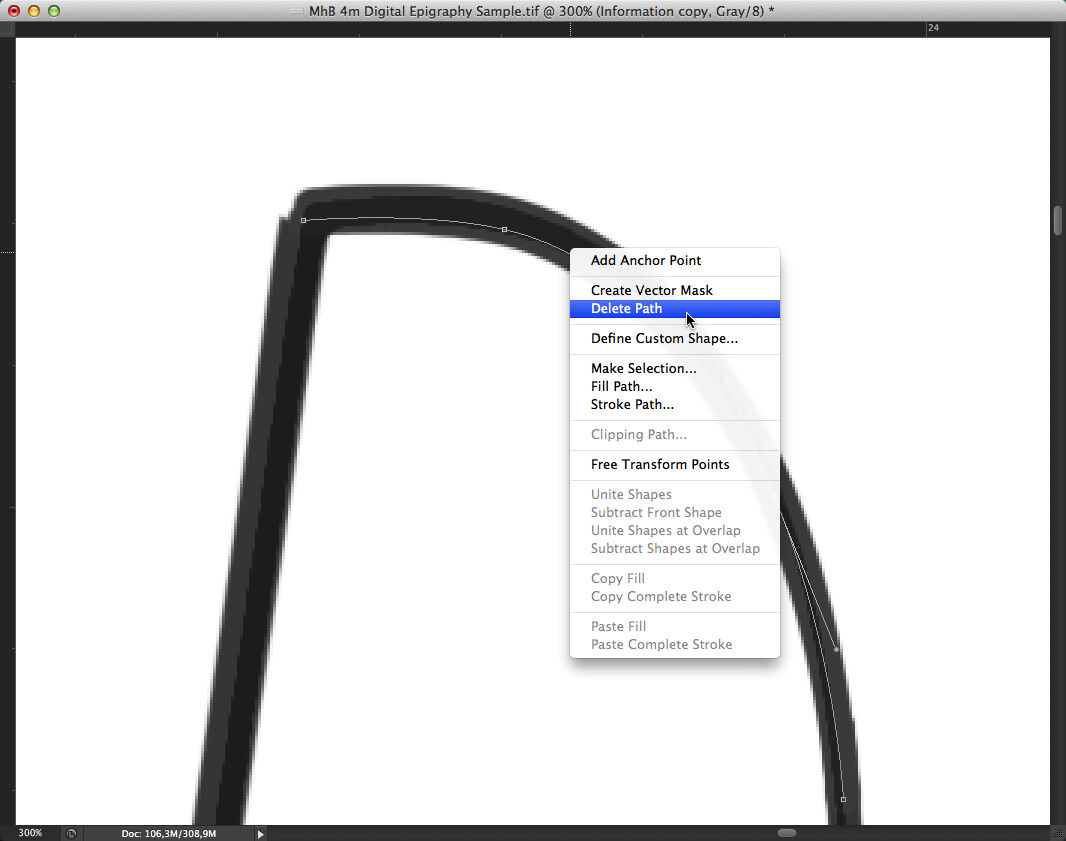
(7) …and smooth. Add corners if necessary. Once you’re happy with the result, don’t forget to delete your Path.
Magnetic Pen Tool - It is an option of the Freeform Pen tool that lets the artist draw a path that snaps to the edges of defined areas on the drawing. We can set up the range and sensitivity of its behavior as well as the complexity of our path (i.e., the number of anchor points). Although this tool is not particularly useful when defining edges on photo enlargements (it works best on high-contrast areas), it proves extremely convenient when modifying inked lines.
Once the artist sets up the Magnetic Pen tool (see the gallery), he/she needs to modify its settings on the Options Bar, so it can be used for adjusting inked lines on the drawing.
Curve Fit - controls the stylus movement sensitivity when drawing the path (0.5-10 pixels). Higher values create simpler paths.
Width - the Magnetic Pen detects edges only within the specified distance (1-256 pixels) from the cursor’s center point.
Contrast - the percentage value to specify the contrast required between pixels for a certain area to be considered an edge. Lower contrast requires higher values (1-100 percent).
Frequency - specifies the rate at which the Pen sets anchor points (0-100). A higher value anchors the path in place more quickly.
When drawing a freehand segment, the cursor has to be moved along the edge the artist wants to trace. Periodically, the Magnetic Pen adds fastening points to the border to anchor previous sections. As the tracing proceeds, the active segment snaps to the edge of the inked line connecting the segments to the last fastening point. Only the most recent segment of the border remains active. If the border doesn’t snap to the desired edge, the artist can add a fastening point manually by clicking once, in order to keep the border from moving. If a mistake is made, the last fastening point can be removed by pressing Delete on the keyboard.
The artist can finish drawing a freehand path in 3 ways: by hitting Return (Enter on PC) to end an open path, by double-clicking, which closes the path with a magnetic segment while holding down Option (Alt on PC), or by double-clicking without Option, which closes the path with a straight segment.
Using the Magnetic Pen for Snapping Paths
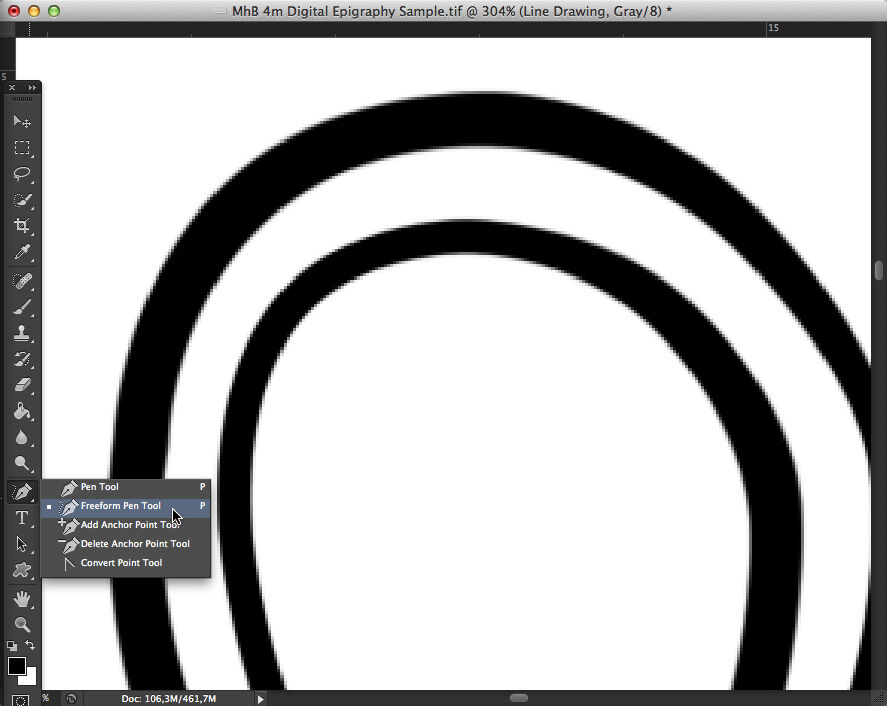
(1) Go to the Tools Bar and right click (secondary click) over the Pen tool. Pick the Freeform Pen tool.
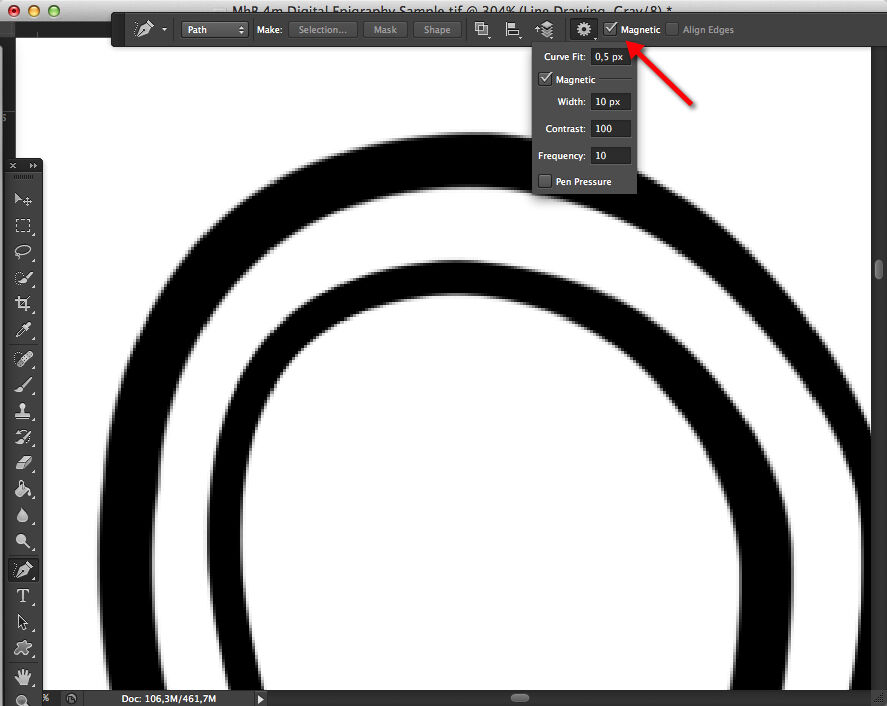
(2) In the Options Bar select Magnetic to activate the Magnetic Pen tool. Hit the cog wheel and set up Curve Fit, Width, Contrast, and Frequency as shown on the screen shot.
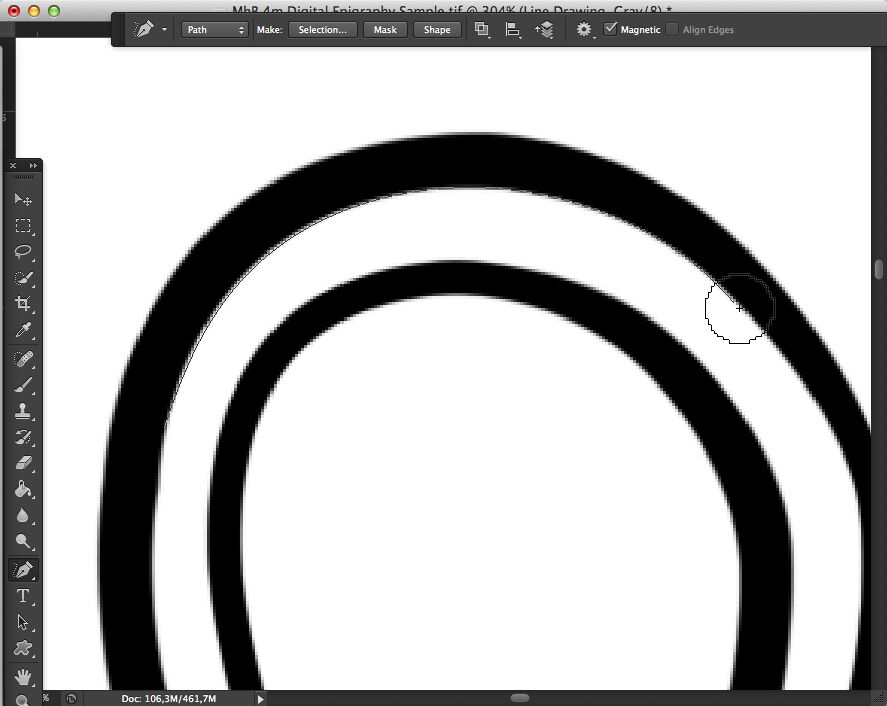
(3) Start drawing your path along the area you want to modify. When you finish your path, hit Return/Enter (it works best when it’s configured as a hot key on your Wacom tablet).
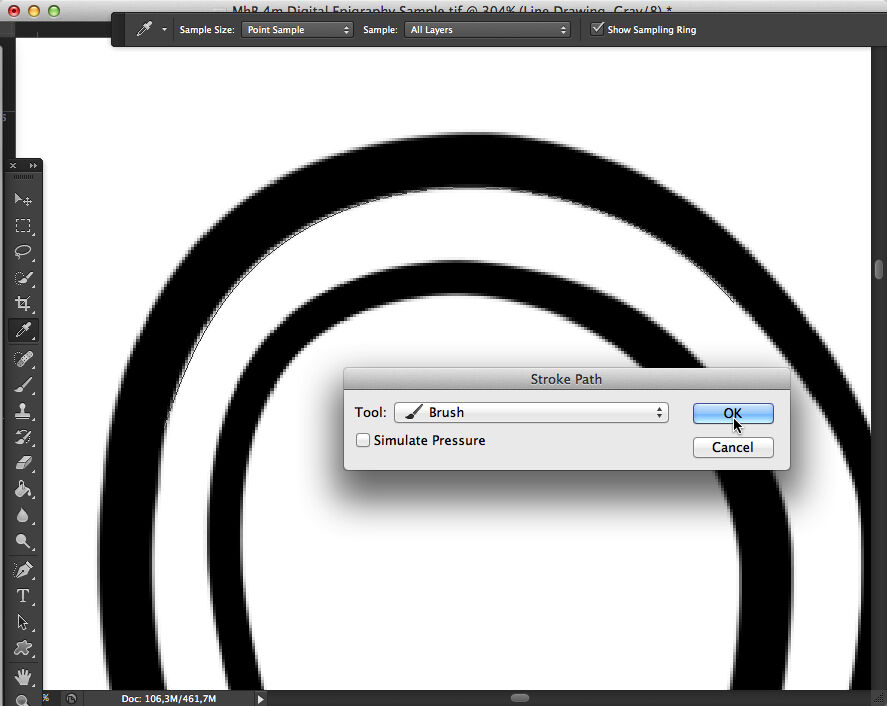
(4) Now that the path is set up, right click/secondary click on it and choose Stroke Path/Brush or Stroke Path/Eraser depending on the nature of modification you’d like to apply.
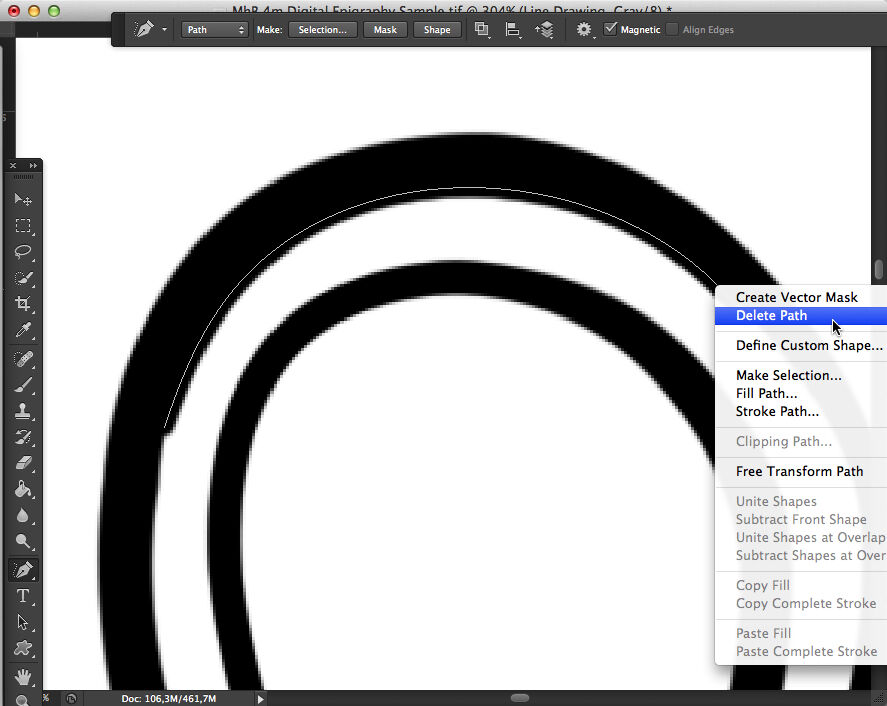
(5) Once you’re satisfied with the result, you can Move your path to a different location by hitting the Select Path tool (black arrow on the Tools Bar) or delete it (Right Click/Delete Path or Esc).
You can download the short tutorial to learn this skill.
Puppet Warp - this function enables the artist to distort selected areas on a drawing via a mesh overlay and the placement of pins. Although we’ve already applied certain transformations on selected areas (File/Transform/Scale, Rotate, or Distort), these are not comparable with Puppet Warp when it comes to flexibility. Before starting any interaction with the selected areas the artist - as always - needs to familiarize himself/herself with the tool’s settings on its Options Bar:
Mode - determines the elasticity of the mesh, Distort being ultra-stretchy and Rigid being the opposite (Rigid is suggested).
Density - specifies the spacing of the mesh, where small changes in moving the pins result in larger warps (fewer points is suggested).
Expansion - expands or contracts the outer edges of the mesh (changing it to at least 3 pixels suggested, so as to pick up the grayscale edges of the inked line)
Show Mesh - displays the pins without the mesh when unchecked. This helps the artist when executing fine line movements.
Puppet Warp
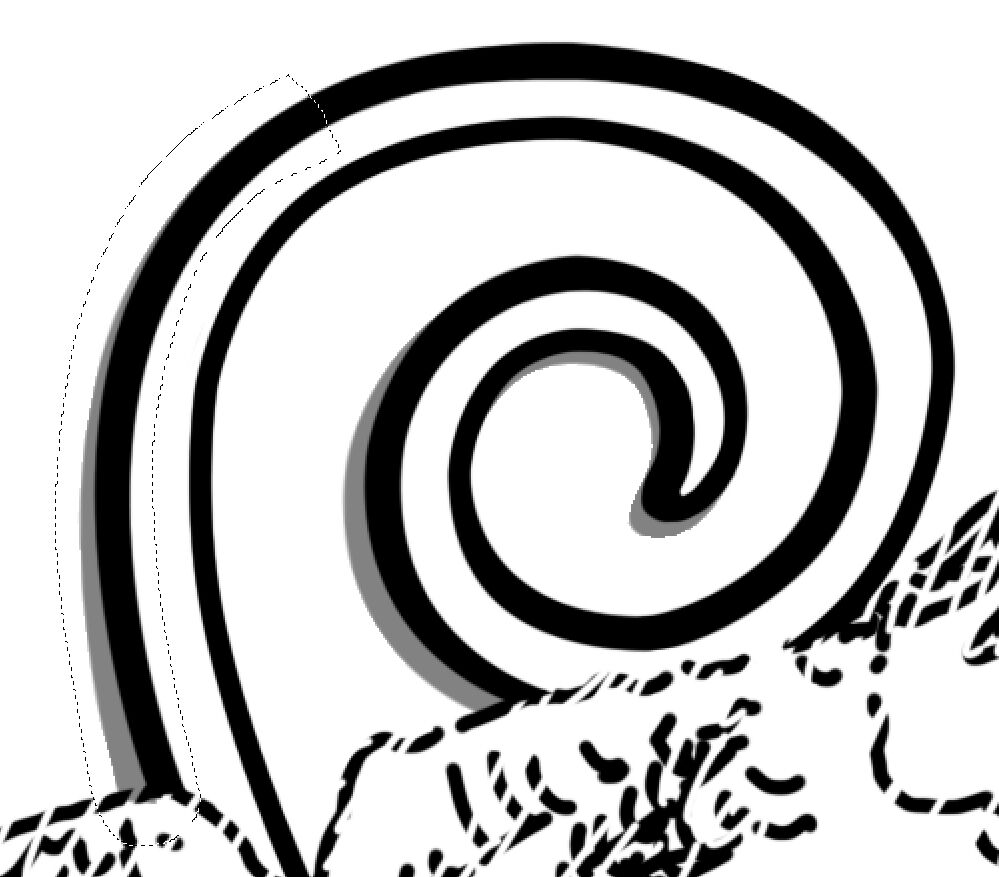
(1) Select the area that needs to be modified by using the Lasso Selection tool.
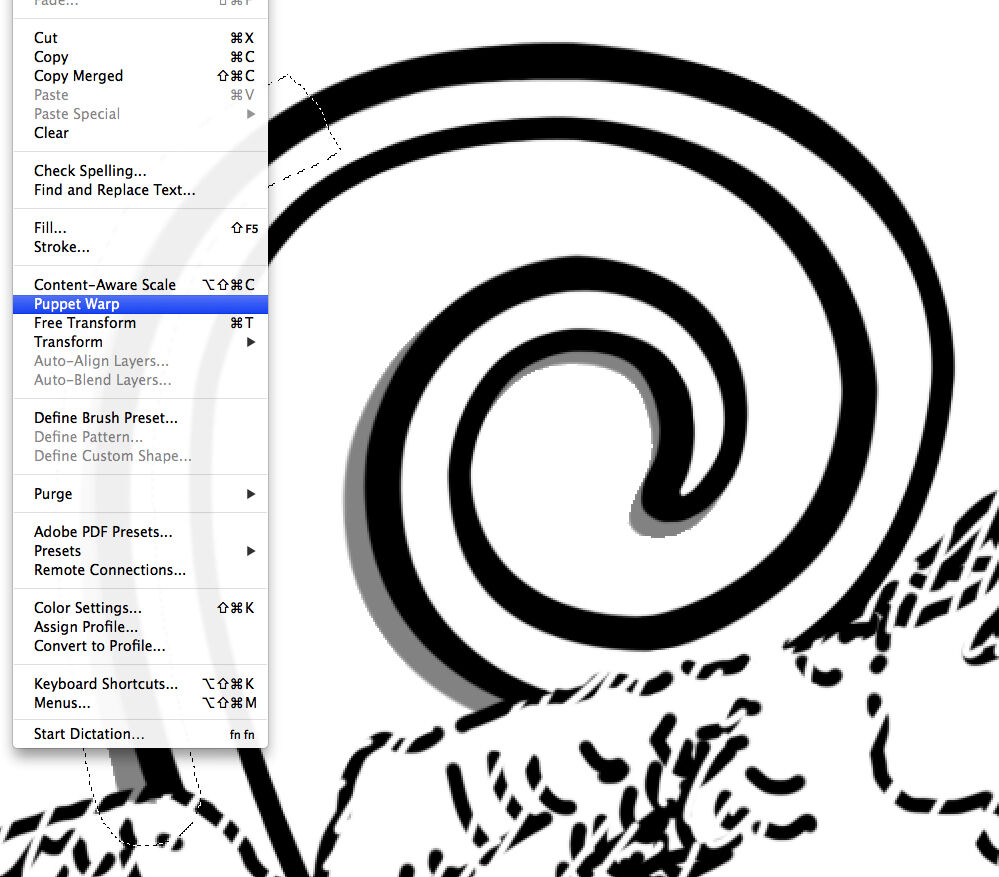
(2) Go to File and select the Puppet Warp tool. Make sure you’re on the right layer.

(3) Pin down (click) the sections you don’t want to move and start “pushing” your line to the right direction (click and drag).
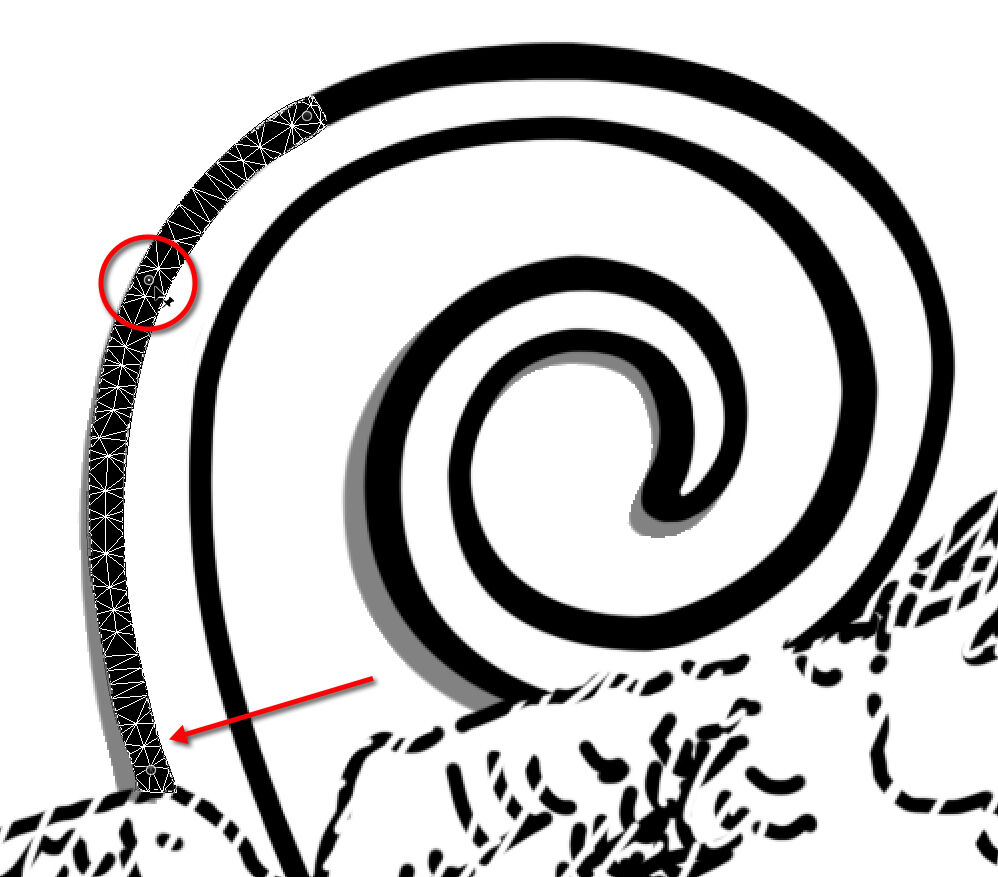
(4) Once more of your line is in place, use additional pins to prevent the sections from movement. Keep “pushing” the line.
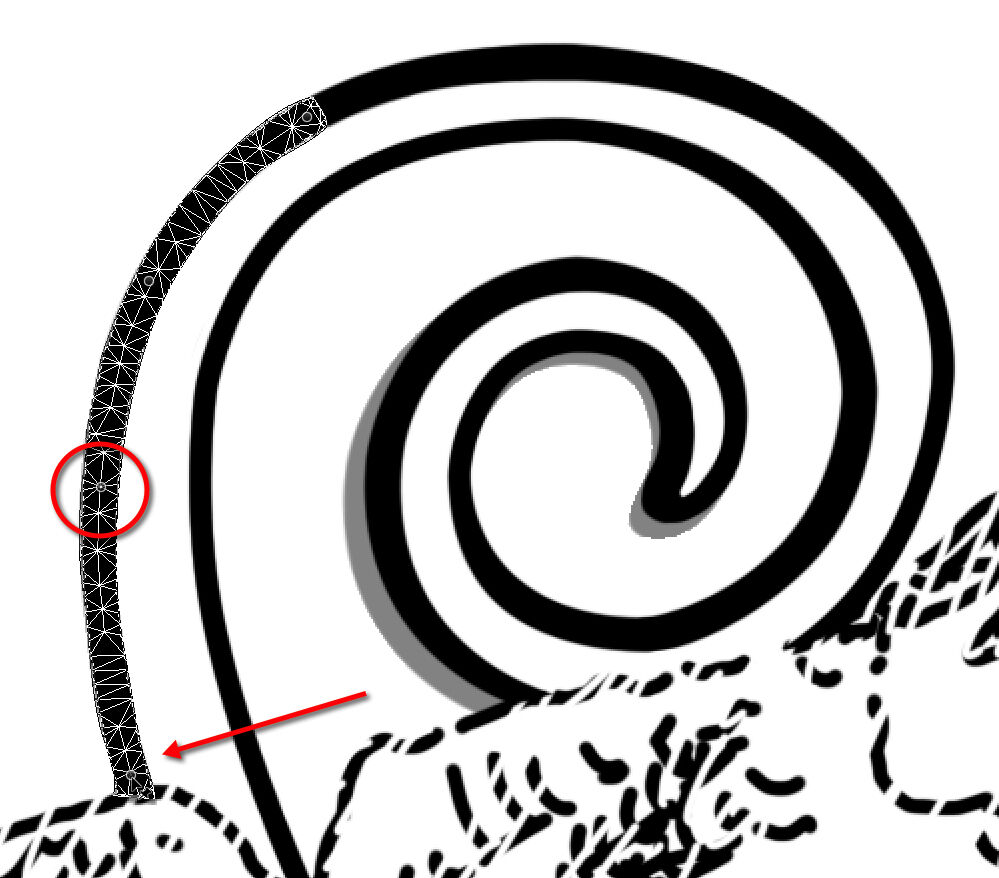
(5) Repeat the last sequence of actions until your line is on the right place.

(6) When done, hit any other tool on the Tool Bar and Apply the changes when asked. Alternatively, you can just press Return/Enter.
You can download the short tutorial to learn this skill.
Just as when drawing with the Magnetic Pen tool, the artist has a few options to make working with the Puppet Warp more flexible. For instance, one can select multiple pins by using Shift+click on the desired pins. Releasing Shift allows all pins to be dragged simultaneously. Selecting a pin and pressing Delete (Backspace on PC) removes the selected pin. Clicking on the curved arrow at the right end on the Options Bar removes all pins at once (Remove All Pins). Pressing Cmd+A (Ctrl+A on PC) selects all pins, while Cmd+D (Ctrl+D on PC) deselects them. One can hide the mesh by simply pressing Cmd+H (Ctrl+H on PC) as well. If the artist wants to cancel Puppet Warp he/she can click the slashed circle icon at the right end on the Options Bar, or simply press Esc. To apply the changes and exit Puppet Warp, one can click the checkmark icon at the right end on the Options Bar or simply press Return (Enter on PC).
Adding Extra Information from Old Photos - during the process of thoroughly documenting a particular monument, the artist might find additional information by looking at archival photos. Whenever extra information is available (damage under cemented areas, more of the carving exposed, etc.), the artist needs to add it by importing and aligning the appropriate photos with the rest of the decoration.
%20-%20Recent%20photo%20with%20cement.jpg)
MHB 4s (detail) - Recent photo with cement
%20-%20Archive%20photo%20aligned.jpg)
MHB 4s (detail) - Archive photo aligned
%20-%20Old%20damage%20added.jpg)
MHB 4s (detail) - Old damage added
Additional Reading:
On how to use the Warp Tool and Puppet Warp for photo modification
0 comment(s)
Leave a comment(We'll keep your email address private)