
Digital Epigraphy (Second Edition)
Chapter 3 – Digital Drawing Tools
Chapter 3, Section 1 - Introducing Photoshop
In this chapter we explore the digital environment in which the final Chicago House inked drawings are created. Although dealing with buttons and sliders while holding our pen might seem to be a bit alien at first, it will nevertheless be worth the effort to learn to customize and to change the appearance of our artwork. We won’t master Photoshop by the end of this chapter, but we’ll get to know what kind of features can be useful for enhancing the Chicago House Method as we know it.
Introducing Photoshop
The Adobe Photoshop workspace as a real-time drawing environment
The reason we use Photoshop for our digital inking is simple: Photoshop lets us draw lines by freehand! This may not sound like an obvious advantage at first. One would think that drawing by computer means that the computer will accomplish the difficult task of drawing our straight lines and beautiful curves for us. In fact, one of Adobe’s most popular software programs is Adobe Illustrator, which is used by many artists as a primary tool for digital inking. Adobe Illustrator’s drawing engine is vector-based, which means that the artist draws paths (guidelines) and the software creates curves based on the frequency and distance of the anchor points on this path. Because of the vectorized nature of the drawings made in Illustrator, these artworks can be rendered in any size, the line quality will stay the same at the same time keeping the file size relatively small.
In theory, then, Adobe Illustrator would be a very appealing option for inking our field drawings, because the software would correct our little mistakes. When the Epigraphic Survey, however, translated its sophisticated drawing method to the computer, in order to ink drawings digitally, its main goal was to capture the unique sculpted character of the ancient Egyptian wall scenes as much as possible. To be able to render the complicated interplay of different line thicknesses, irregularly carved shapes, and rich painted details on the multilayered wall surfaces, Chicago House needed a more natural painting tool, and that tool is Adobe Photoshop.
Photoshop, as its name indicates, is primarily a photographic editing tool. In the past ten years, however, the software has been discovered by digital artists, and, as with other software such as Corel Painter, Photoshop has become an indispensable tool for digital painting. As can be seen throughout the entire Digital Epigraphy website, using Photoshop in conjunction with a drawing tablet gives the epigraphic artist an excellent tool to capture and depict the fine details that one encounters when documenting decorated wall surfaces in a line drawing format.
.jpg)
Photoshop CC working environment (menu bar, toolbar, canvas, and panels)
When we first open Photoshop, we see a rather complex on-screen environment, with horizontal and vertical rows of icons and text, plus a handful of little windows on the right. These windows are called panels, and much of the work that we do in Photoshop involves using them regularly. The layer panel, for example, is where we add, delete, select, and arrange our drawing’s layers, and where we add layer masks and layer effects. For some drawings we’ll also add adjustment layers using both the Adjustments and Properties panels. We can change the colors of our brushes in the Color and Swatches panel, go back to previous steps in our workflow with the History panel, and so on. There are many panels to choose from, so it can be a bit overwhelming to the digital artist, especially at first sight. This is why it is very important from the beginning to know how to manage and arrange these panels on the computer screen.
Resetting the Essentials Workspace
First of all, let’s make sure that we have our default Photoshop workspace in front of us. This default workspace is called Essentials, and it can be selected through the workspace selection box. Let’s reset the Essentials workspace itself, so that all of the panels are placed back in their default location (Reset Essentials).
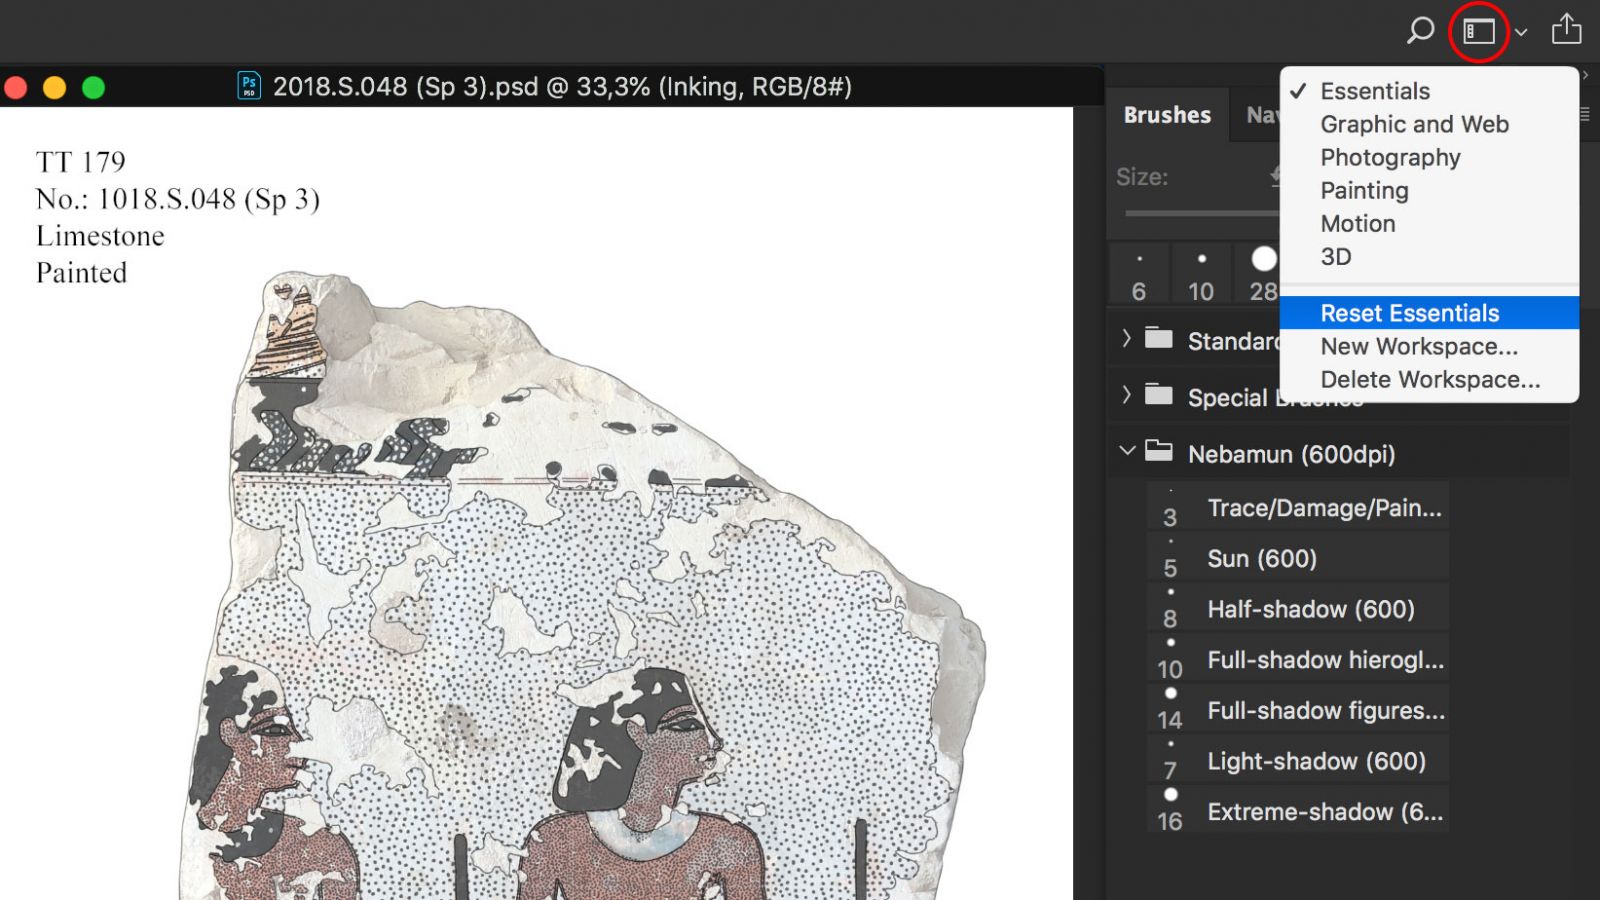
Reset Essentials workspace
Arranging the Main Panels
Photoshop’s panels are located in columns on the right side of the screen. By default, we see two columns: the wide main column and a much narrower secondary column beside it on the left. By default, Photoshop opens three panels for us: The Color panel at the top, the Adjustments panel in the middle, and the Layers panel at the bottom.
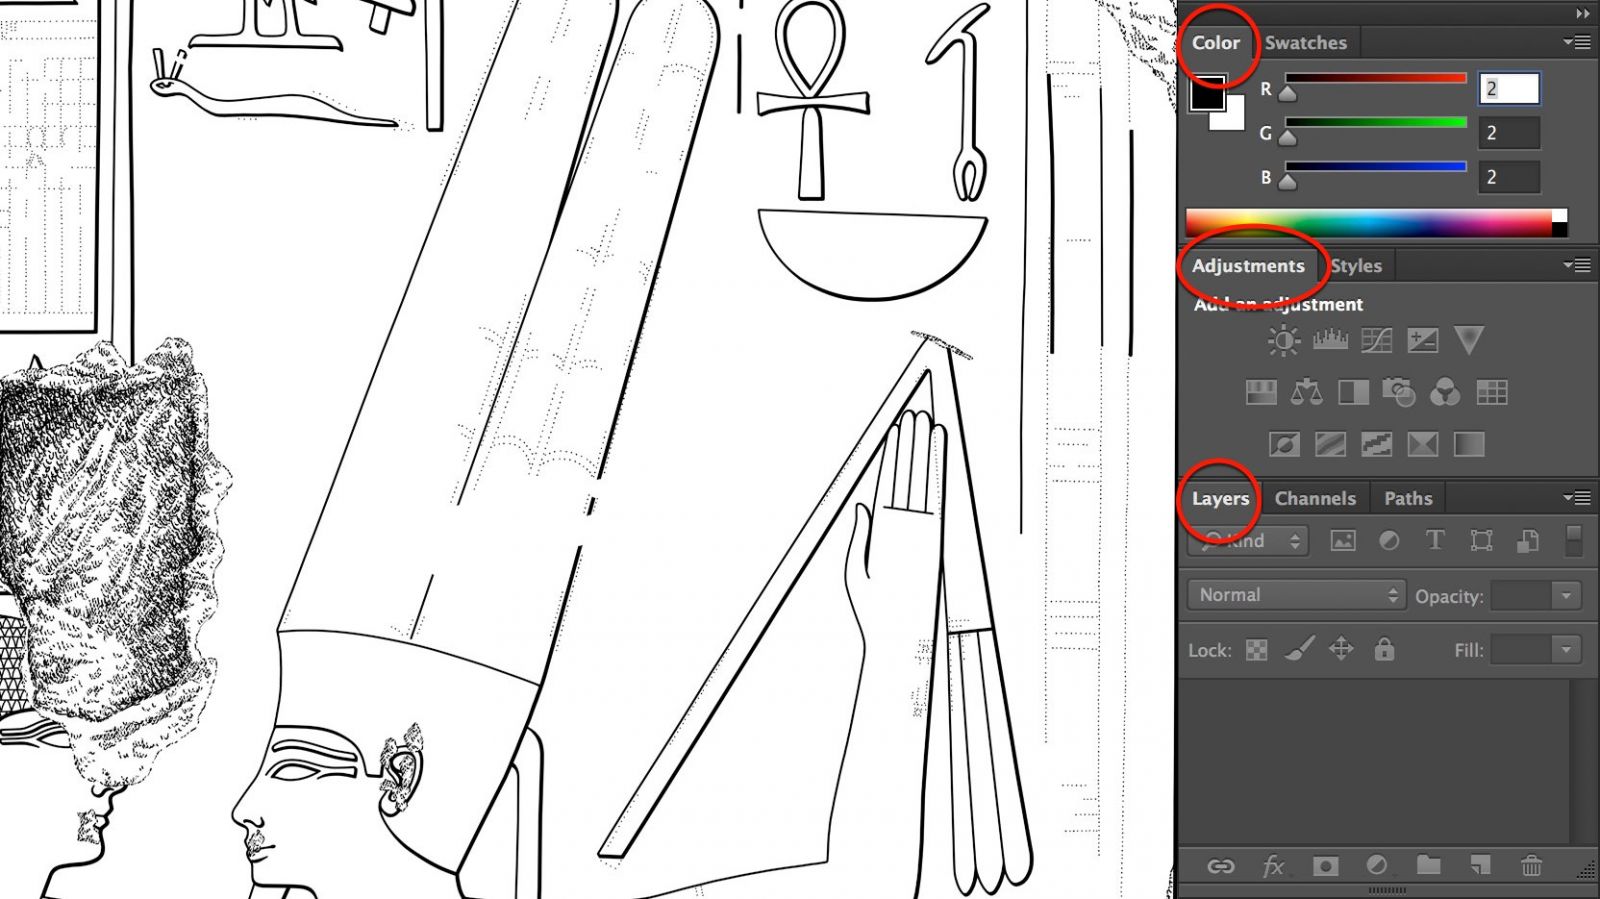
The main panels by default
Each panel has its name displayed in a tab at the top of the panel. Although there are only three panels open, there are more names listed in the main column. The Color panel at the top also has a Swatches tab to the right of it. The Adjustments panel in the middle has a Styles tab to its right, and the Layers panel actually has two other tabs - Channels and Paths next to it. To prevent your workspace from being taken up by floating panels everywhere, Photoshop collects (docks) some panels in panel groups. Only one panel can be active at a time within each group, but we can switch in between them by clicking on their tabs.
Changing the order of the panels within a group is easily done by clicking and holding (dragging) the tabs left and right. Moving an actual panel in between groups is also possible, by dragging the tab of the panel we wish to move over the destination group until a blue highlight border appears around the new group. This border lets us know that we can release the panel.
Moving the Adjustments panel between groups
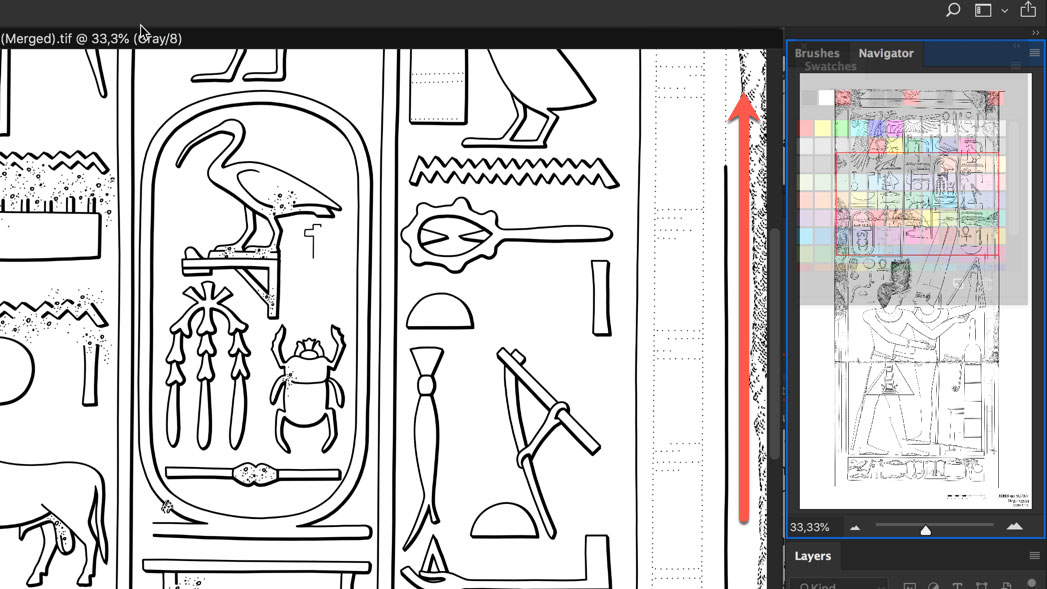
We can also make a new group from any docked panel by dragging a tab downward, towards the lower edge of the panel group, until a blue highlight bar (not a border!) appears between the two panel groups.
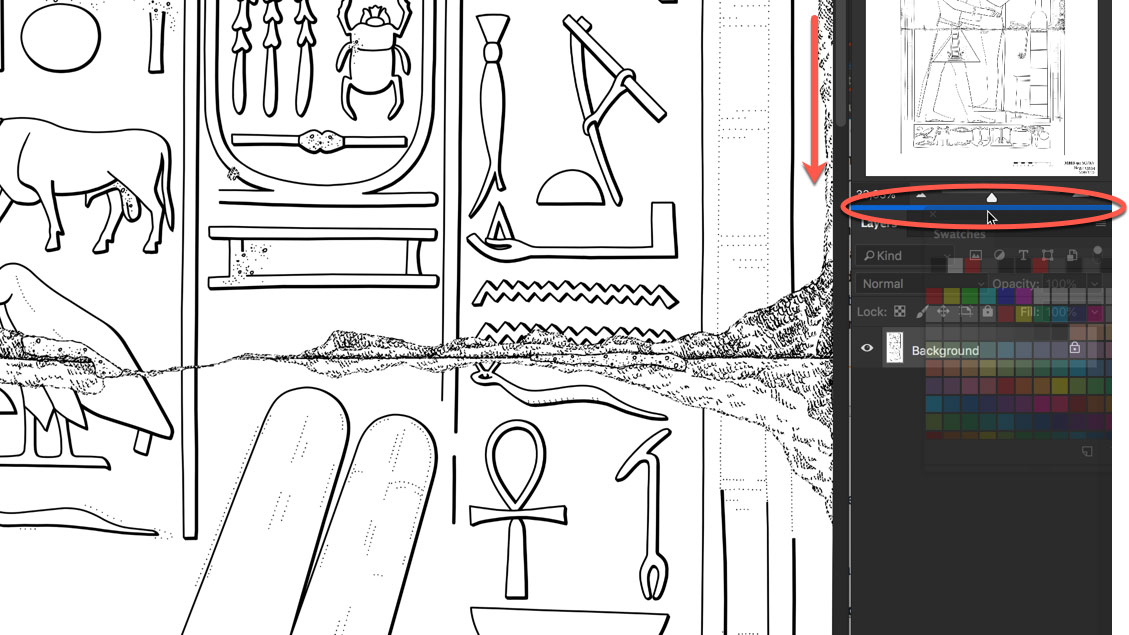
Making a new group from the Swatches panel
We can temporarily minimize panel groups to free up more space by double-clicking on any tab in the group. To maximize a group again, just click once on a tab and it appears again as it was before. If we no longer need a single panel in a group, we can close it by clicking on the menu icon on the panel’s upper right corner and choose Close. We can close the entire group in the same way, by selecting Close Tab Group from the drop-down menu.
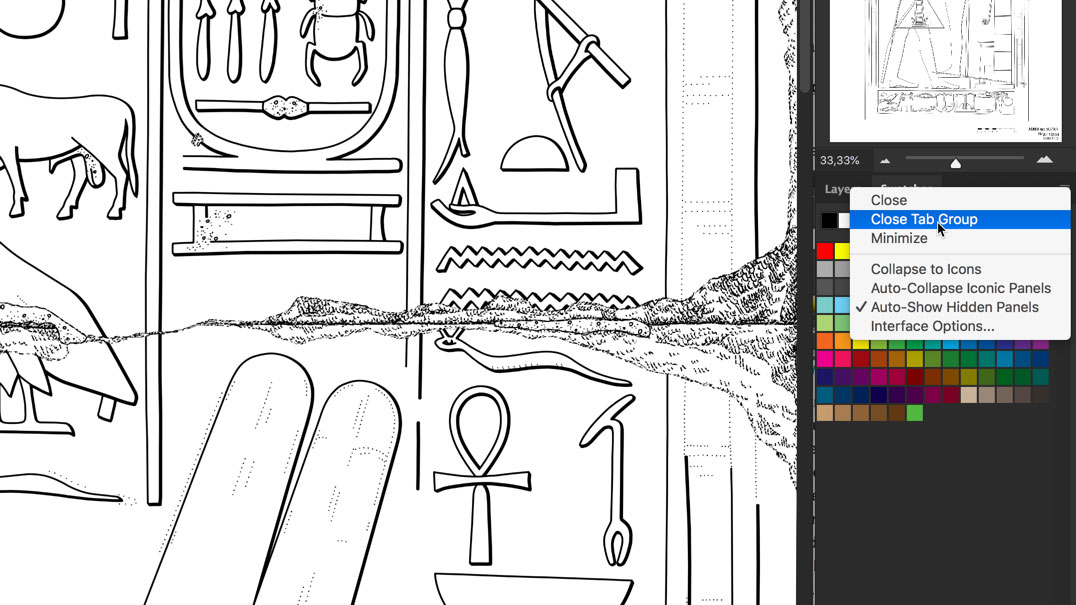
Closing panels and groups
To re-open a panel after we’ve closed it, or to open any of Photoshop’s other panels, click on the Window menu in the Menu Bar along the top of the screen. Now, if we close the Color panel and re-open it through the Window menu, it shows up exactly where it was before. Notice that when we close an entire panel group, and later open any panel which was part of the group, we also re-open the other panels in the group with it. It is also important to point out that in the Windows menu only the active panels have a checkmark next to their names, meaning that although our Swatches panel is present on the workspace, it’s not active at the moment. Once we switch to the Swatches panel the checkmark appears right next to it. The checkmark means a panel is open and active. No checkmark means the panel may be closed - appearing nowhere on the screen - or it may just be nested in behind a different active panel in its group.
The Secondary Panel Column
By default, the panels in this column appear only as icons:
![]()
Icons on the Secondary Panel Coloumn
The two panels that initially appear in this second column are the History panel on top and the Properties panel below it. By dragging the left edges of these panels farther left, we can reveal enough space to display their names as well. A good use for this secondary column is to hold panels we’ll need, but we don’t want to see open all the time. If we click on the panel’s icon (or its name), Photoshop will temporarily expand the panel to full size, so we can work with it. To collapse the panel back to icon view mode, we can either click on its name/icon again or hit the double arrow on the panel’s upper right corner. If the artist needs even more space on the screen, the main panel column works exactly the same way. Dragging the vertical divider to the right results in an even more compact view, where all the panels are represented by icons only.
![]()
Photoshop panels' icons view
Moving Panels Between Columns
It’s possible to move panels from one column to another by dragging them over to their new place. We can release our panel as soon as the blue highlight panel/bar appears and our panel moves to its new place.
Hiding All the Panels
Finally, there are a couple of keyboard shortcuts for temporarily hiding all the panels on the screen. Pressing the Tab key on the keyboard hides all the panels along with the Tools and the Options Bar - basically it will hide everything except the Menu Bar. Pressing Tab again brings all the panels and bars back. To hide only the panels on the right, press Shift+Tab once. Pressing Shift+Tab again brings them back. Moving the cursor to the right edge of the screen while the panels are hidden results in the re-appearance of our panels so we can interact with them. But as soon as we hover our cursor somewhere else the panels disappear again. These features are particularly useful when we are working with large drawings, and we need all the real estate our screen can offer.
Saving our Favorite Workspaces
Every artist has his/her own way to arrange the panels he/she favors during inking. It is also possible that different types of drawings will need different panel layouts. The best way to deal with these situations is to save our favorite panel layouts as templates for future use. We can click on the same Workspace Selection Box as we did when resetting the Essentials workspace, and in the drop-down menu we select New Workspace. Here we are able to give our new workspace a name and decide if we want to save our keyboard shortcuts (if we reset any) or menu items as well. Once our workspace is saved, we can load it any time by selecting it in the Workspace Selection Box.
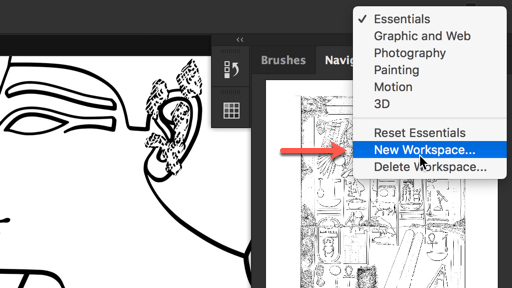
Saving a new workspace
The Tools Bar
Now if we look at the left side of the Photoshop Workspace, we see a vertical bar called the Tools Bar. These buttons are the heart of the software’s drawing/image manipulating management. Although most of the capabilities represented in the Tools Bar are used for image editing, the digital artist should know what each of these can do. To reveal the Tools Bar, check Tools in the Window Menu.

The Tools Bar
1. Move - moves selected layers around. Click and hold to adjust the positions of layer elements. Also used to set and move Guide Lines.
2. Rectangular Marquee - allows the user to select rectangular shaped areas within a drawing. These can be copied or cut and then pasted into new layers. Other marquee tools are available by clicking and holding the button.
3. Lasso - creates a freehand selection. There are other types of lassos available, including a Magnetic Lasso and Polygonal Lasso.
4. Magic Wand - creates selections based on the same color.
5. Crop - makes adjustments to the overall size of a drawing. Affects the size of the whole image, not just a layer.
6. Color Selection - lets the artist grab a color from an image and applies it to the brush or fill. Access by Alt+click while drawing.
7. Healing - removes dust marks and scratches from scans. The Patch tool is used to repair larger areas on a photo or scan.
8. Brush - the most frequently used tool for painting on a background with any selected color in any size (hold left click to change while painting). Also used on layer masks for showing or hiding parts of the image.
9. Clone Stamp - similar to the healing brush, but it doesn’t blend. Instead, it creates a direct copy of the information from the first selected area to the second.
10. History Brush - works similarly to the Brush tool, except that the information with which it paints is from the original state of the drawing. It paints with the information from whatever History state is selected on the History Panel.
11. Eraser - when on a layer, this tool will erase the information with a transparent effect. If one is on the background layer, it will erase with whichever secondary color you have selected.
12. Paint Bucket - fills areas with solid color using the foreground color set on the Tools Bar. The Gradient tool creates a blending of the foreground color and background color (click+drag).
13. Blur - makes part of the drawing blurred. The Sharpen tool does the exact opposite.
14. Dodge - lightens the area where it is used. It’s useful on particularly dark enlargement scans. We’ll use it more in Section 2 of this chapter.
15. Pen - lets the artist draw a line by clicking one spot and then clicking elsewhere to add anchor points. In between these points, Photoshop places a line called path. It can be used to create complex selections and smooth curved brush strokes. With the Freeform Pen the artist can draw freehand paths with the limitations of starting and ending anchor points, but with the freedom to draw any line shape without stopping to add extra points along the way. The Add Anchor Point, Delete Anchor Point, and Convert Point tools are used to edit the paths drawn with the Pen.
16. Type - adds horizontal or vertical text to images/drawings. Size, color, and other attributes of the text can be specified and adjusted.
17. Path Selection - selects paths created with the Pen tool, shapes that were converted to paths, and even text.
18. Shape - draws all kinds of shapes that are made out of vectors, meaning they are made from points and paths instead of pixels.
19. Hand - moves the images/drawings around onscreen. The Rotate View tool is self-explanatory.
20. Zoom - zooms in up to 3200% or zooms out by holding down the Option button while clicking.
21. Foreground and Background Color - it is only possible to work with two colors at the same time, which can be set here by using different palettes. They can be switched by clicking the arrow above them.
22. Quick Mask and Screen Mode - in Quick Mask Mode the artist can paint to create or edit a selection. The Screen Mode lets the artist easily switch between Standard, Full with Menu Bar, and Full Screen Modes.
The Menu Bar
Because of the overwhelming number of menu options Photoshop has (nearly 300!), here we’ll cover only the ones important to our digital drawing needs. Of course, different situations need different solutions, so the user might eventually want to know more about the available options.
Photoshop
Hide Photoshop, Hide Others, Show All- hides all of Photoshop’s menus, panels, and windows so one can work in other programs, or hides every program running on the computer except for Photoshop. Show All reveals every program you may have hidden.
File
New, Open - creates a new document or lets the artist pick an existing one to open. One can open any document as a linked Smart Object or browse the recently opened documents from the same menu as well.
Save - saves the document as it is or changes it to another format (Save As). Although we almost exclusively use tiff as our file extension, pdf can be very useful for printing purposes.
Revert - wipes out any changes we've made to the current document and returns it to its last saved state.
Place - this option is used to place an image or other Photoshop-supported file format into the current document as a Smart Object. The artwork appears on its own layer, surrounded by a bounding box we can use to resize it.
Import Images from Device - lets us use a scanner to get a picture, drawing, or anything else off paper and into Photoshop on a Mac. (WIA Support to import images from an attached digital camera, memory card, or scanner is only available on PCs running Windows.)

The Import Images from Device panel is used for scanning documents
Export - this menu item is used to export drawings as paths so they can be opened with Adobe Illustrator.
Automate, Scripts - it is possible to automate tasks we do over and over in Photoshop by saving them as actions. There are some built-in actions that can be set here. Scripts also helps with changing file extensions or other features of files in batches, rather than individually.
File Info - creates metadata about the current document, including when it was created, how big the image is, its name, copyright information, and so on. It is editable any time, and it is therefore very useful to label our drawings.
Print - Choosing this item opens the Photoshop Print Settings dialog box and lets us adjust features like the number of copies, print quality, and which printer to use.
Edit
Undo, Step Forward/Backward - allows us to correct our mistakes, either by erasing the last change we made or stepping back and forth in the History Panel up to the number of steps previously selected.
Cut, Clear, and Copy - deals with selected objects’ movement on the drawing canvas. Copy Merged makes a merged copy of all the visible layers in a selected area. When we're editing a multi-layered document, this is a handy way quickly to consolidate and copy a certain part of the drawing - the area we've selected onto a single layer without having to select that area on each layer.
Fill - fills the selected area with the color of the artist’s choice. If nothing is selected, it fills the whole layer instead.
Stroke - adds a colored stroke, or outline, to the current selection.
Puppet Warp, (Free) Transform - twists, turns, moves, or distorts pixels independently of other pixels in a drawing (Puppet Warp) or scales, stretches, warps, distorts, and rotates the selected objects. Free mode lets the user do a whole sequence of the above modifications before saving the changes.
Auto-Align and Auto-Blend Layers - these can be used to compose selected layers into one based on the common elements, and therefore can be very helpful during stitching scanned parts of enlargements.
Define Brush Preset - converts the selected object into a custom brush.
Define Pattern - makes a custom pattern out of the current selection.
Define Custom Shape - turns the selected path or vector mask into a custom shape.
Adobe PDF Presets - manages settings we can use when making pdf versions of drawings.
Keyboard Shortcuts - customizes Photoshop’s keyboard shortcuts, adds one’s own, and saves these personalized menu commands.
Menus - customizes which menu items are hidden or shown.
Image
Mode - allows us to change the current document’s color mode and bit mode.
Adjustments - most of the options here are useful for changing our background photo’s overall tonal quality, which can be very helpful working with bad scans.
Image/Canvas Size - while Image Size lets one change the drawing’s dimensions and resolution, Canvas Size changes the document’s dimensions without affecting the resolution.
Image Rotation - rotates the image by a preset or arbitrary degree.
Variables - creates powerful document templates that we can use to generate several versions of the same basic design (with different images and/or text) automatically.
Layer
New/Duplicate/Delete/Rename - interact with selected layers. The same actions can be managed directly from the Layers Panel.
New Fill - creates a new layer and fills it with a solid color, gradient, or pattern. If the canvas size is enlarged, Photoshop fills the extra space as well.
New Adjustment - adds a layer where nondestructive changes can be made to the drawing/image.
Layer Mask - allows the artist to obscure an entire layer or layer set, or just a selected part of it. It is editable and it is a grayscale image so what we paint in black will be hidden, what we paint in white will show, and what is painted in gray shades will show in various levels of transparency.
Group/Ungroup/Hide/Arrange - interact with selected layers. The same actions can be managed directly from the Layers Panel.
Align/Distribute - lets the artist align content that exists on different layers along the objects’ edges or center points.
Link/Select/Merge - interact with selected layers. The same actions can be managed directly from the Layers Panel.
Flatten Image - merges all the drawing’s layers into the Background layer.
Matting - this option removes the extra pixels surrounding an object's edge after it has been isolated from its original background. After being applied, the item's edge should look cleaner and more natural.
Type
New to Photoshop CS6, this menu has all the commands related to text that were previously sprinkled throughout Photoshop’s menus and preferences. Because we are working almost exclusively with drawings, adding and editing text will not be explained in detail in this tutorial.
Select
All/Deselect/Reselect - places or deactivates “marching ants” around the perimeter or a particular area of the entire document.
Inverse - selects the area that is not part of a selection.
Color Range - opens a dialog box that lets the artist select areas in the drawing based on color.
Refine Edge - opens a dialog box that lets the artist fine-tune the edges of a selection.
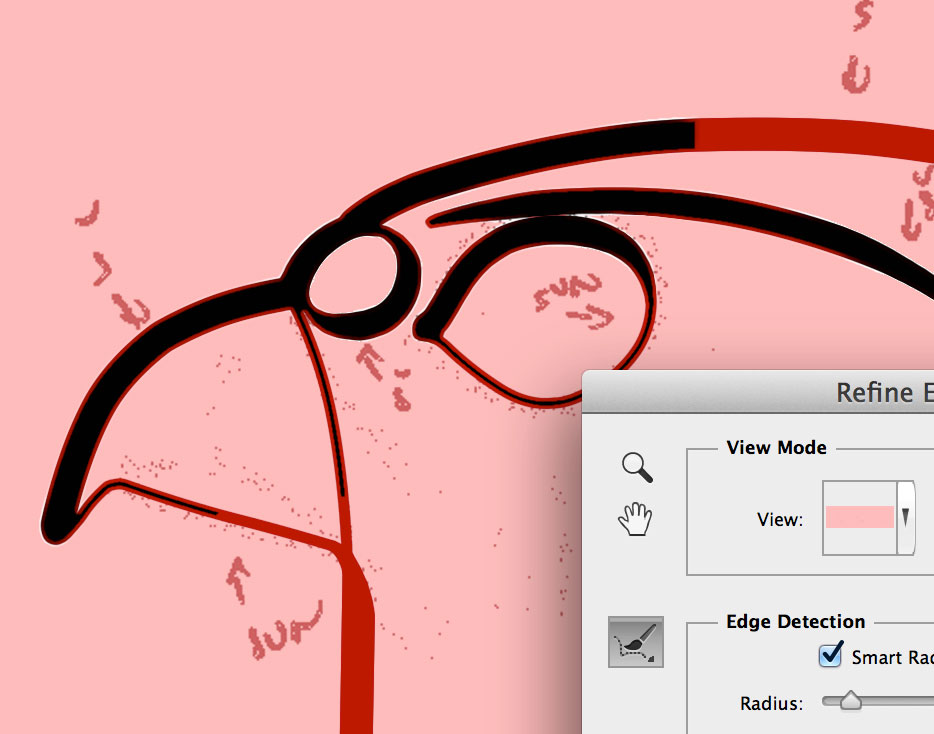
Refine Edge dialog box
Modify - lets the artist tweak the edge of a current selection by expanding, shrinking, feathering it, grabbing just its border, or smoothing it.
Grow/Similar - finds and grabs pixels that match the colors just around the selected area or anywhere in the drawing.
Edit in Quick Mask Mode - temporarily covers the drawing with a red overlay, or mask, letting us create or fine-tune a selection visually.
Save/Load - lets the artist save and load a previously saved selection. This is particularly useful for complicated selections that have to be used repeatedly.
Filter
This menu is a collection of filters that can be used in modifying images. It groups filters by type: Artistic, Blur, Sharpen, etc. Because of the nature of our inking method, there is no particular use of filters in our process. Nonetheless the artist should know about them and experiment with them to be aware of their existence.
View
Proof Setup - creates a proof, which is a sample version of the drawing that simulates what the finished artwork will look like. It can simulate how the drawing’s colors will look on a Mac or PC monitor, or in another color mode, or even how a color-blind person would see them. This preview process, called soft proofing can be turned on/off in the Proof Colors submenu.
Zoom In/Out, Fit on Screen, etc. - self-explanatory command to view the entire artwork or its details on screen; the same actions can be managed directly from the Tools Bar.
Extras - when this option is turned on, the artist can add alignment helpers like guides and grids to the drawings.
Show - lists the extra items (guides, layer edges, notes, etc.) we can display and use while drawing.
Snap/Snap To - lets the artist align selected parts or objects with guides, grids, layers, etc.
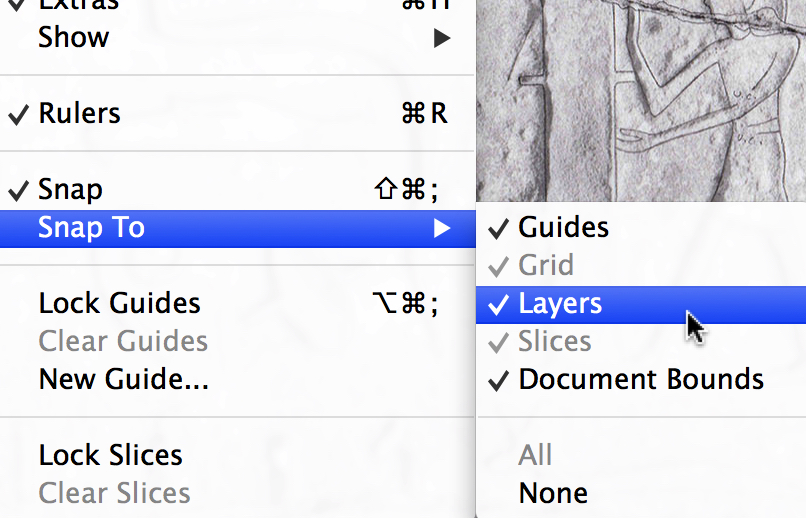
Snapping objects to layers
New Guide - adds vertical or horizontal guides to a drawing/image. Lock Guide prevents us from accidentally moving a guide we set up previously, while Clear Guides gets rid of all the guides we set up.
Window
Workspace - rearranges Photoshop’s panels, menus, and tools as was discussed at the beginning of this section. A short description of the panels we’ll use the most is appropriate here in the introductory chapter:
Adjustments - lets us add Adjustment layers that we can use nondestructively to alter the color and lighting for a drawing or image.
Brush - selects and edits Photoshop’s built-in brushes, as well as brushes the artist has created.
Brush Presets - lets us view a painting sample, as well as edit and store our own customized settings for brushes.
Channels - shows the different color channels contained in the drawing/image.
Clone Source - settings for using the Clone tools.
Color - this panel can be used to view and change the foreground and background colors.
Histogram - includes a graph (called a histogram) that shows information about the pixels of the drawing.
History - displays a timeline of the edits made to the current drawing. Also shows what the image looked like last time it was saved and lets the artist restore the drawing to any previous (last saved or last opened) state.
Info - includes information about where the cursor is, the color of the pixels it's hovering over, and the size of the current selection.
Layers - add, delete, and organize the document’s layers from this panel.
Navigator - lets us change how much we’re zoomed in on an image and which part of the image we are viewing.
Notes - notes can be viewed, edited, and deleted here.
Paths - lets the user keep track, change stack of, add, or delete all the paths of the artwork in this panel.
Styles - layer styles are a popular way to add effects, such as drop shadows and strokes, to layers in a non-destructive way. The artist can save combinations of effects, such as blueprint settings through this panel.
Swatches - lets the user save, view, and pick colors from libraries of color panels.
Tool Presets - if the artist regularly uses the same settings for a particular tool, this panel can be used to save them as a preset, so they can be used again later.
Help
If one doesn’t know how to do something in Photoshop, this menu is for finding the answer. Provides a direct link to Adobe’s online help system, including lots of tutorials, and helps the user activate or deactivate a copy of Photoshop. One particular submenu can be very useful for our work:
Search - this is a Mac-only feature and helps the artist find any menu item by just typing in its name.
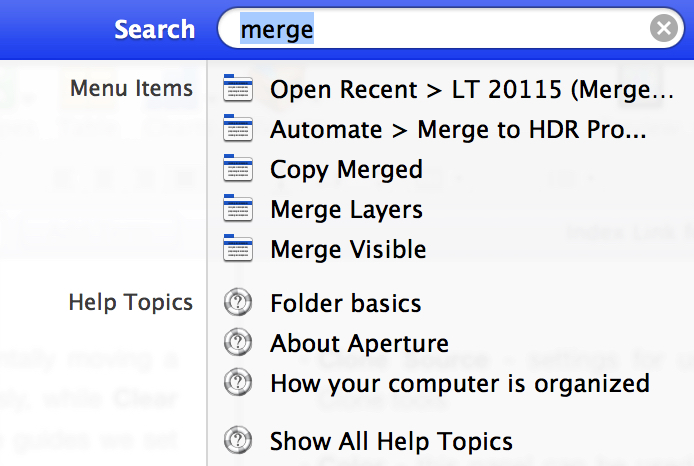
The Search window
Additional Reading:
The Complete Beginners guide to Adobe Illustrator
Managing Panels in Photoshop CC
0 comment(s)
Leave a comment(We'll keep your email address private)