
Digital Epigraphy (Second Edition)
Chapter 3 – Digital Drawing Tools
Chapter 3, Section 2 - Essential Photoshop Skills for the Artist
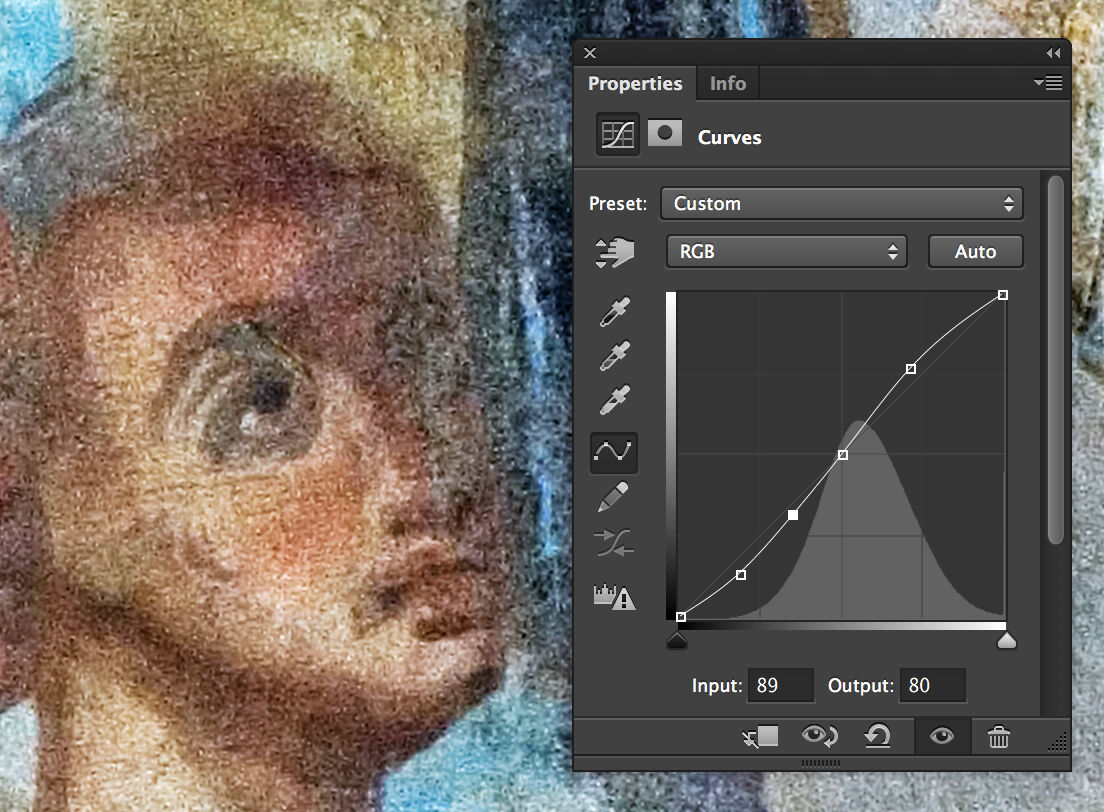
---Color-enhancement-using-the-Curves-tool.jpg)
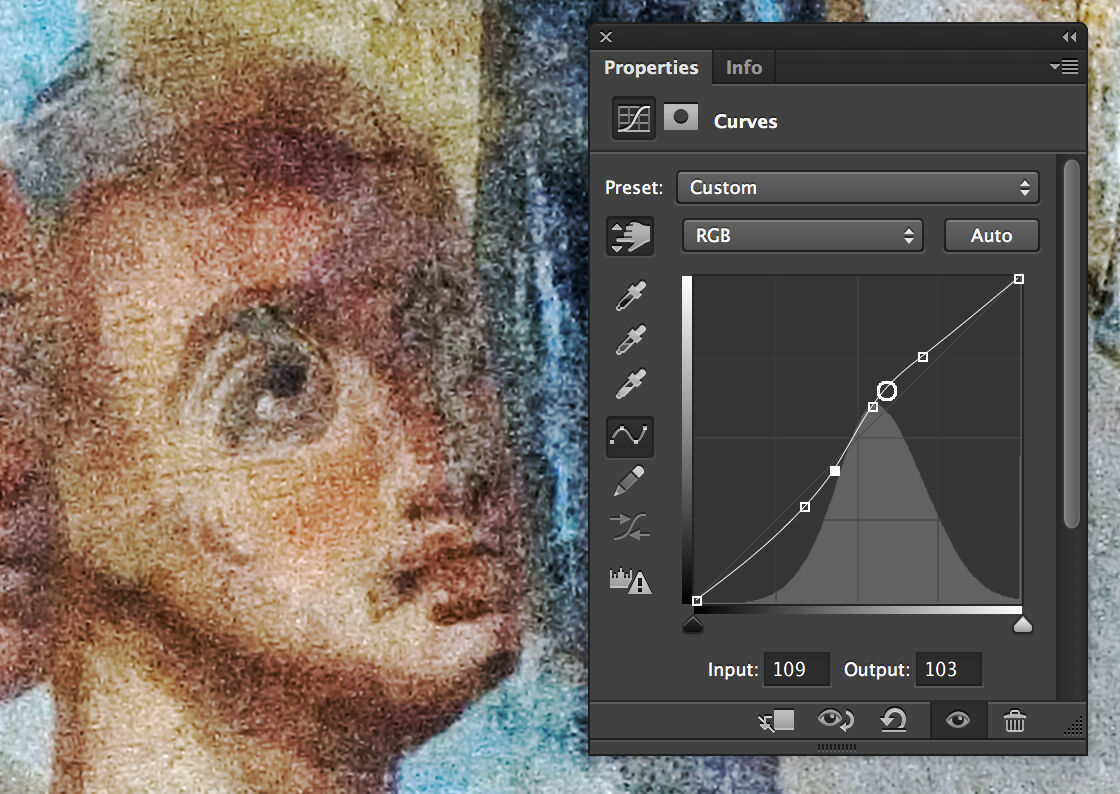
MHB 91 (detail) - Color enhancement using the Curves tool
For whatever purpose a digital artist uses Photoshop, there are a handful of fundamental features that form the basis of almost any task. As we’ll learn later, working within the parameters of the Chicago House Method, we might be able to accomplish our goal without ever encountering some of these basic features. It is a good idea, however, to introduce some of these other common Photoshop features to the artist, if for no other reason than to suggest a more complex way of thinking whenever we do an art project.
These basic groups of skills are Layers, Masks, Selections, Curves, and, last but not least, Brushes. All of these features have been essential components of Photoshop for the last 20 years, but they have constantly been refined and are still fundamental to the Photoshop environment, through many new versions, dominating our day-to-day Photoshop habits.
Layer Basics
Using layers in Photoshop lets us experiment with different effects without modifying the original image. Layers also allow us to stack images on top of each other in the same way that different transparent sheets of plastic could be stacked. Layers are simply images and effects that sit within a document, allowing for each to be edited, repositioned, or removed independently of all the other elements. As we will learn in the Merging Scanned Images section, any task that involves putting more than one image together will involve layers. But layers are not just useful for creating composites. They complement all types of image editing by enabling the artist to make duplicates and to try out different adjustments, knowing that anything can be changed back to its original state.
The Epigraphic Survey digital inking method is based on the fact that every distinguishable feature of a certain drawing is drawn on its own layer, and therefore can be modified independently. The use of layers makes these drawings a lot more flexible than their paper-based counterparts. Entire series of enhanced drawings can be printed based on a single layered digital drawing, emphasizing certain features while omitting others.
Therefore, of all the panels and windows in Photoshop, the Layers Panel is the one that should always be close to hand. When the Layers Panel is open, the user can access the following important features:

The Layers panel
-
Blending Modes - changes how a layer interacts with all the layers below it. Each mode gives us a different look by blending the pixels on the selected layer with those below. We use these to make backgrounds transparent, darken or lighten colors, etc.
-
Opacity - controls the transparency of the entire layer. We use this to make a layer show through beneath another layer and to paint transparent brush strokes. This could be especially useful when inking on a photo enlargement.
-
Fill - controls the opacity of the layer but not the layer effects outside of its fill.
-
Lock Layer - completely locks the layer so that we can’t edit it. It prevents us from accidentally drawing certain features on the wrong layer.
-
Lock Transparency - this allows us to paint on a layer, but not on the transparent areas. For example, this feature can be used for indicating scalpel effects on damage.
-
Show/Hide icon - clicking the eye icon turns the layer’s visibility on and off. It’s best used to try out different effects and see our drawing with or without the background image.
-
Layer Style - this is the special effects area of the layers palette. It can be used, for example, for thickening or thinning line weights. Layer Styles are nondestructive, so they can be changed or removed any time.
-
Layer Mask - layer masks allow us to paint on a portion of an image while protecting another portion. The artist can use them for merging scanned image parts or to make selections.
-
Adjustment Layer - allows color changes to any layer beneath it. It is also nondestructive, and it can be deleted later, so the Adjustment Layer and the layers beneath it will return to their previous state.
-
Layer Group - creates an entire group of layers, best used when the artist needs to distinguish between lots of layers.
-
New Layer - creates a new layer above our drawing’s last used (therefore currently selected) layer.
-
Delete Layer - deletes the selected layer(s) or layer group(s).
-
The Background Layer remains locked unless we unlock it by double-clicking on it. We are able to paint on this layer even in its locked state, but it can’t be moved onto the top of other layers unless it’s unlocked.
Selections
Selections enable the artist to define an area of pixels on a drawing and help in making changes by isolating one area from another. Selections play a part in all kinds of Photoshop tasks. Sometimes this involves using more than one selection tool or command, and during photo modification often the goal is to convert the selection to a mask.
Photoshop has several selection tools, but whether the artist uses selections for cutting out parts drawn on the wrong layer, erasing or adding precise details, filtering, or copying and pasting, one general rule is: the more accurate our selection the better. You can see the different types of selection tools above, but a few useful shortcuts should be pointed out here to be able to use them effectively:
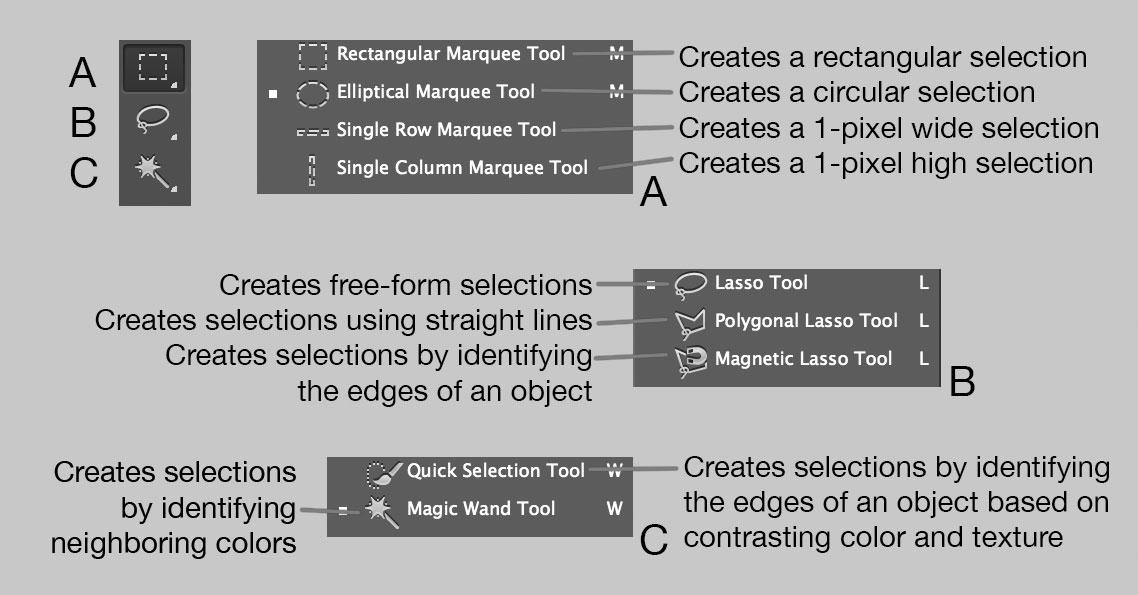
Selection tools
With any selection tool, hold down Shift to add to an existing selection, or hold down Alt to subtract from it. Pressing Shift+Alt will intersect. When using the Marquee tools, hold down Alt to start a selection from the centre and Shift for perfect circles or squares (Shift+Alt does both). Hold down Space while selecting to temporarily move the selection. Hold down Cmd and click on any layer thumbnail, Channel, or Path on its panel to load its shape as a selection.
Sometimes it’s easier to select the opposite of what one would like to interact with, and then invert the selection. For example, selecting a complex artwork against a homogeneous background is difficult in terms of pixels (with all the details and different shades), and would take a lot of time. The background, however, would probably take a couple of clicks with the Magic Wand. Once the background is selected, going to Select/Inverse or pressing Cmd+Shift+I will do the trick.
Among the most useful selection tools for the digital artist are the Lasso tool and the Quick Selection tool. While the Lasso tool “draws” the boundaries of our selection, the Quick Selection tool “paints” it in, and, since the latter works like a brush, its size can be adjusted. On occasion, it’s easier to paint a selection rather than use the regular selection tools. After roughly encircling the area we would like to modify, we can press Q to enter Quick Mask mode, and unselected areas will be covered by a pink overlay.
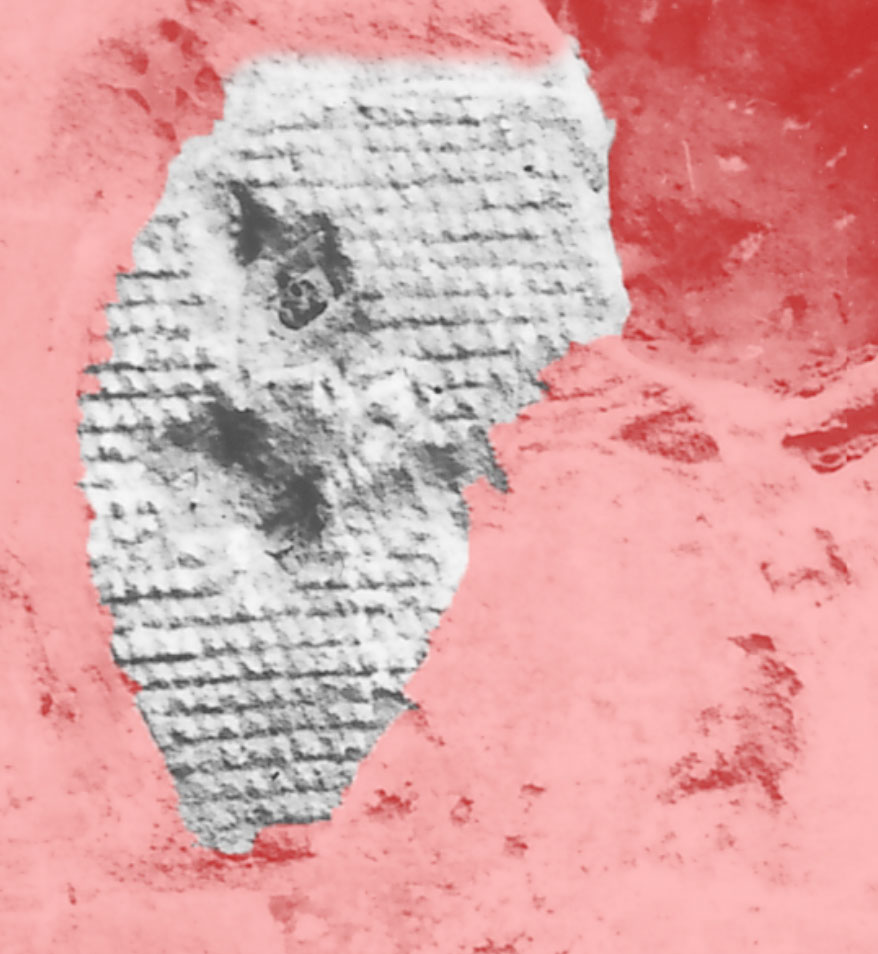
Unselected areas shown in pink
Now we can open the Brush tool and choose either a soft- or hard-edged brush tip, then paint with white to add areas to a selection, or with black to subtract areas. When done, Q must be pressed again to return to the “marching ants” view. (These marching ants don’t always display the full selection, so Quick Mask can also be useful for checking exactly where the selection is operating.) When making a selection, it’s useful to keep the Anti-Alias box checked, which results in smoother transitions.
Further Useful Selection Tricks
Refine Edge
This tool comes in very handy when we have to create intricate selections of troublesome areas, such as the edge of a damaged block line. First, we have to make an initial selection with any tool, then click the Refine Edge button at the top. Now we can press the F key to cycle through all the different views to find one that gives the best contrast. The key to success here is getting the Radius right, because this controls the area of refinement around the edges of a selection. A larger radius is good for fuzzy edges. The artist can use the Refine Radius tool to increase the radius around large soft areas.
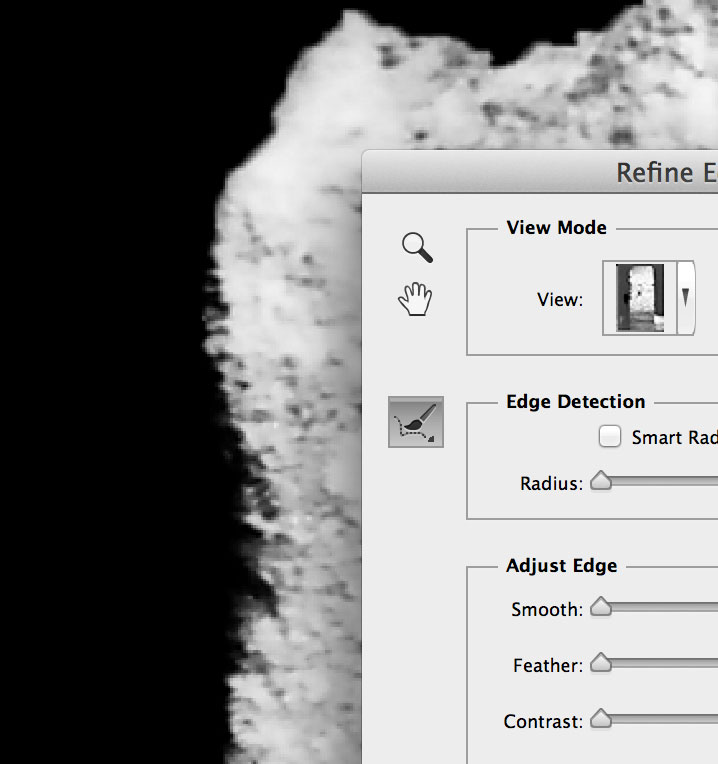
Refine Edge
Temporarily Emphasize Edges
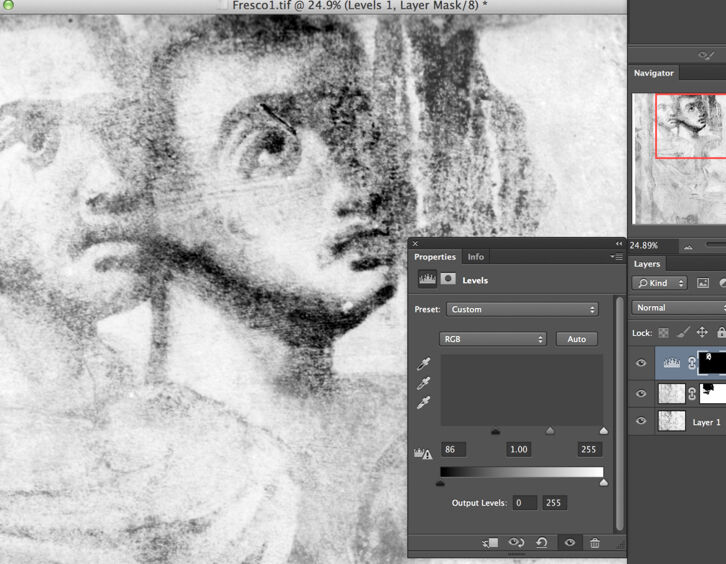
Most of the selection tools (Quick Selection tool, Magic Wand, etc.) work by seeking out edges or changes in contrast across an image. So, if a given tool is struggling to latch on to the edges of a shape, we can help by emphasizing those edges with a temporary tonal tweak. The best tool to use for these enhancements is an Adjustment Layer such as Levels, which enables the artist to boost the contrast of the image to make the edges more visible. The good thing about the Adjustment Layers is that once the desired selection is made, we can delete the layer and go back to our task.
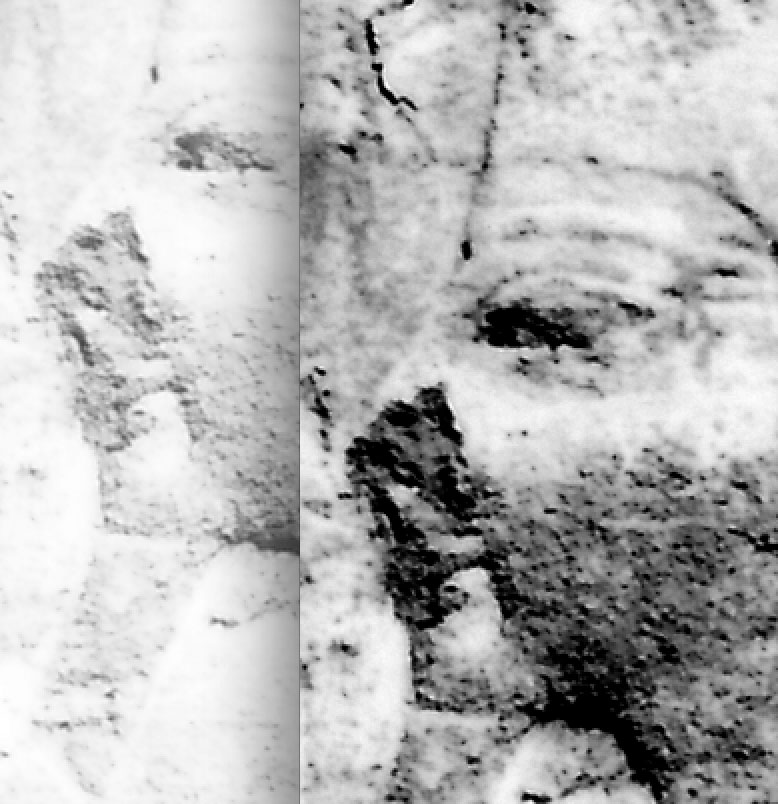
Temporarily Emphasize Edges
Layer Masks
Layer Masks are one of those Photoshop features that beginners might find hard to work with, although the philosophy behind masks is very simple: masks enable the artist to hide or reveal parts of a layer.
To add a mask, we have to click on the icon at the bottom of the Layers Panel, which results in the appearance of a little box next to the layer. This is the mask thumbnail. While it is highlighted, one can paint with black or white over the image. Masks are always indicated in grayscale. The parts of the mask that are black hide the layer’s content, while the parts that are white keep the layer’s content visible. The parts of the mask that are gray make the content partially visible. Using masks is very similar to using the Eraser tool, but much more useful because one can bring parts back whenever needed. What’s more, masks can also be used on Adjustment Layers to hide or reveal changes in color and tone.
Using Layer Masks to Emphasize Details on a B/W Photo:
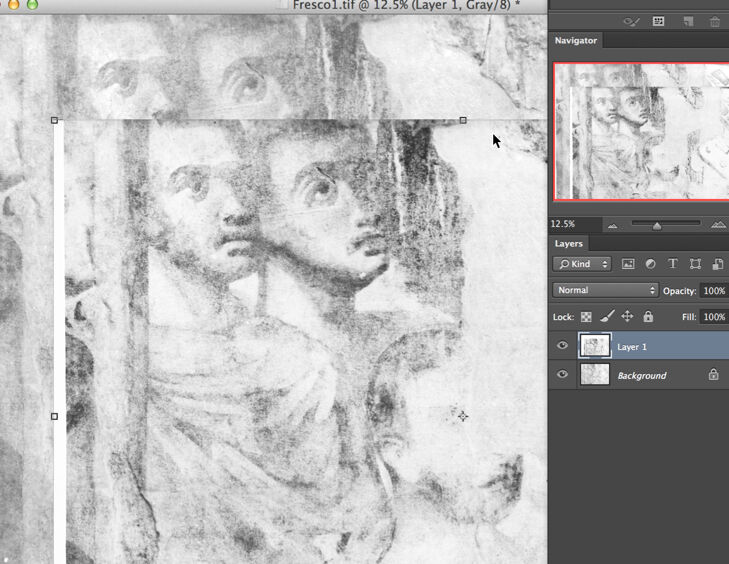
(1) Open the two photos and go to the dark one. Select the Move tool, then drag the image over the light one. Press Cmd/T and resize and position it so that the details match. Press Enter to apply, then go to the Layers Panel, double-click the Background layer, and hit OK to make it editable.
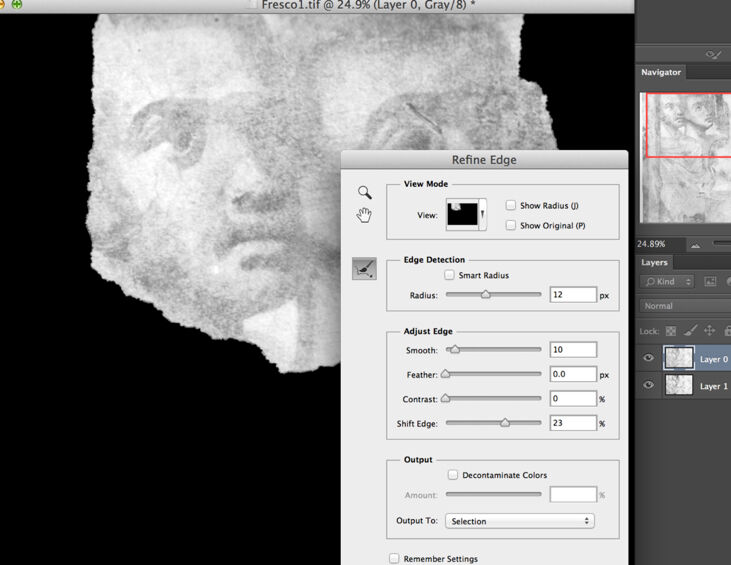
(2) Drag the top layer below the bottom one. Highlight the top layer, then hit the Quick Selection tool and paint over the area you’d like to emphasize. Click Refine Edge and - depending on how accurate the selection has to be - set Radius, Smooth, Shift Edge, and Output as seen above.
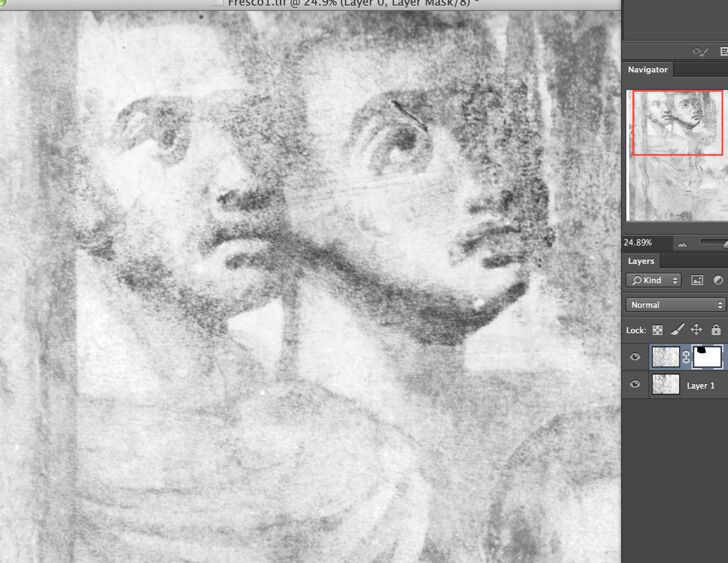
(3) Hold down Alt and click the Add Layer Mask icon to add a mask that hides the selected area. Highlight the Layer Mask thumbnail in the Layers Panel, then select the Brush tool. Set the Foreground color to black (changing brush opacity makes the strokes gentler), and then paint over the faces to reveal some of the darker details from the Background layer.
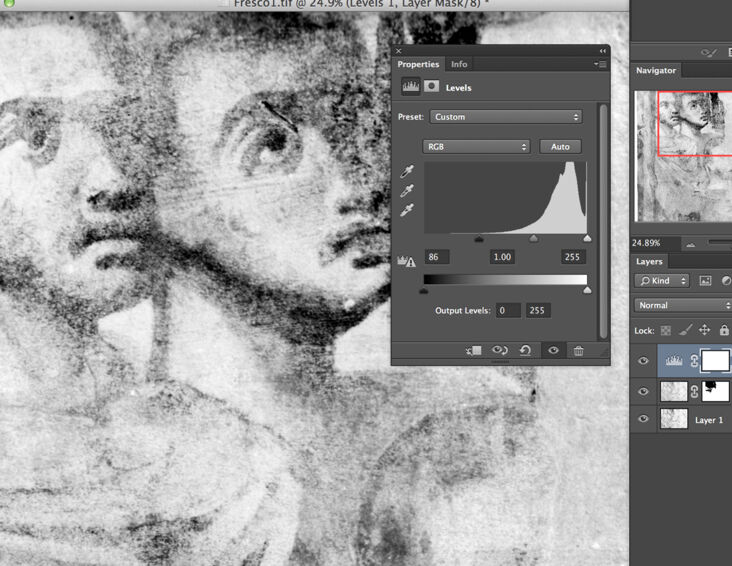
(4) Finally, add some localized adjustments to the image. Make sure the top layer is highlighted, then click the Create Adjustment Layer icon in the Layers Panel and choose Levels. Adjust the levels according to your needs and see if you can reveal more details on your background image.
(5) Next, hit Cmd/I to invert the Layer Mask to black, and then paint with white to reveal the shade shift over the face and curtains. By using Layer Masks instead of manipulating the entire image, you should be able to do as many changes as you want, and to go back to the original in case you’re not satisfied. It is also possible to use different effects on certain areas.
The power of Layer Masks can be demonstrated with a simple project: we have two photo enlargements, one of which is light and reveals lots of details on dark areas but is burnt out over lighter elements. The other one is the exact opposite. When we pencil on our photo in front of the wall, we want to see as many details as possible. Instead of being forced to choose in between these two imperfect enlargements, with a little modification we are able to enjoy the benefits of both. (As an easy reminder, the artist should think of masks in terms of light: black blocks out all light; white lets light in, while gray lets varying levels of light in.) Just like any grayscale image, a mask can be created with a paintbrush, fill, or gradient, giving us control over their shape and most importantly their transparency.
Five Mask Essentials
Highlight the mask thumbnail - When we work on our mask, we always have to make sure the mask thumbnail is highlighted on the selected layer in the Layers Panel, rather than the image thumbnail, otherwise we might end up painting over the image instead of the mask.
Knowing the right shortcuts - D resets the foreground colors to black and white, and X swaps them. The ] and [ bracket keys resize the brush tip and Shift+] and Shift+[ hardens or softens the brush (we’ll talk about the brushes more later in this section).
Turn selections into masks - Often, the process of making a mask begins with a selection. Any active selection can be turned into a mask simply by clicking the Add Mask icon. This hides everything but the selected area. Holding down Alt while clicking does the exact opposite and hides just the selected area.
Adjustment Layer Masks - Conveniently, Adjustment Layers automatically come with Layer Masks, which means that the artist can add - for example - a Levels or Curves Adjustment Layer to make a tonal change, then immediately pick the Brush tool and start painting to apply the change selectively over the image.
Invert from white to black - It’s sometimes much easier to hide absolutely everything on a layer, then paint with white to bring back the parts we want. By holding down Alt and clicking the Add Layer Mask icon we can add a full black mask that hides everything, or simply highlight an existing white mask and hit Cmd+I to invert it.
Curves
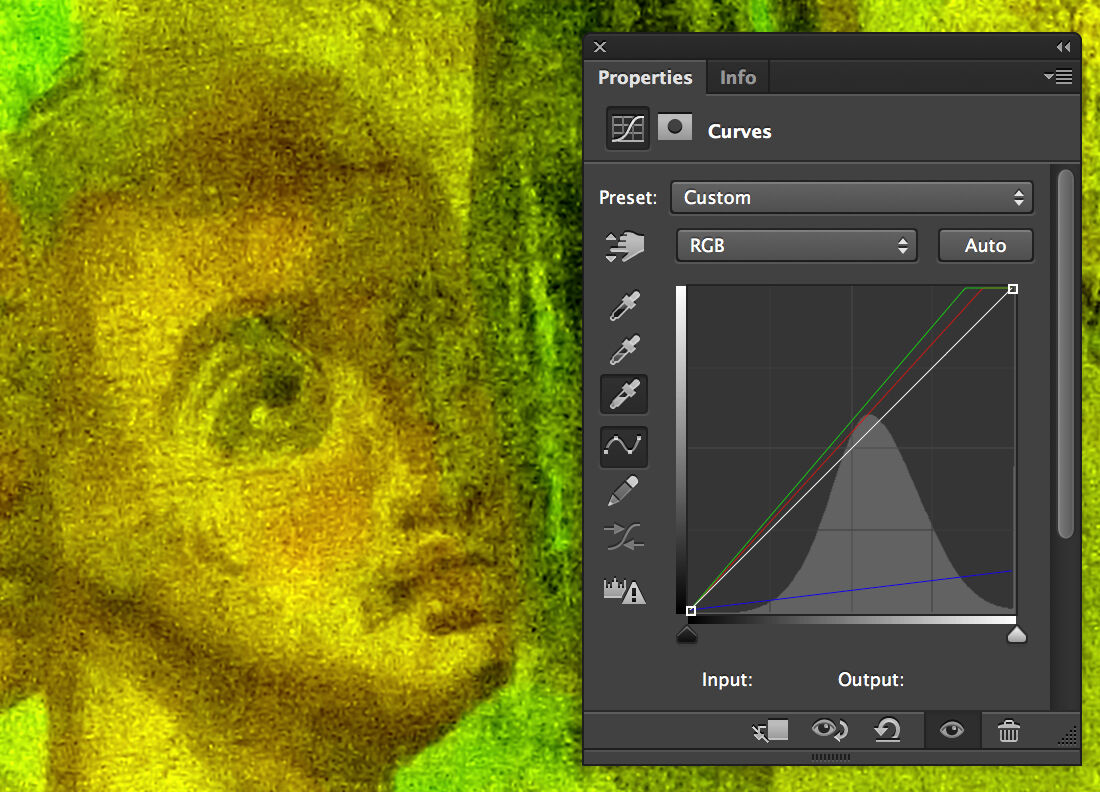
As an Epigraphic Survey artist who works almost exclusively with black-and-white images, one would think that learning about Photoshop’s color management is rather pointless. However, some of the Survey’s more recent documentation efforts (paint studies at Medinet Habu, Roman fresco project at Luxor temple) are strongly concerned with colors and tonal modifications. With one of Photoshop’s most powerful and flexible tools, called Curves, the artist is able precisely to control tones throughout an image. With Curves one can not only adjust the brightness of different parts of the tonal range, but also change individual color channels, correct color casts, and create a huge range of tonal effects. It’s possible to apply Curves directly on an image layer (Image/Adjustments/Curves, or Cmd+M) or alternatively as an Adjustment Layer. In general it is recommended using Adjustment Layers, so that the changes are completely reversible.
The Most Common Curves Adjustements:
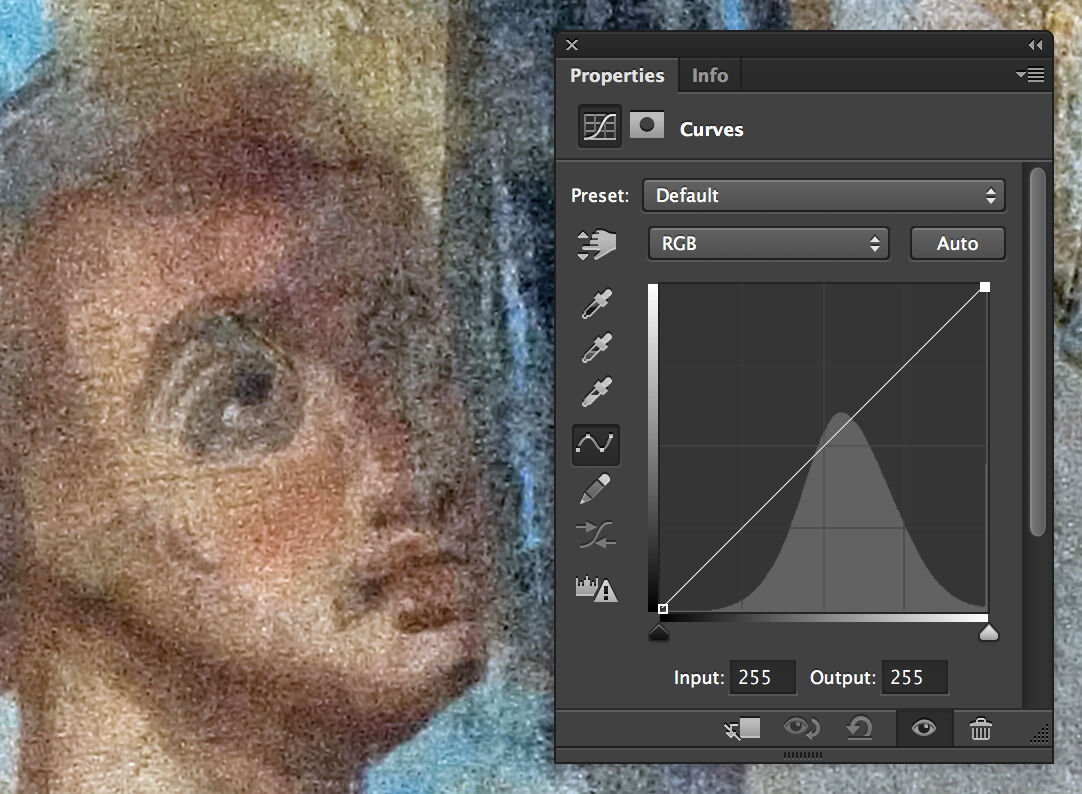
(1) The original color image shows part of a Roman fresco. It was already color-corrected by the photographer and is used here only for demonstration purposes.
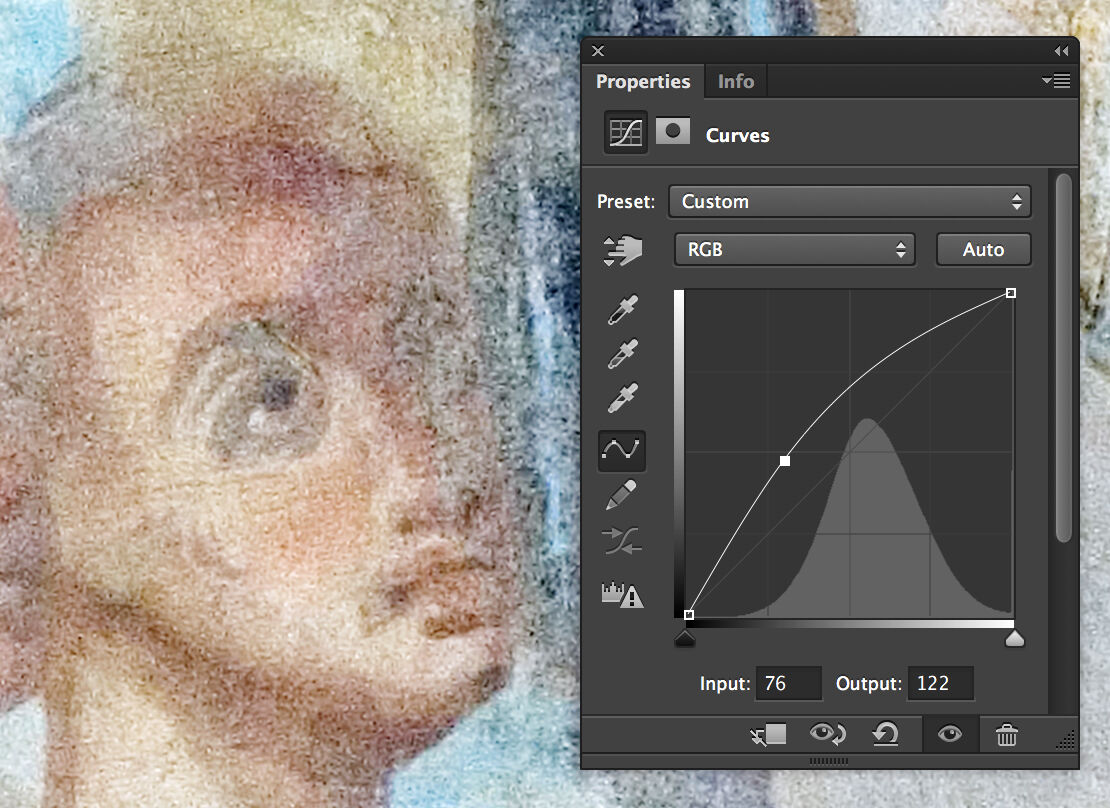
(2) Lighten an image - click and drag upwards on the line to brighten all the tones in the image
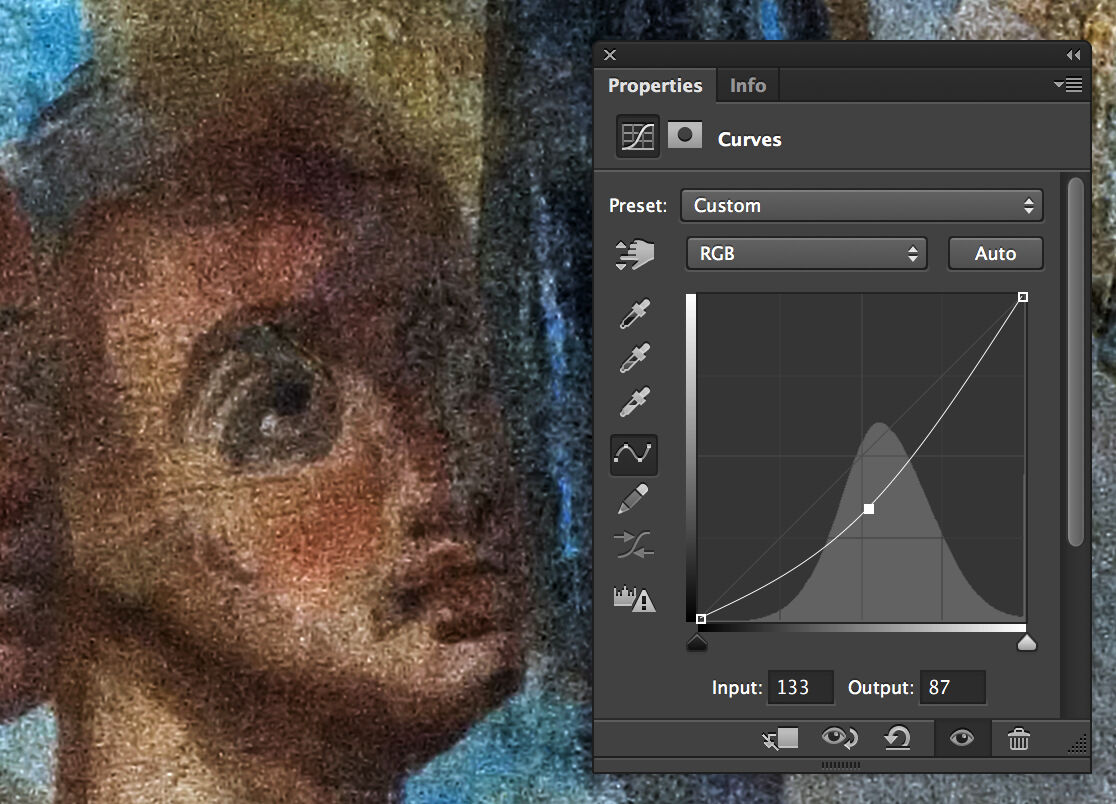
(3) Darken an image - click and drag downwards on the line to darken all the tones in the image.

(4) Add contrast - make an S-shaped curve with two points, one dragged up, the other dragged down.
(5) Target specific tones - adjust one part of the line and pin the rest back along the diagonal with further points.
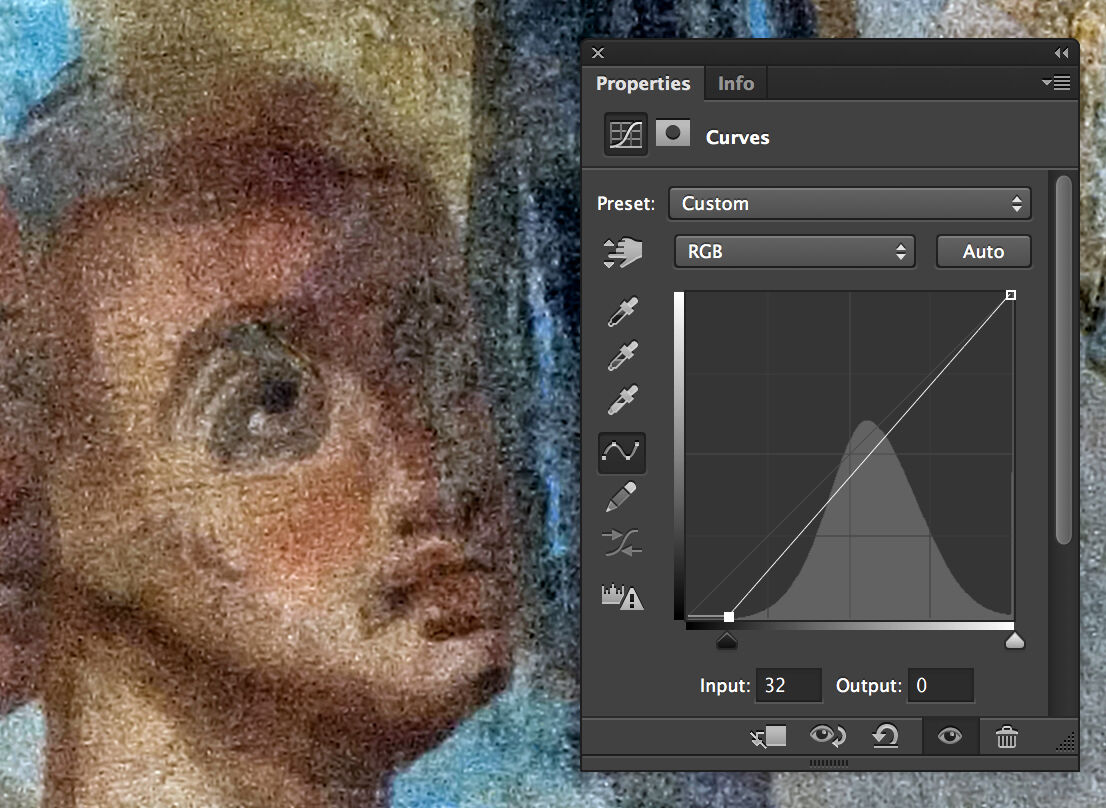
(6) Set black-and-white points - hold down Alt and drag the bottom sliders inwards until clipped pixels appear.
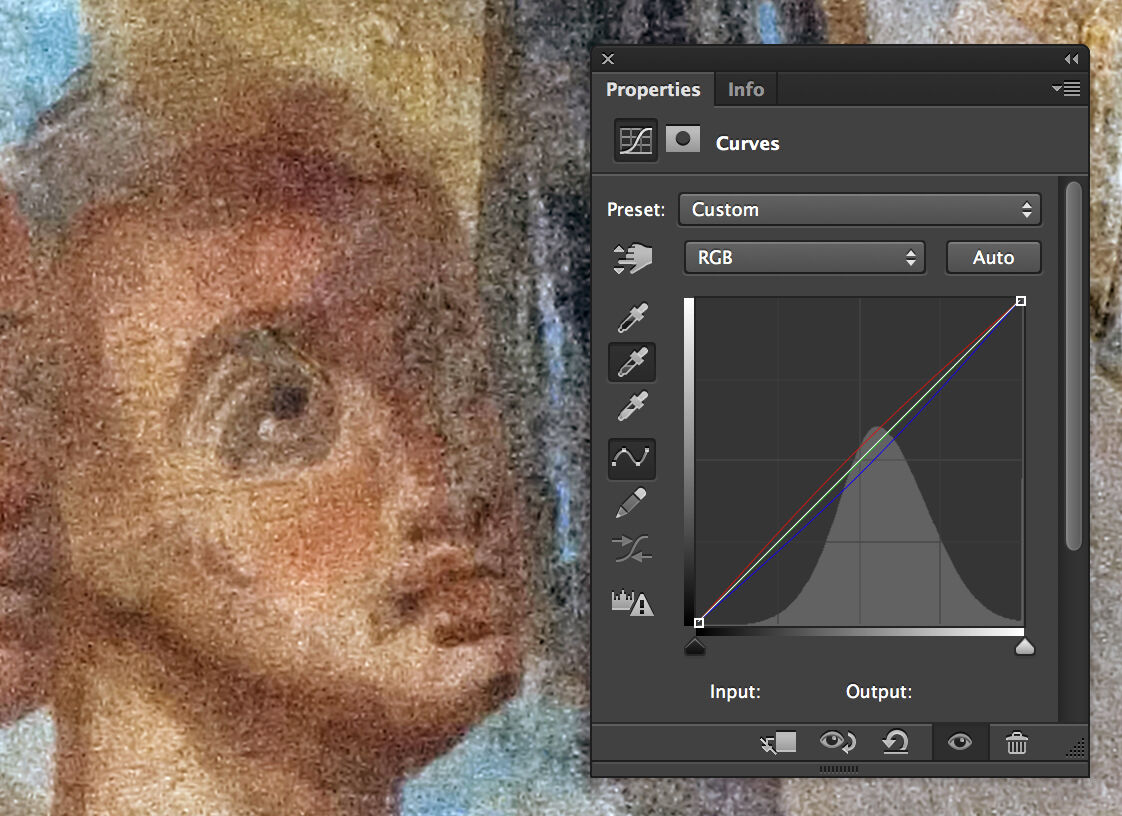
(7) Fix a color cast - click with the middle eyedropper on a part of the image that should be neutral gray.
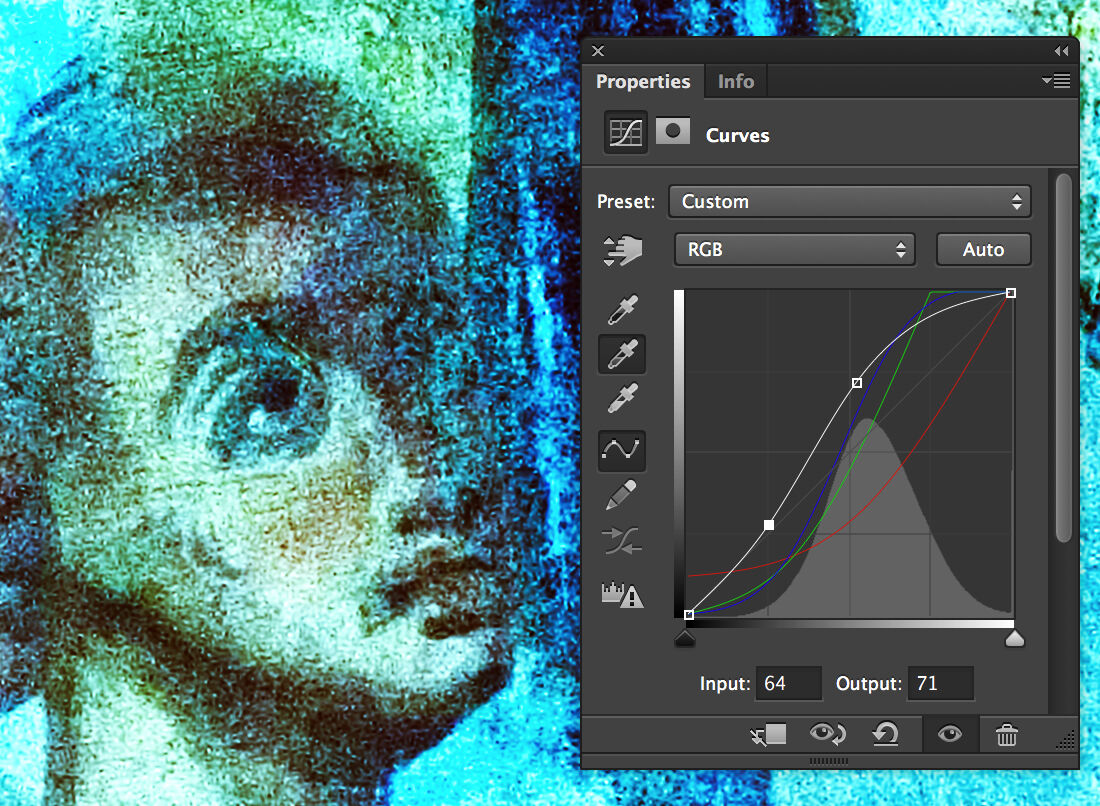
(8) Add color shifts - click on RGB, choose Red, green, or blue and adjust the lines by dragging them.
(9) Make interactive tweaks - click on the hand icon, then drag over the image to adjust the tones.
(10) Set colors - double-click the black or white eyedroppers, select a color on the Color Picker, click OK, then click on the image.
Modifications in curves happen by adjusting the shape of the so-called Curve line. The Curve line enables the artist to adjust brightness by altering different parts of the tonal range. The X-axis represents the tone before any change, and it is displayed on a scale from 0 (black) on the left to 255 (white) on the right. The Y-axis represents the changes we make. Dragging the line up past the initial straight diagonal lightens the tones, while dragging it down darkens them. It’s also possible to add multiple points to fine-tune these changes.
Brushes
Brushes are one of the most powerful tools in Photoshop’s creative arsenal. Certainly Brushes will be the initial painting tool for the Epigraphic Survey artist and will be explained in a lot more detail later on. When clicking on the Brush tool ( Shortcut: B), we have a number of options to adjust at the Options Bar:
- Tool presets - access previously saved brush settings.
- Brush picker - accesses and manages preset and saved brushes, controls brush size and edge hardness, and saves settings as a preset.
- Brush panel - manages deeper customization of brushes as described in Chapter 4, Section 4.
- Mode - contains blend modes. A Blending mode is a way to mix the colors with the object(s) behind them using specific mathematical formulas working over the RGB values of each pixel.
- Opacity - controls how transparent the brushstrokes are.
- Tablet pressure controls opacity - the artist can make the opacity vary by changing the amount of pressure applied to the tablet.
- Flow - controls the rate at which the color is applied to the drawing. A lower number means less paint is applied.
- Airbrush - emulates a tool that sprays paint onto the canvas with compressed air.
- Tablet pressure controls size - controls the brush size by changing the amount of pressure applied to the tablet.
The Brush Presets
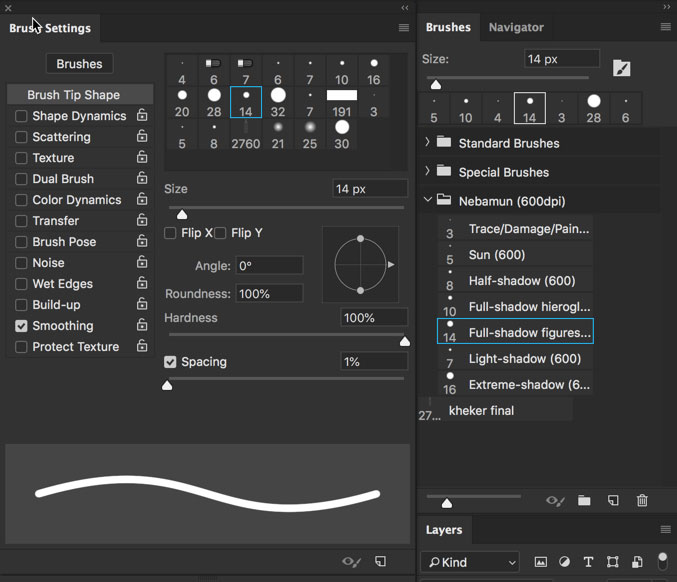
The Brush Presets panel
Shape Dynamics - Allows the artist to adjust the shape of the brush tip, either randomly or with pressure controls. One can set randomness with the Size, Angle, and Roundness Jitters (jitter means randomness in Photoshop and is adjusted by using sliders). The Flip X and Y boxes can be used for extra randomness.
Scattering - Turns any brush into a random scatter. The Count settings in combination with the Spacing settings in Brush Tip Shape can be used to control the size and density of the scattered effect.
Texture - Adds a texture or pattern to the brush tip. This is useful for creating the look of paint on a textured surface. One can choose a pattern from the dropdown menu, then experiment with the Mode and Depth settings to control its appearance.
Dual Brush - Selects a second brush tip that acts a little like a mask for the main brush tip, so that the first brush fits inside the shape of the second brush. One can experiment with Blend Mode and scattering for an array of effects.
Color Dynamics - Adds random shifts in color as we paint. The jitter sliders can be used to set Hue, Saturation, and Brightness. The Foreground/Background Jitter flicks between the two selected colors and can be controlled by pen pressure. When Apply per tip is checked, it results randomly colorful strokes.
Transfer - Adds random Opacity and Flow settings that affect how the brush builds up paint. (When using the mixer brush, we can set the Wetness and Mix the paint as well).
Brush Pose - This feature is only available for pressure sensitive tablet users. It lets the artist set tilt values for the X and Y axis that control how the pen behaves.
Brush Cursor’s Appearance

Brush cursor options
As a factory setting, the brush cursor reflects the size and shape of the selected brush, but it can be changed (Photoshop/ Preferences/Cursor). If the brush cursor suddenly turns into a dot inside crosshairs, it means that Caps Lock might be turned on, which lets the user switch between the currently used and the precise cursor. While inking, the artist should paint with either Normal Brush Tip (which makes the tip slightly smaller than the actual brush stroke) or Full-Size Brush Tip.
Customizing Brushes
There are lots of options to customize a brush tip in Photoshop, as shown on the previous page. Although the artist might limit his/her brushstrokes to solid lines during inking, again, it is very useful to know how to interact with these settings in case we need them. The basic use of the Brush Panel involves picking a preset brush tip from the upper-right window of the Brush panel, then activating a category on the right and tweaking the settings of that category that appear on the right. The preview area at the bottom of the panel shows how those changes affect the brush. Once a particular setting is selected, it can be locked by activating the padlock next to its name. This newly created brush can be saved by clicking on the folded paper icon on the lower right corner of the Brush Panel. Photoshop gives the artist endless choices to change brush behavior, far more than can be included in this manual. (We will talk more about setting up our custom brushes in Chapter 5, Section 4.)
Additional Reading:
· The Master Guide to the Photoshop Layers Panel
· Understanding Layer Masks in Photoshop
· The Science Behind Using the Curves Tool
· A Comprehensive Examination of the Brushes Tool from Adobe
0 comment(s)
Leave a comment(We'll keep your email address private)