
Digital Epigraphy (Second Edition)
Chapter 4 - Digital Fieldwork
Chapter 4, Section 2 - Portable Wacom Tablets
Introducing the Cintiq Companion
-digitally-penciled-on-the-Wacom-Cintiq-Companion_1.jpg)
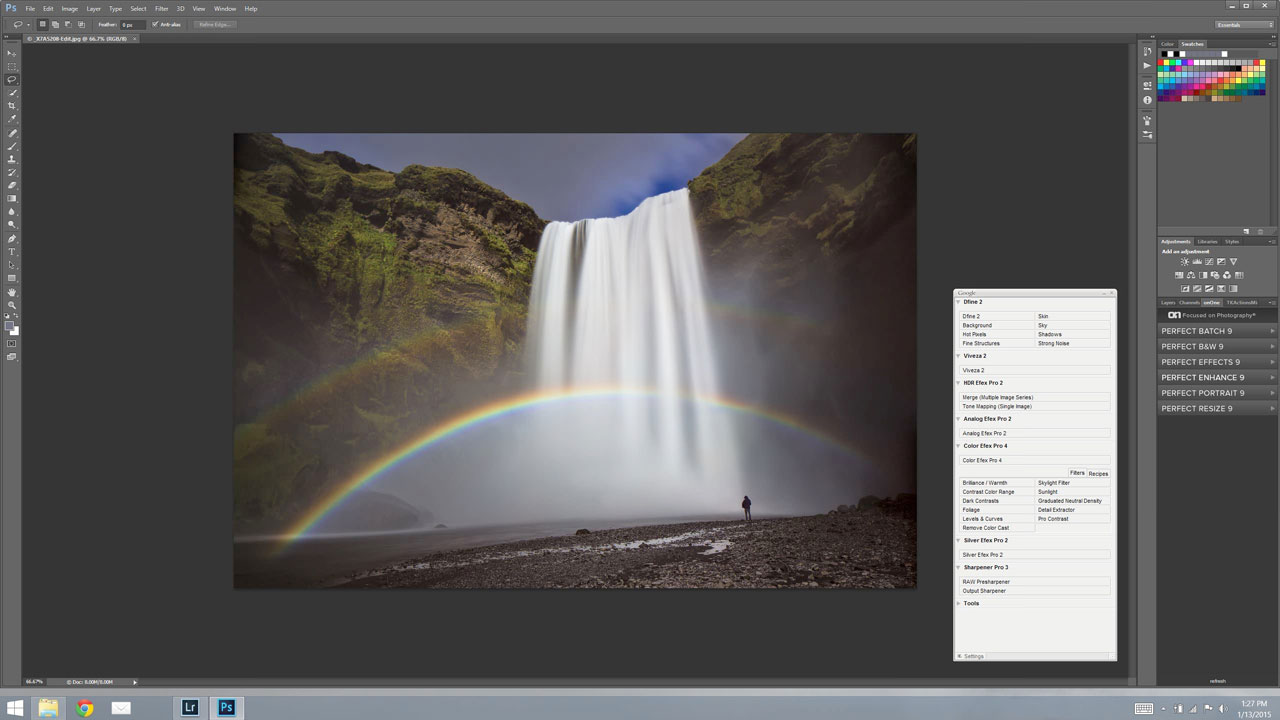
MHB 172S (detail) digitally penciled on the Wacom Cintiq Companion
The first potential solution to fulfill the need for a high powered, high resolution portable graphic tablet was provided by Wacom Co., Ltd. in 2013, shortly after the first edition of this book was released. In the past three years, the Epigraphic Survey has been extensively testing these machines on numerous different projects, assessing their advantages and shortcomings for digital drawing fieldwork.
The Wacom Cintiq Companion is a Windows tablet with a 13.3-inch high resolution display and Wacom’s well-known touchscreen/stylus combo with the same 2048 levels of pressure sensitivity as its larger siblings, such as the previously discussed Cintiq 22HD. Since the Cintiq Companion is a fully fledged Windows PC, it allows the artist to take a full version of the Photoshop software to the field. Therefore, one can set up a drawing canvas with all the necessary layers in publishing resolution (1200 dpi) and file format (tiff), and work with it in the same software environment using the same hardware from the first digital pencil strokes to its final, inked iteration.
The Wacom Cintiq Companion’s Technical Specifications:
At the time of writing, the device is already in its second generation. The Cintiq Companion has a 13.3-inch (33.8 cm) screen with 16.7 million displayable colors. While the first-generation screen has a rather low resolution of 1920 by 1080 pixels (full HD), in the second iteration of the tablet Wacom bumped up the pixel density to QHD (2560 x 1440 pixels), which provides much more accurate line placement for the artist.
Both generations of the Cintiq Companion have a battery life of 4-5 hours with typical use, which is 38% shorter than a typical tablet's battery life. One has to keep in mind that this is an average figure, and actual battery life largely depends on the strain a tablet is under at any given time. (Obviously working with high resolution multilayered drawings in Photoshop consumes a lot more energy than writing notes.)
The original Cintiq Companion is powered by a single core Intel Core i7 (3rd Generation) 3517U / 1.9 GHz system on a chip. Its clock speed is 3 GHz, which is much faster than average for a tablet processor. With 8 GB of RAM, it has plenty of memory for multi-tasking and running desktop applications, but it can be rather sluggish when dealing with large tiff files at 1200 dpi, which is the required resolution for the Survey’s work, even in the field. Naturally, the second generation of the tablet uses 4th and 5th generation Intel Core processors that are a lot more powerful and can be maximized with an Intel Core i7 (3.1GHz) processor, Intel Iris Graphics 6100, 512 GB solid state drive (SSD) and 16 GB of RAM. (Depending on budgetary considerations, it’s always recommended to aim for the most powerful model, therefore in this book the highest configuration of the second-generation Cintiq Companion is meant when referring to the Companion.)
Its weight is 1700 g / 3.75 lbs., and its overall dimensions are 374 x 248 x 15 mm (14.7 x 9.8 x 0.6 inches), which makes the device light and portable enough to be carried out and around the field.
Unlike the first-generation Companion (which comes in a version that runs Windows but can’t also be used as a regular tablet tethered to a Mac or PC), the Cintiq Companion 2 can be used at a desk as a graphics tablet for the artist’s regular computer, a feature that makes it a potential replacement for the Wacom Cintiq 22HD when it comes to inking. The budget conscious artist should take this useful feature under serious consideration when makes his/ her decision about purchasing equipment for digital epigraphy.
As we pointed out in the previous section, however, fieldwork has rather different demands than inking in the studio, so a certain level of customization is inevitable before one takes the Companion to the field.
Preparations for working with the Companion
Preparing the digital negative
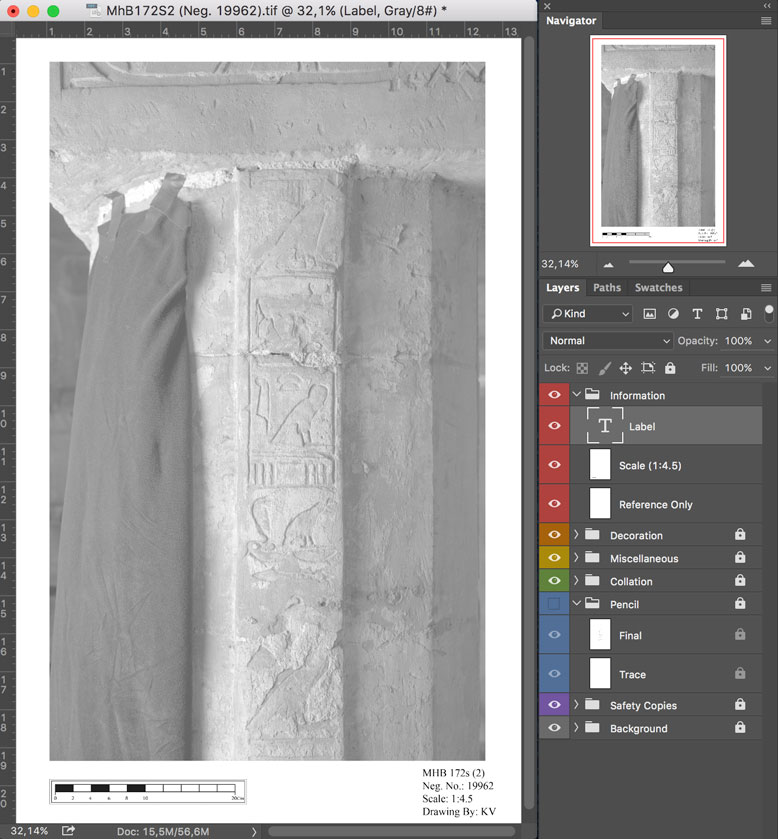
The Epigraphic Survey is very keen on avoiding any physical contact with the decorated surface, so the core technique is based on high resolution large format photographs as the basis for documentation. When penciling digitally, the artist receives a 1200 dpi scan of the negative for the wall section to be documented. This is basically a digital version of the traditional black and white photograph, such as has been used for penciling since the origins of the project. It has a high level of detail and accuracy, but it needs to be scaled and set up properly before it is ready for penciling. Setting up a digital file for fieldwork requires some preparation in advance. By working with standardized preset canvases built around the photograph, the artist is able to minimize the necessary preliminary work with the touchscreen interface.
Templates
To help the digital artist’s work in the field, the Epigraphic Survey invented digital templates, which are blank, transparent Photoshop canvases in variable scales, including each of the necessary layers on which the artist will need to work through all stages of the drawing process. In addition to the layers, a centimeter scale and a tool for checking the drawing’s measurements against the wall are also part of the package. As soon as the photographer prepares the proportionally accurate 1200 dpi digital tiff file, the artist imports the file into the appropriate template, where it becomes the main background layer. Before it can be penciled on, its size needs to be properly adjusted using the provided digital scale and the physical meter stick shown in each photo. Once the background is properly set up based on the template’s scale, the canvas can be cropped to minimize the overall file size. Before talking about the actual fieldwork, however, we should have a look at the field-specific customization options available in Adobe Photoshop.

Layer arrangement on a 1:4 digital drawing template
Software customization
Photoshop has evolved substantially since 2011, when Adobe adopted the subscription model and aggregated their collection of services under the name Creative Cloud (CC). It is no longer necessary for Adobe to update their software on a yearly cycle; instead, whenever there are new features ready to be added, they can update every user’s software remotely. Moreover, the 2014-2016 updates added many useful features and steadily improved the interface customization, making digital fieldwork much easier.
The most significant recent change is that Photoshop is now optimized for touch. Previously, Photoshop CC worked on touch devices — including the first Microsoft Windows tablets — but most of that support was limited to pressure sensitivity provided for the pen accessory. Now the icon’s size can be 200% larger, which is important when working on a high-resolution screen.

Photoshop UI upscaling at 200% (left) compared to 100% (right) shown on the Wacom Companion
Photoshop’s resolution used to change according to the resolution of the computer on which is was being used. It was already awkward to use the small buttons and icons on the first generation Wacom Companion (2014), but when Wacom doubled the second-generation Companion’s resolution in 2015, the variable resolution made the Photoshop software almost impossible to use.
Photoshop UI as it appears on the Wacom Companion 2 before any customization applied
When Adobe realized the situation, an upscaling mechanism was incorporated into Photoshop, which either automatically changes the size of the interface according to the machine or allows the artist to do it according to individual preference.
Fully customized Photoshop UI as it appears on the Wacom Companion
Windows OS settings
It should also be mentioned that it is possible to pinch and zoom and pan using the fingers on the touch screen. Users are now able to rotate images and objects, using the same rotation gestures that are common in iPad applications. Although the Survey’s Companion customizations for the field may need to be tweaked slightly from project to project, the core elements of the user interface are so significant that they must be explained in detail.
Since we are usually working with large files that require lots of computing power, the first step is to make sure the Companion is working at its highest performance settings (Control Panel/All Control Panel Items/Power Options).
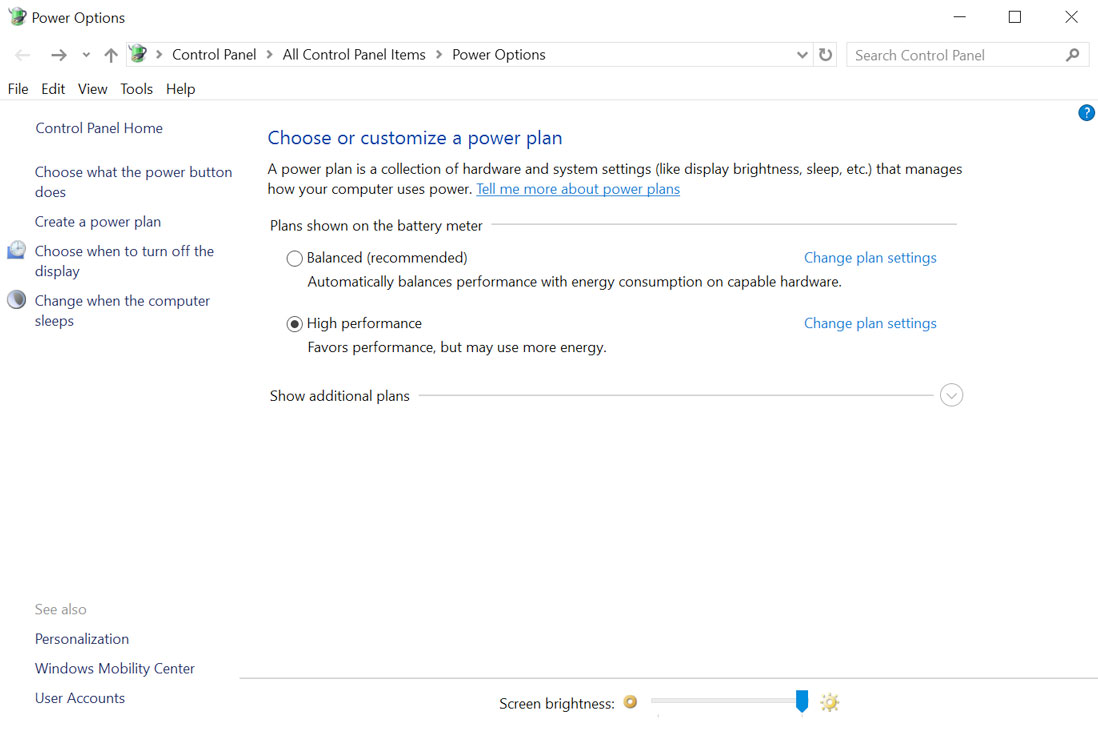
Power Options set up for High Performance in Windows 10
Although this setting compromises the battery life somewhat, this shouldn’t cause much concern as long as the Companion has a power source in the field. In the performance settings, one will find a further customization option for the sleep and display settings tab (Control Panel/All Control Panel Items/ Power Options/Edit Plan Settings).
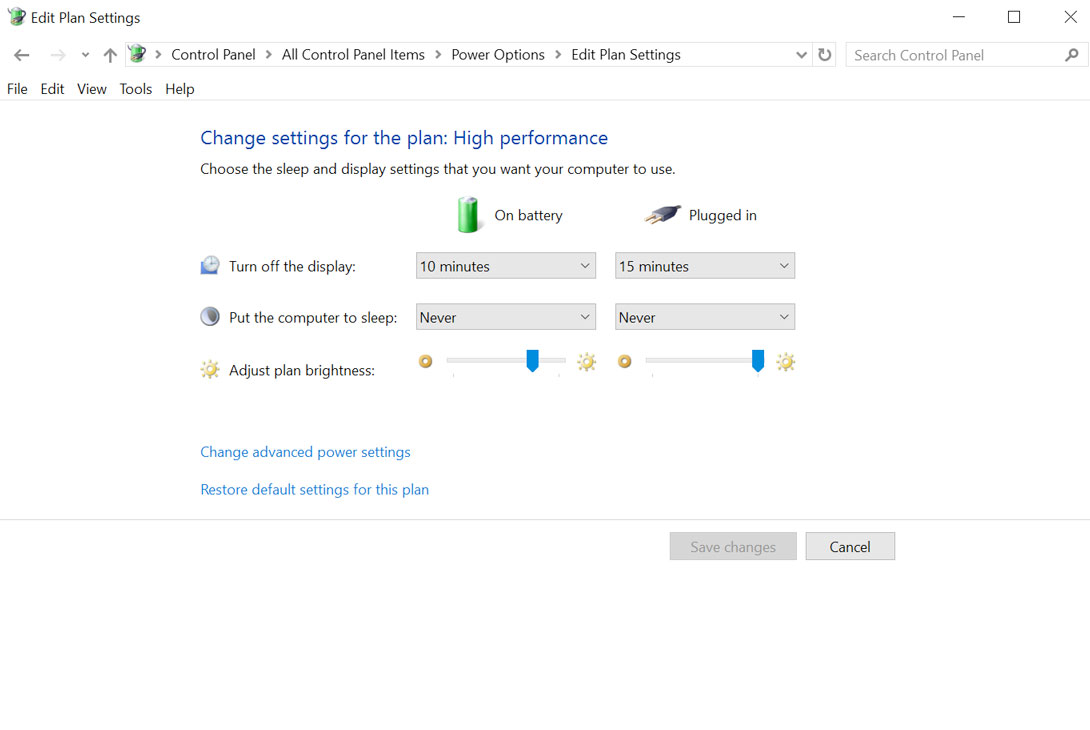
Sleep and Display settings for High Performance in Windows 10
Here one can choose how the Companion should respond when the artist is away from the computer. It is desirable to minimize screen time when the device is not immediately in use, while keeping the computer on and ready at short notice, but individual preferences may vary; the setting presented here may be used as a default.
The artist may find additional useful options under Windows’ Settings tab. One more relevant setting should be highlighted: under the “Display” tab, it is possible to disable display rotation and automatic brightness adjustments. Although they could be useful in some situations, both can be very distracting features when one is seriously focused on a drawing.
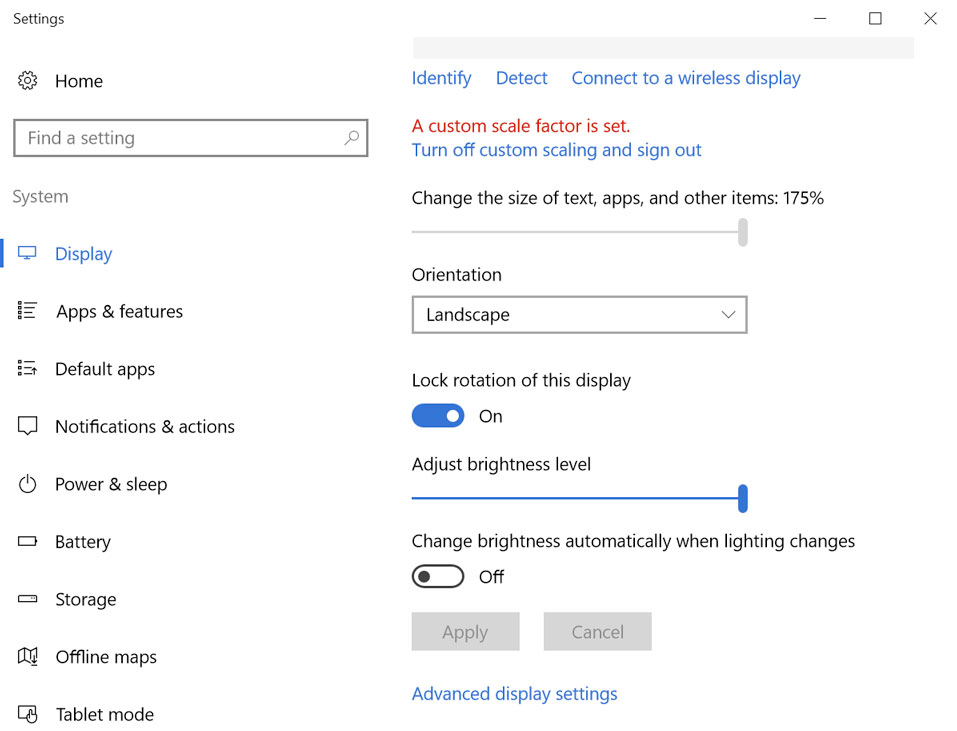
Disabling automatic display rotation and brightness in Settings
Workspace customization
As we move towards the customization of the workspace, it is worth mentioning that keeping the Companion’s file and folder system, and specifically its desktop, clean and well organized is one of the key elements of successful fieldwork. One arrangement that proved suitable for the Survey’s fieldwork is shown below:
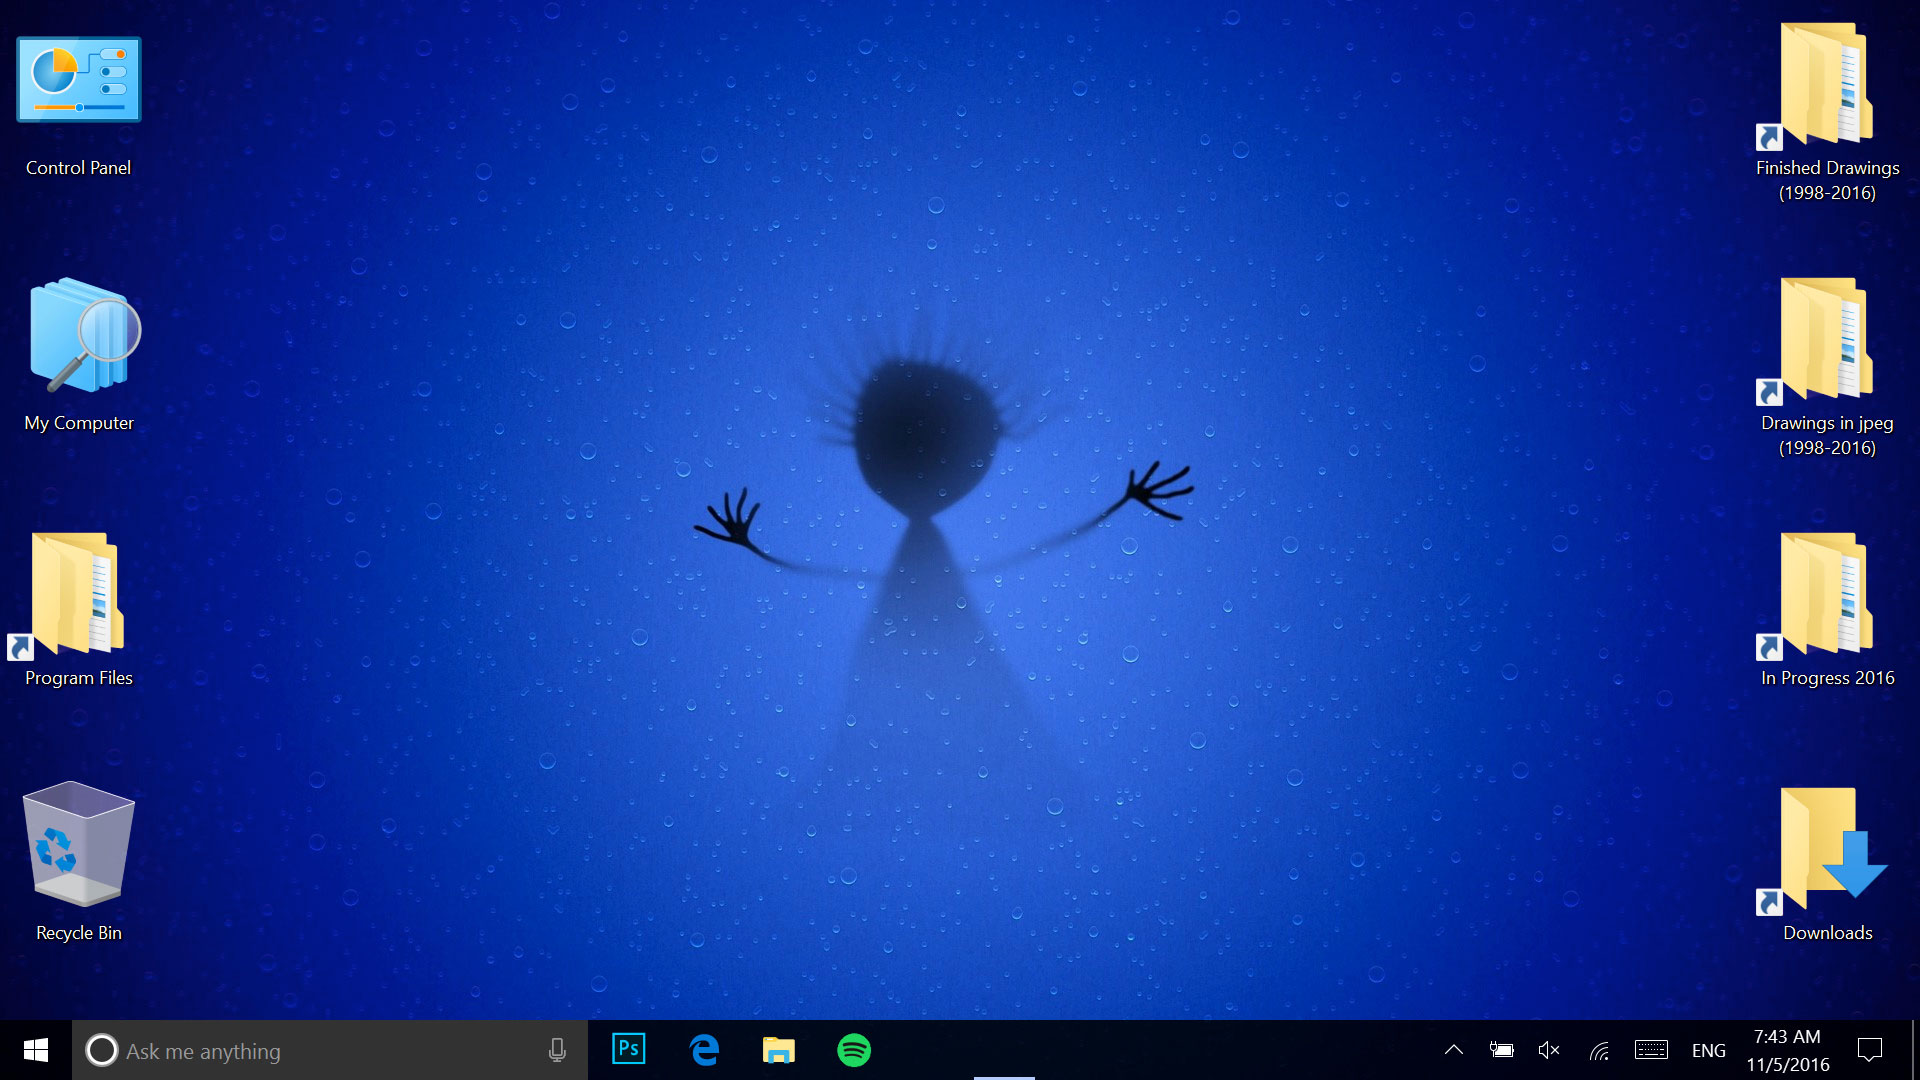
Companion applications and essential folders as they appear on the Desktop
As can be seen, the icons are upscaled to their largest possible apparent size (Right Click on desktop/View/Large icons) to provide quick and easy access to certain settings and folders. On the left, there is a shortcut to the Control Panel to adjust computer settings. The My Computer shortcut is a direct link to the most important folders, devices, and drives. The Program Files shortcut takes us to the folder in which applications that are not part of the operating system are conventionally installed. Finally, it is most advisable to have the Recycle Bin located on the desktop.
![]()
Enlarging the icons by modifying the Icon View
On the right side of the Desktop, one can get quick access to the most frequently used folders via shortcuts. Finished Drawings contains all the artwork from previous projects that have been through the entire documentation process and are in their final form. This is either stored locally or using external storage. Keeping them available in the field allows the artist to stay consistent with regard to method and conventions and allows cross-referencing when needed. Drawings in jpeg, as its name indicates, is a folder with a lightweight version of each drawing from the Finished Drawings folder. Full size digital images can be unwieldy for field reference, so reduced-size jpeg versions are essential for reference during fieldwork. In Progress (‘appropriate year’) is a folder containing the current season’s drawings that are being worked on in the field and are in some stage of completion. Finally, there is a shortcut to the Download folder as well, since it is commonly used for accessing shared files (there will be a much more thorough explanation of file sharing in Section 4).
Photoshop customization
Regarding customization of Photoshop, there are some fieldwork-specific changes to be considered in comparison with our regular studio workspace. Thorough magnifying and prioritizing of icons and panels will help the artist engage with his/her work and focus on drawing. Creating the right workspace for fieldwork depends on the nature of the project and can be tailored to the artist’s individual needs and preferences. The arrangement that is discussed below is based on the Survey’s traditional epigraphic work and serves as a general guideline for such settings.
There are simple customizations to consider, such as changing the software’s appearance to a dark color theme (Edit/Preferences/Interface/Color Theme) to achieve more contrast in direct sunlight.
One should maximize both font size and Photoshop’s user interface as well (Edit/Preferences/Interface/Text/UI Font Size/Large and Edit/Preferences/Interface/Text/UI Scaling/200%). There is one more basic setting that can be tweaked to magnify interface elements by modifying the Tab size (Edit/Preferences/Workspace/Large Tabs), which should be checked before moving on to more time-consuming changes.
Custom Brush Set - the specific set that is used exclusively in the field, mostly containing pressure sensitive brushes, dotted and dashed brush strokes related to the actual scale and resolution for digital penciling (a more detailed description of these brushes will be given later in this section).
Custom Tool Set- in the latest version of Photoshop CC, the option for a deeper customization of the interface is available for the user. Now the artist can determine which tools should be represented on the toolbar, even the ones that are usually hidden in subfolders behind the main toolset (Edit/Toolbar).
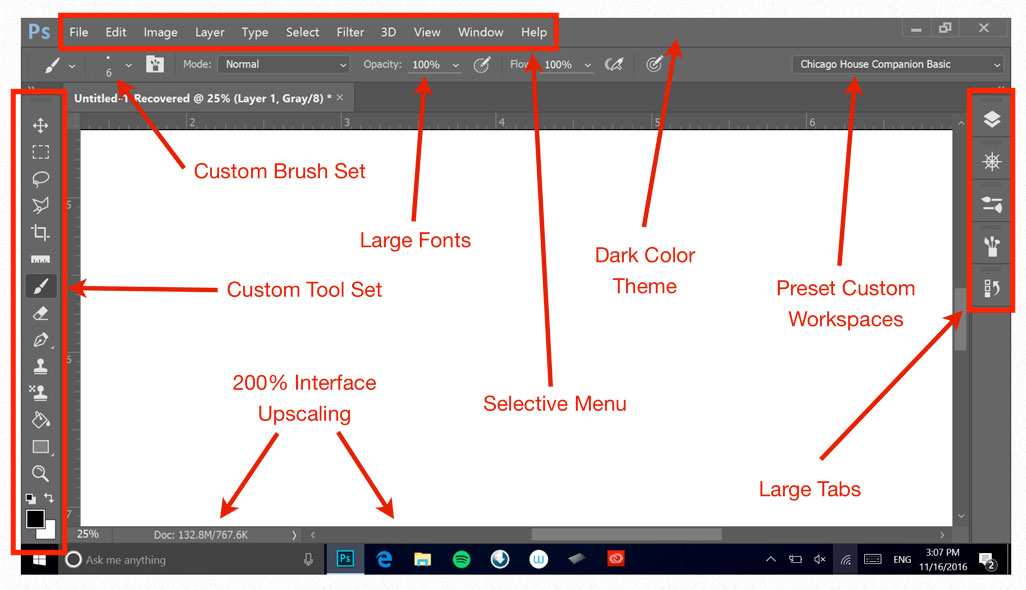
The main attributes of Photoshop customization regarding field work
This prioritization is advantageous in the field, not only reducing the artist’s toolset to give a minimal footprint on the canvas, but also by creating specific toolsets for individual field projects. The set can be determined by dragging tools in and out between the two columns, where the left half represents the tools that appear on the canvas. The Epigraphic Survey has the following basic tools as its field set:
- Select, Measure and Crop Section - Move Tool, Rectangular Marque Tool, Lasso Tool, Polygonal Lasso Tool, Crop Tool, Ruler Tool
- Drawing Section - Brush Tool, Eraser Tool, Pen Tool and its subfolder tools
- Texture Section - Clone Stamp Tool, Pattern Stamp Tool
- Shape Section - Rectangle Tool and its subfolder tools
- Extras Section - Zoom Tool, Show and Switch Foreground/Background Tool
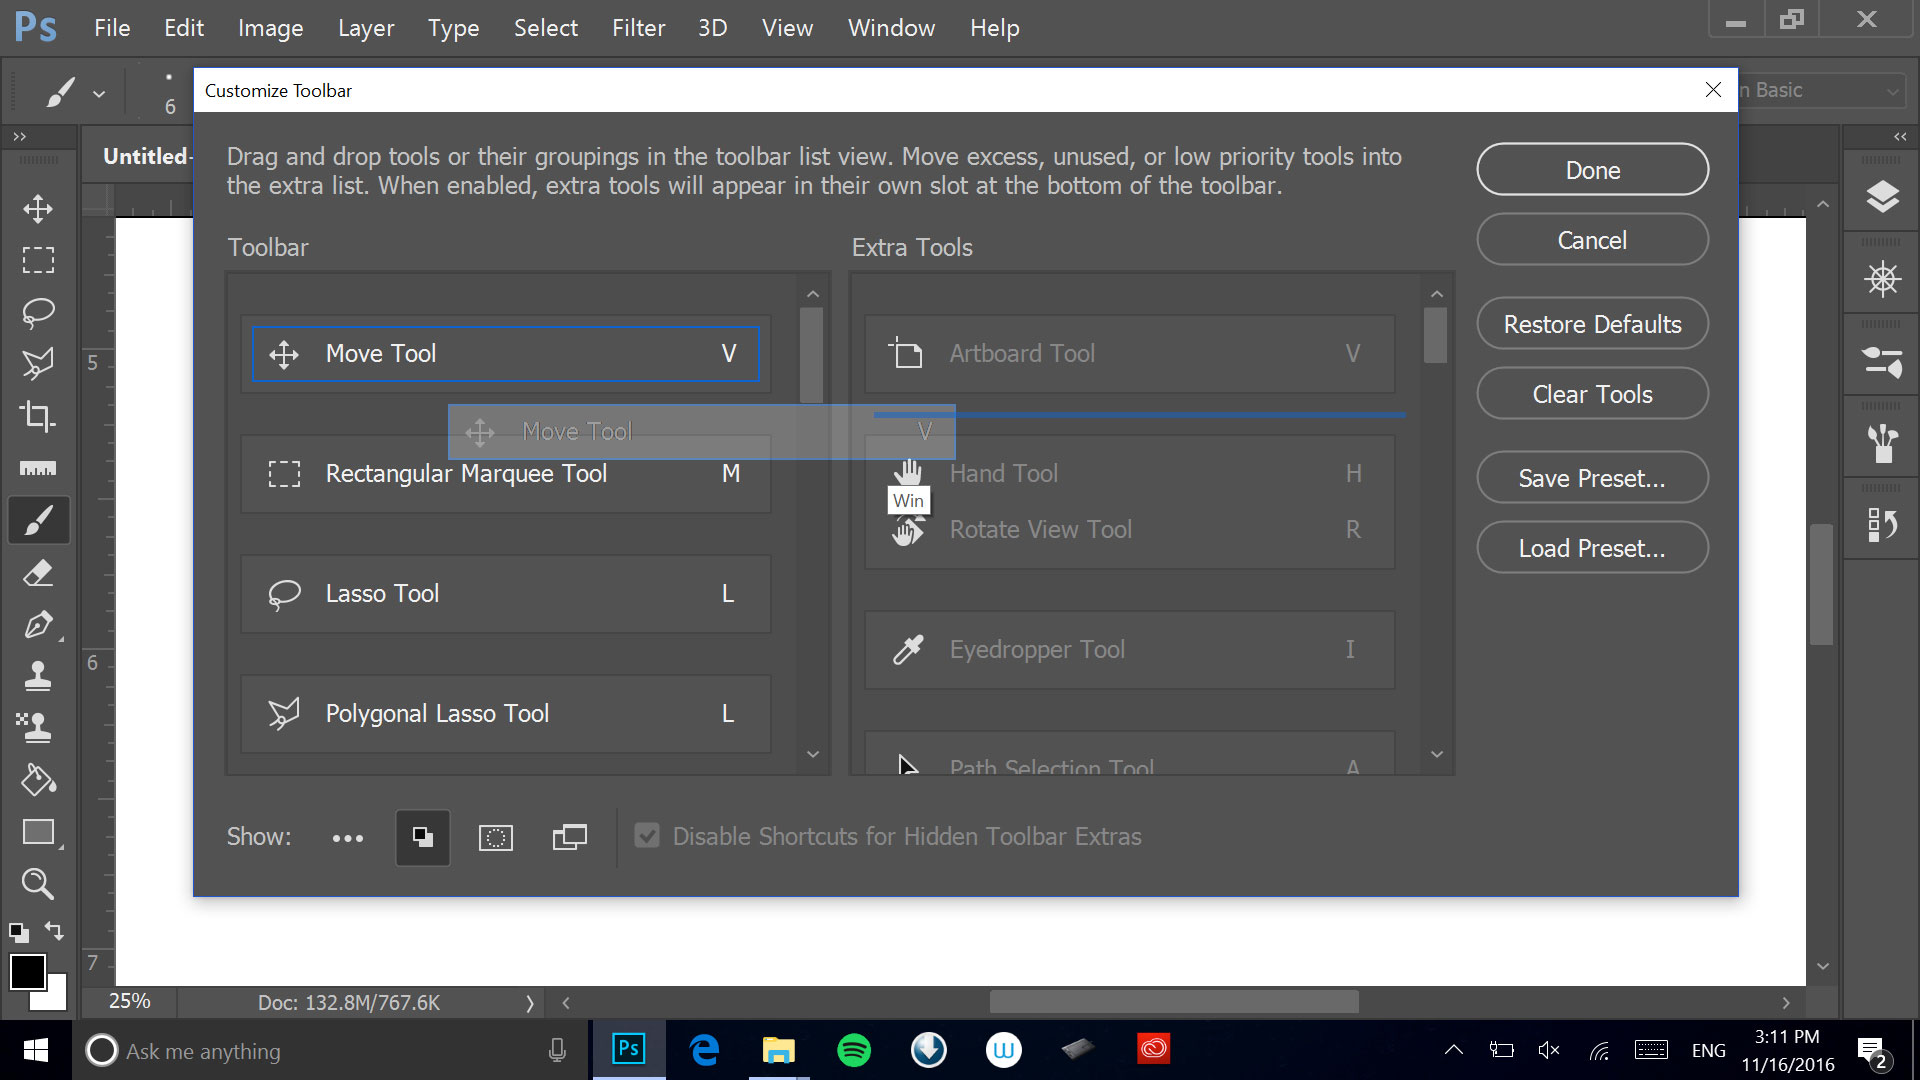
Customizing Toolbar elements in Photoshop CC
Once the artist determines the appropriate Tool Preset for a specific field project, there is an option to save this Tool Preset, so it can be replaced and reapplied when necessary.
Selective Menu Items- in a similar manner, the artist can now hide certain Application and Panel Menu commands (Edit/Menu) by unchecking the eye icon in the little box next to each command. It is up to the artist to decide how much decluttering of the interface should be done by hiding the commands that are never or very rarely used in the field. Keep in mind that the commands are not deleted, only hidden, and they can be recalled at any time by hitting the Show All Menu Items command at the bottom of each Menu.
Again, once the artist is satisfied with the customized settings, this specific arrangement can be saved either to the current set or to an entirely new set, which can be created and loaded when necessary. Furthermore, any command can be highlighted by adding a color panel behind it, providing yet another tool to simplify and rationalize Photoshop’s architecture for the field.
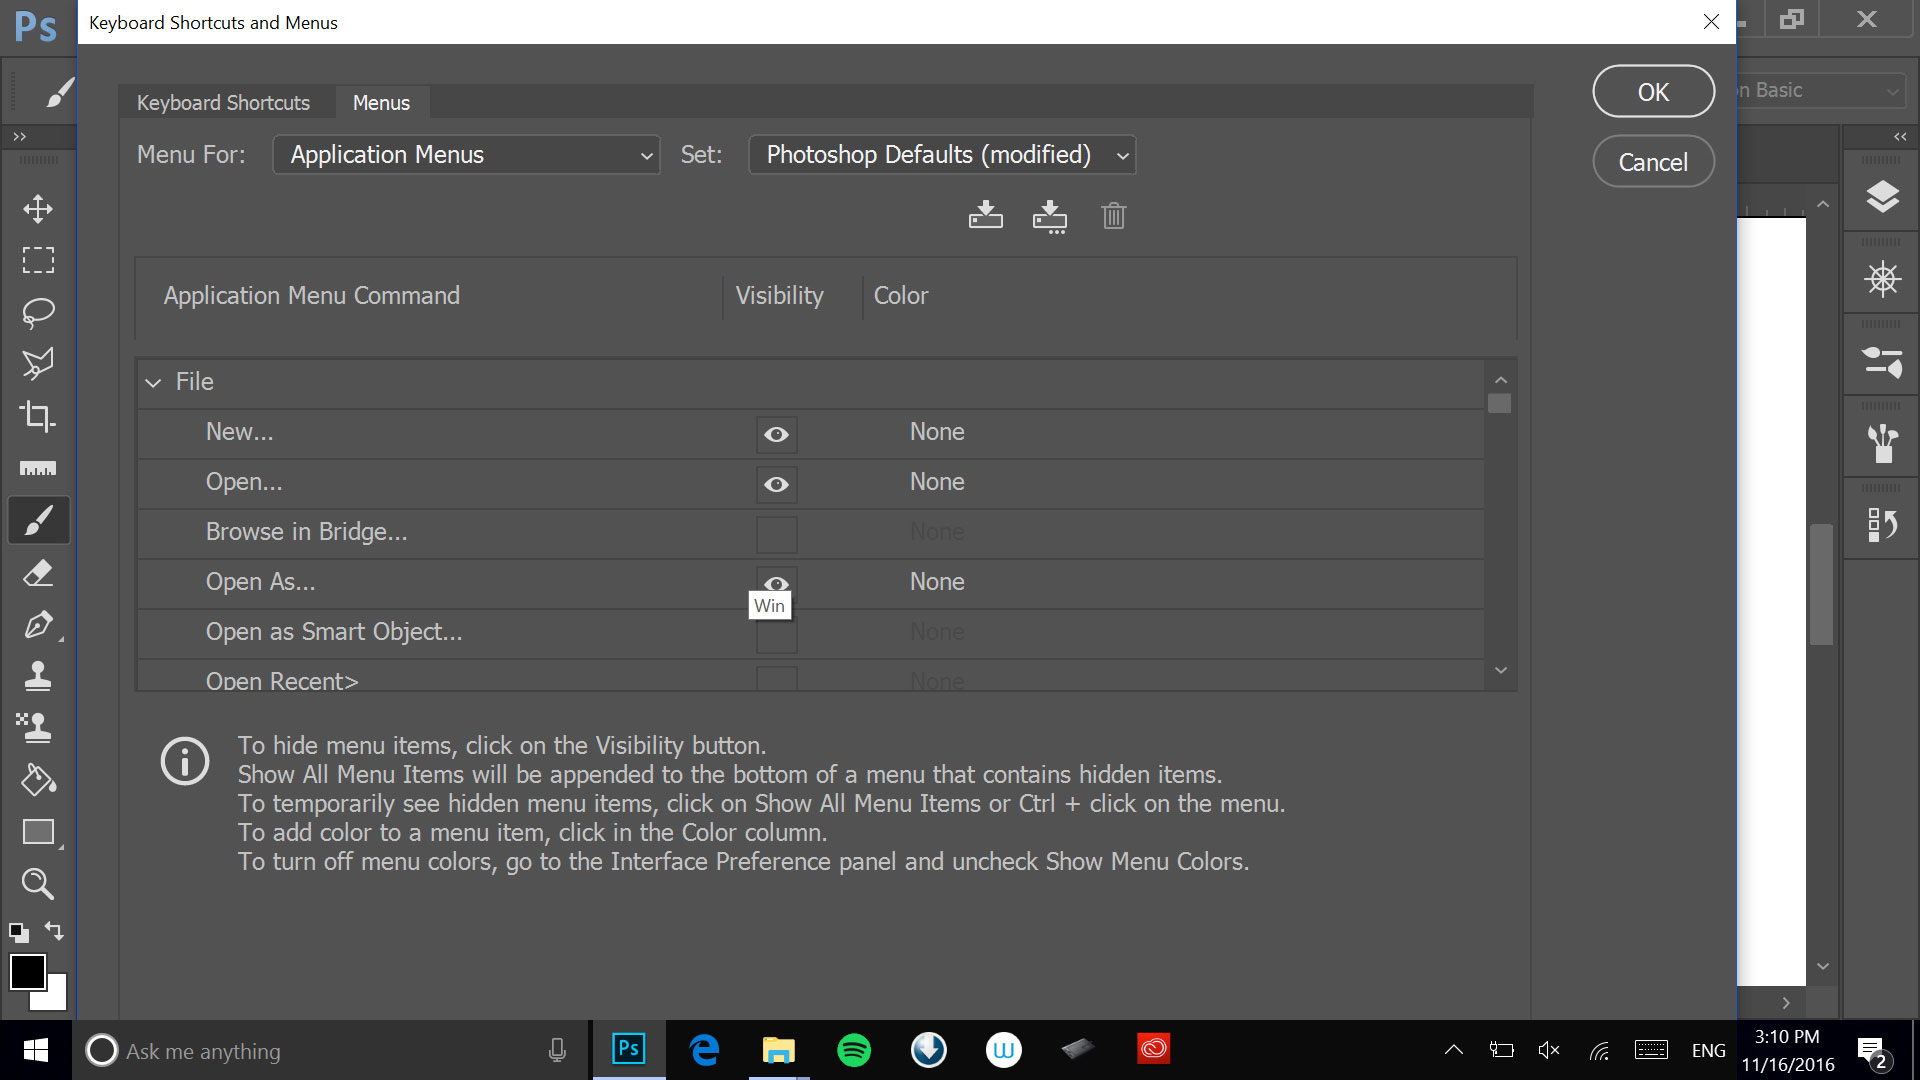
Customizong the Application Menus in Photoshop CC
The Cintiq Companion in the field
With Wacom’s Companion, it is possible to use a digital photograph instead of a printed enlargement for the drawing background, “penciling” directly onto the digital image in the presence of the inscribed wall surface. There are, however, a couple of initial issues to be addressed with this new technique:
- The tablet needs to be secured at the wall, but at the same time the artist must be able to perform the usual rotation of the surface and bending movements. Due to the tablet’s size and narrow bezel, it needs to be inserted into some kind of wooden frame to give the necessary support to the artist’s arms. Although the first experiments with this technique on the tablet were made simply by putting it on a regular drawing board, afterwards a special drawing case was designed and produced to accommodate the device.
- Additionally, the digital brush must imitate the feel of an actual technical pencil on paper, allowing the artist to search for the right curve by going over and over the same area and gently building up the penciled lines. To address this issue, a new pressure-sensitive brush type was designed specifically for digital penciling, allowing the artist to perform very light, almost invisible strokes with the brush.
Creating a Companion Drawing Case
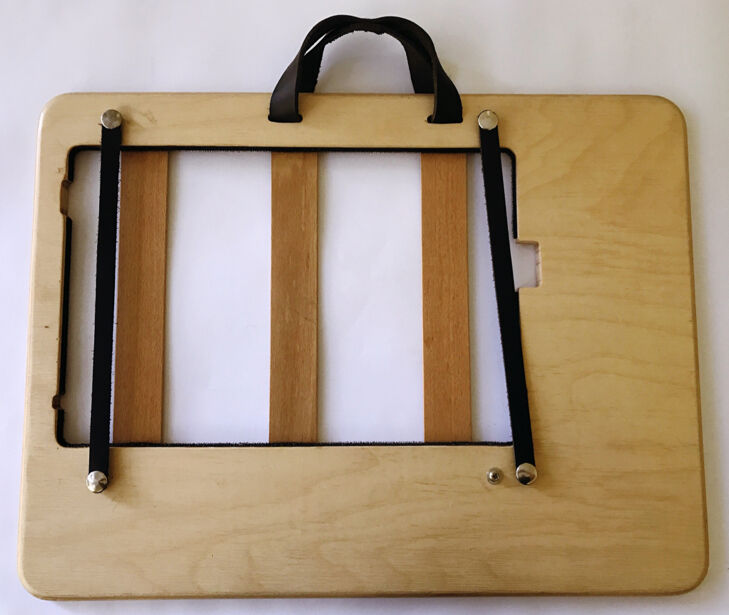
(1) The Companion sits securely in a cutout that also provides optimum ventilation while creating a continuous flat surface.
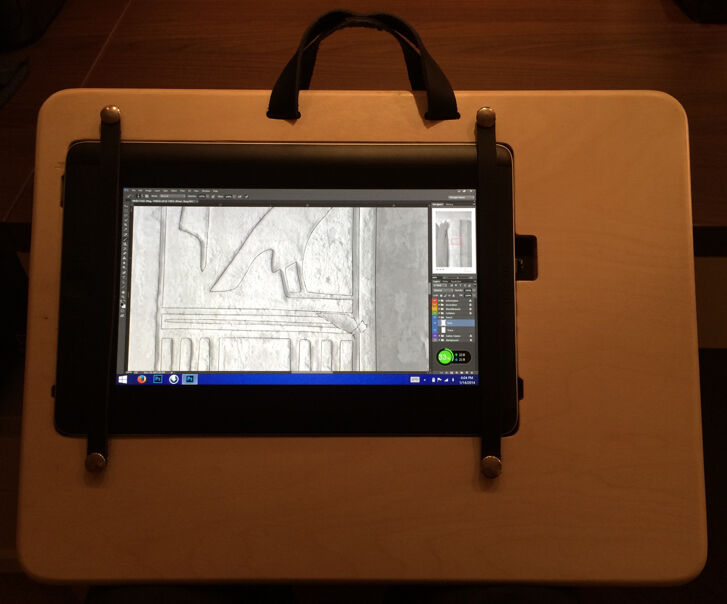
(2) The tablet is secured by removable leather straps. The asymmetrical arrangement provides room for the artist’s elbow while drawing.
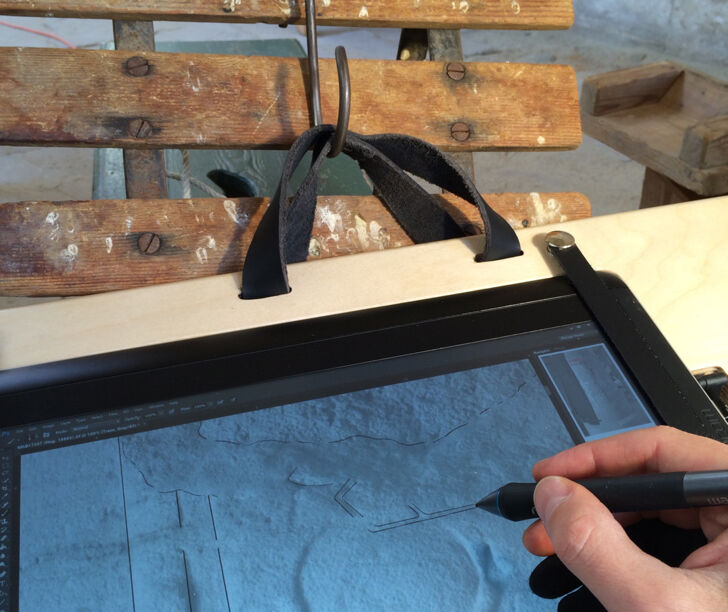
(3) The case can be attached to a metal hook by its leather handles, providing the correct angle for drawing while remaining horizontally adjustable.
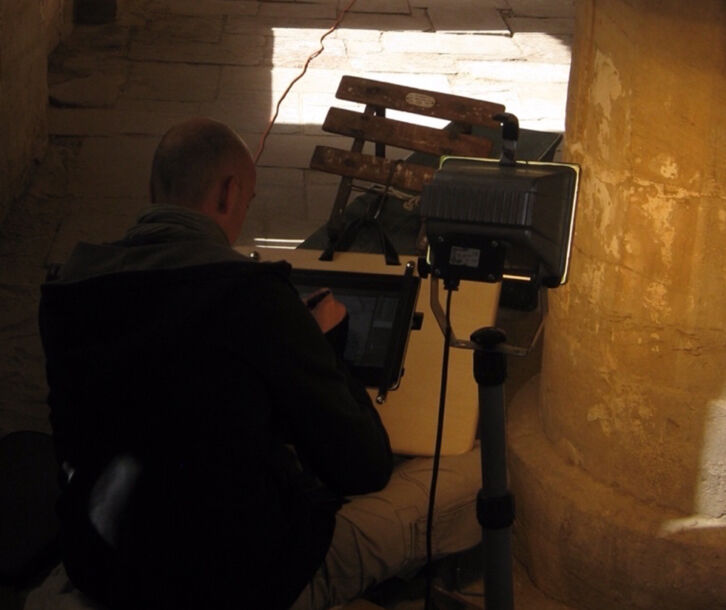
(4) Overall the digital “penciling” experience remains very close to working on an actual photographic enlargement on regular drawing board.
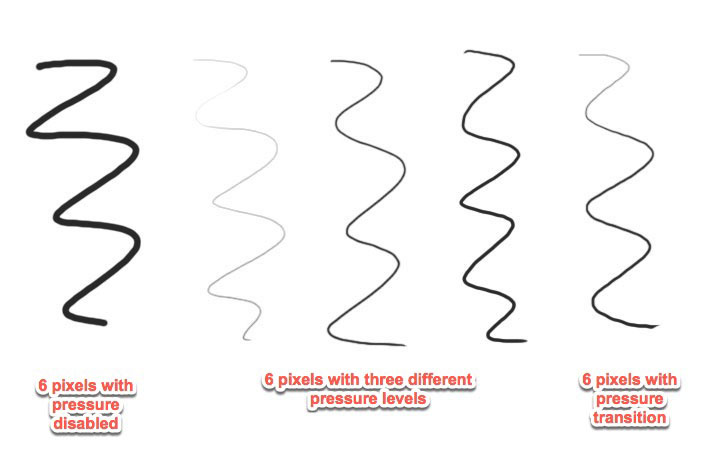
Changes in line weights when adding pressure
There are many different ways to imitate pencil in Photoshop, from texture-based strokes to using erodible brush tips. Our choice at Chicago House was aimed at simplicity and effectiveness. Every artist’s penciling style is obviously different, but one thing is common to all: the artist has to search for the right curve (i.e., the correct rendering of the inscribed line) before putting down the final version. The pressure-sensitive brush helps by using fine transitions and imitates the way in which the artist applies the same strokes on paper.
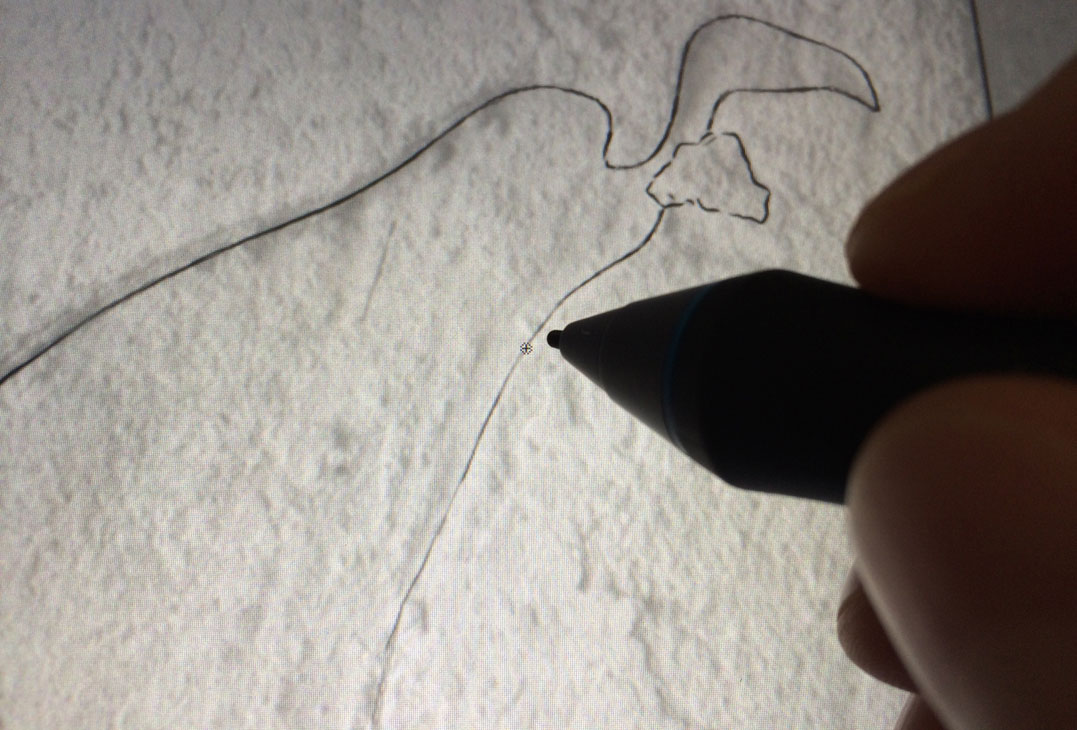
Searching for the right curve with the Brush Tool
Although erasing on the surface can be relatively straightforward, sometimes one just wants to make the “pencil” line a little thinner, a little straighter, or somewhat less wiggly. In these cases, using a soft eraser (Hardness at 50%) helps a great deal to improve the line quality.
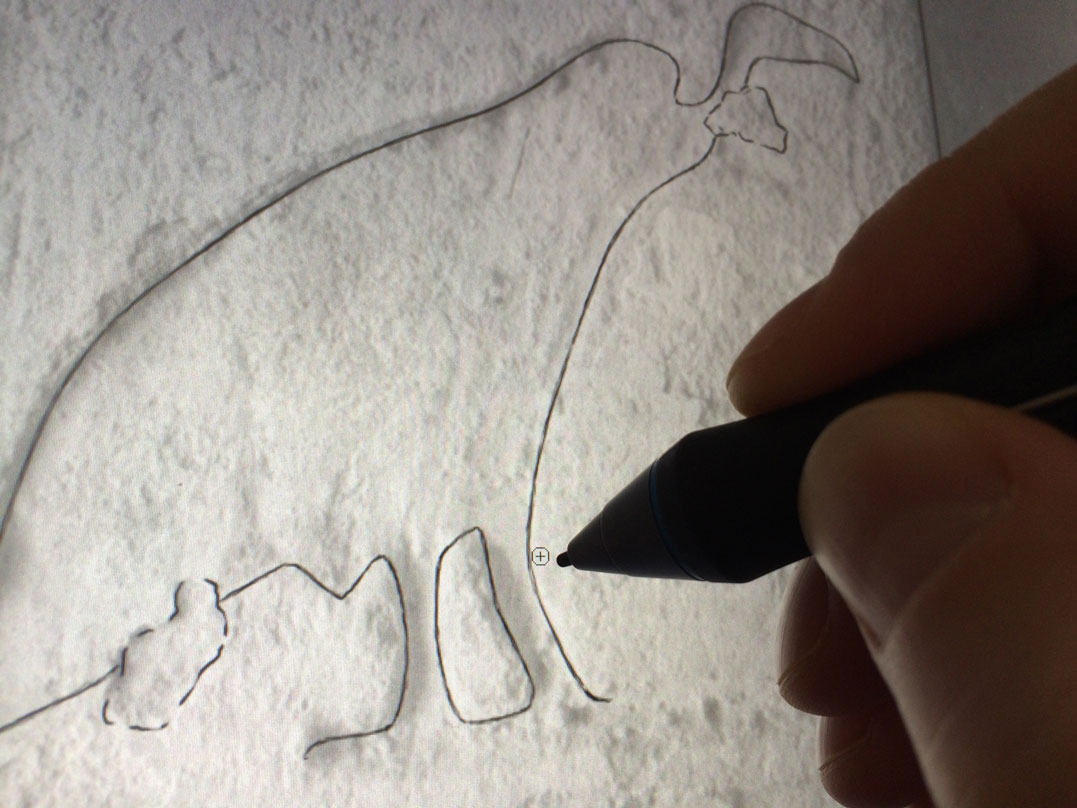
Using a "soft" eraser for refining edges
Finally, there are the usual technical aids when penciling: by holding down Shift we can draw straight lines and, by selecting certain areas, we can move line sections or perform the usual transformations, as described earlier in this Manual. Sometimes setting up work paths as guides when testing out where to put the pencil lines can also be useful.
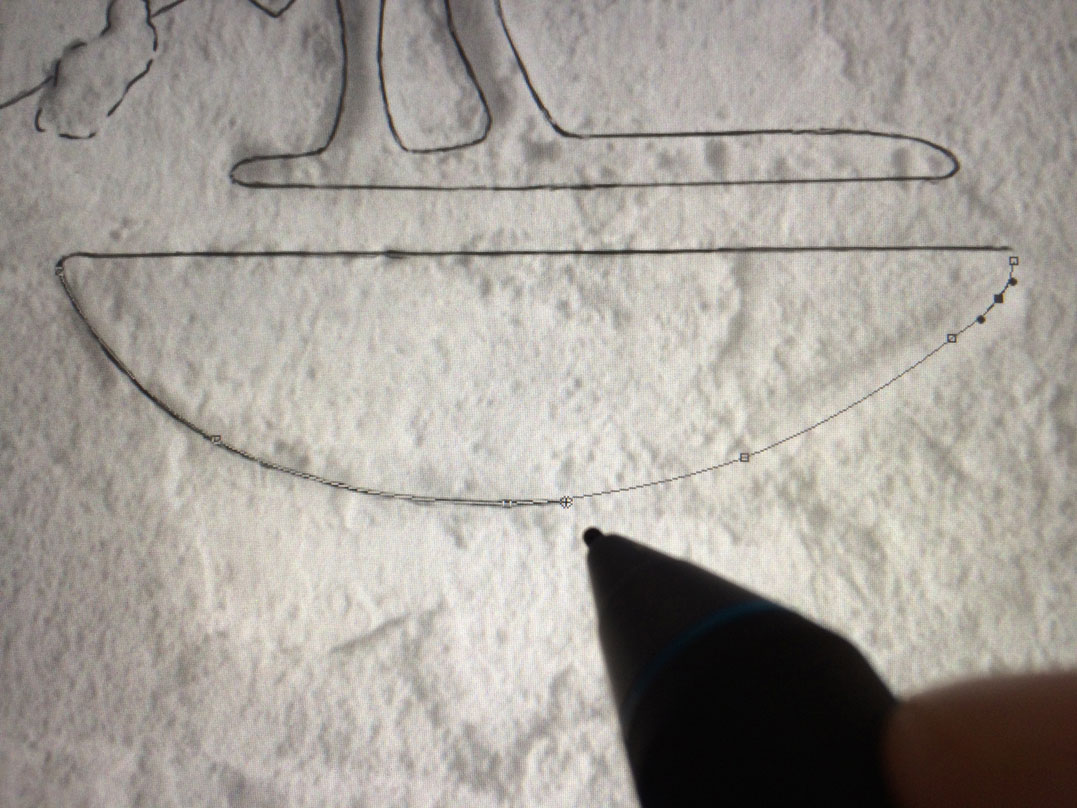
Work path indicating pencil line placement
Once the basic penciling technique is mastered and the artist is satisfied with the tablet’s setup at the wall, it is necessary to perform a measurement check in order to determine if the digital background is at the correct scale and is undistorted. A simple cross-referenced sequence of measurements is performed at the wall. This formula was invented for traditional enlargements, and it is used for the digital checking in the same manner. The measurement sheet is part of the Template, found among the Information Layers in the Reference Only folder, labeled as Scale Measurements. The artist simply writes by hand on the layer, and it becomes part of the overall package.

MHB 172S Scale Measurement for Drawing waiting to be filled with numbers
There are many individual preferences and tricks one develops during fieldwork that can work in a similar manner when penciling digitally. Certain modifications that take a lot of time to apply on paper, such as slightly repositioning a penciled feature, adding subtle changes to a curved line, or simply relating features to each other, are easily made in Photoshop. While getting used to drawing on a glass surface with a gap between the pencil tip and the actual line takes getting used to, being able to distinguish and sort out different types of information and being able to work in the same environment wherein the pencil drawing is being inked is worth the compromise. Nevertheless, there are cases when it is not necessary to have a fully functional, bulky computer on site, and for those occasions we have to examine a very different approach to digital epigraphy: working on the iPad Pro.
MHB 172S ready for penciling
0 comment(s)
Leave a comment(We'll keep your email address private)