
Photoshop, dragged down by lackluster features, finally arrives to the iPad – Hands-on with Adobe’s long-awaited creative tool

Brush was among the first batch of desktop tool sets implemented on the iPad
Adobe Photoshop for the iPad is finally available as a free download through Apple’s App Store. When we started exactly a year ago, one of the first news blurbs on the digitalEPIGRAPHY website reported on Adobe’s grand announcement about bringing a full-fledged “real” Photoshop to the iPad. We couldn’t hide our excitement about the possibilities a desktop quality Photoshop application would mean for the Epigraphic Survey’s digital workflow. During the past year - somewhat cautiously - we were repeatedly reminded that in Adobe’s terminology “real Photoshop” doesn’t necessarily mean “full Photoshop”. Nonetheless, for the iPad version, we still hoped for Adobe to present a solid set of tools and features wrapped in a touch-friendly UI that could eventually function as a do-it-all core software tool for digital epigraphy.
Now, more than a year after the announcement, the app was released to an overwhelming amount of negative reviews. The first signs that Adobe might not deliver on its promises came from Bloomberg’s report, revealing that beta testers were disappointed with Photoshop for iPad’s limited toolset, features and functionality. Back in May, when public beta-testing of the app started, we had already heard rumors about the iPad version losing the Menu bar with the drop-down menus in favor of a collapsible right-side toolbar. Although accommodating such a radical UI change seemingly proposed a challenge even for seasoned Photoshop users, we’d have gladly accepted these changes in return for having all the tools we needed for digital documentation right at our fingertips. After trying out the iPad version in the past weeks, we don’t feel the desire to abandon the Survey’s well-established solutions just yet. Nevertheless, we’d like to share our first impressions getting around the interface and working with Photoshop on the iPad.

Cloud based file sharing is one of the most forward-thinking features built in Photoshop for the iPad
The welcome screen on the iPad is remarkably similar to the desktop experience, however the resemblances end upon opening any of your previous works from the cloud, importing a photo or file from the usual sources or setting up a blank canvas. During our test, we could easily set up a 20x16 Inch (the Survey’s maximum photo enlargement size) 1200 dpi canvas without any hiccups. Although there are some customization options on this panel, it’s worth noting that right now only RGB 8-bit canvas mode is supported by the app, which is an unnecessary overkill if you work in greyscale. When inking in the studio, all work is done at 1200 dpi, therefore for the iPad to be considered as a serious contender for the studio, it must be able to handle this environment. We’d like to praise Adobe’s approach here, using the same source code for both their desktop and mobile apps. On the desktop, Photoshop limits document size at 300000 x 300000 pixels (with 10 levels of group hierarchy, and layer number is maximized at 8000), which would consume 250GB of RAM to create – an obvious overstretch for even the most powerful hardware. What sharing the source code means for the iPad is that canvas size on Apple’s tablet is only limited by the amount of available graphics memory (RAM). A mere 10 years after its creation, working on an iPad with a 1200 dpi multilayered PSD file has become a reality. Obviously, photos can be imported from the iPad’s Camera Roll or directly from the Camera as well, while PSD projects can be picked up directly from the computer, thanks to cloud-based saving. Working offline is not a problem either as files are re-synced over Creative Cloud when back online. We have to agree that Adobe’s Cloud Documents is an excellent answer to cross-platform sharing and one of the app’s most welcome features.

One must click around blindly to find the tools needed for changing basic layer attributes
After opening a document, you’ll find yourself on a completely reimagined Photoshop interface. At first, Adobe’s mobile workflow looks positively barebones in comparison with the desktop experience, with only very few tools where you expect them to be. Without the optional pop-up descriptors accessible on the desktop version, we often find ourselves randomly clicking unfamiliar icons to see what happens. We understand and have tremendous respect for Adobe’s attempt to design a UI for smaller screens. Maximizing canvas size without compromising on usability while optimizing for touch and pencil is not a small feature to achieve. With that said, we would still happily exchange this minimal UI to the familiar, unaltered desktop interface provided by Astropad Studio. The developers at Adobe must have expected a certain degree of confusion as well, since a ‘help’ section was included in the top-right corner, containing a fair number of tutorials and shortcuts animations. To its left you’ll find the export button, which allows you to save your document as a PNG, JPEG, PSD or TIFF. Again, there is next to no customization provided here with no option to save your preferred presets.

The usual Layers options are all present on the iPad, but some tools are tucked away in submenus

For UI comparison, this is the desktop version of Photoshop tethered to the iPad via Astropad Studio
When it comes to features, we can’t help but keep going back to the desktop version for comparison. Naturally, the Layers tab has a prominent spot on the right. It can be either fully visible or, alternatively, layers can be presented in a space-saving compact mode while still allowing access to many common features via gestures. Layers can be reordered, renamed, moved, resized and transformed just like on the desktop version. Luckily, Photoshop’s Adjustment layers, our essential tool for making substantial changes to photographic drawing backgrounds, weren’t left out. However, instead of having the full set, Adobe selected the most commonly used options to include here. Currently only bitmap masking is supported with the option to clip layers to other layers and groups. It still means that many of the standard masking techniques used for photo modifications and illustration are mostly covered in the mobile version. Although basic selections (including feathering options) are present, we have to wait for a future update to access advanced features, such as automated selections and selection refinements or - for that matter – to save selections. When it comes to transformations, a wide collection of both content and selection modifications are available; scaling, rotating, distorting (warp is currently not included) or adding perspective to certain parts of a drawing shouldn’t be a problem. In case you’d like to add labels and shading to your drawings, basic text (in any color and custom font) and gradients (only linear gradients are supported using the foreground and background colors) options are also present. Clicking further around, we are constantly reassured that there is more coming in the future. Many features, such as Effects or Smart filters already have a placeholder but currently labeled as “Not yet supported on this device”.
When cycling through the features that are already present in version 1.0, the very apparent trend is that for every tool that made the first cut, there are a fair number of tools that didn’t, making the whole experience rather frustrating. Longtime Photoshop tools and features that many of us rely on are completely missing, including the Pen tool (which is critical for precise inking), image filters, Shapes, advanced masking options, the Curves tool, brush libraries etc. There's no way to rotate the entire document if you want to change it to landscape view instead of portrait. You can't set crop aspect ratios. There are no alignment tools. There's no easy way to import another Photoshop file. There are no swatches to save hues for consistency. You can only use a limited set of touch shortcuts unless you happen to have an iPad-friendly keyboard that allows you to apply some of the standard Photoshop shortcuts. Gesture interaction is limited to undo, redo, zoom and pan or double tap to zoom out. The feature that stands out is the Touch shortcut, which is displayed as a translucent circle on the canvas working similarly to the Shift or Command key, letting you switch between different tools without having to go back to the toolbar.
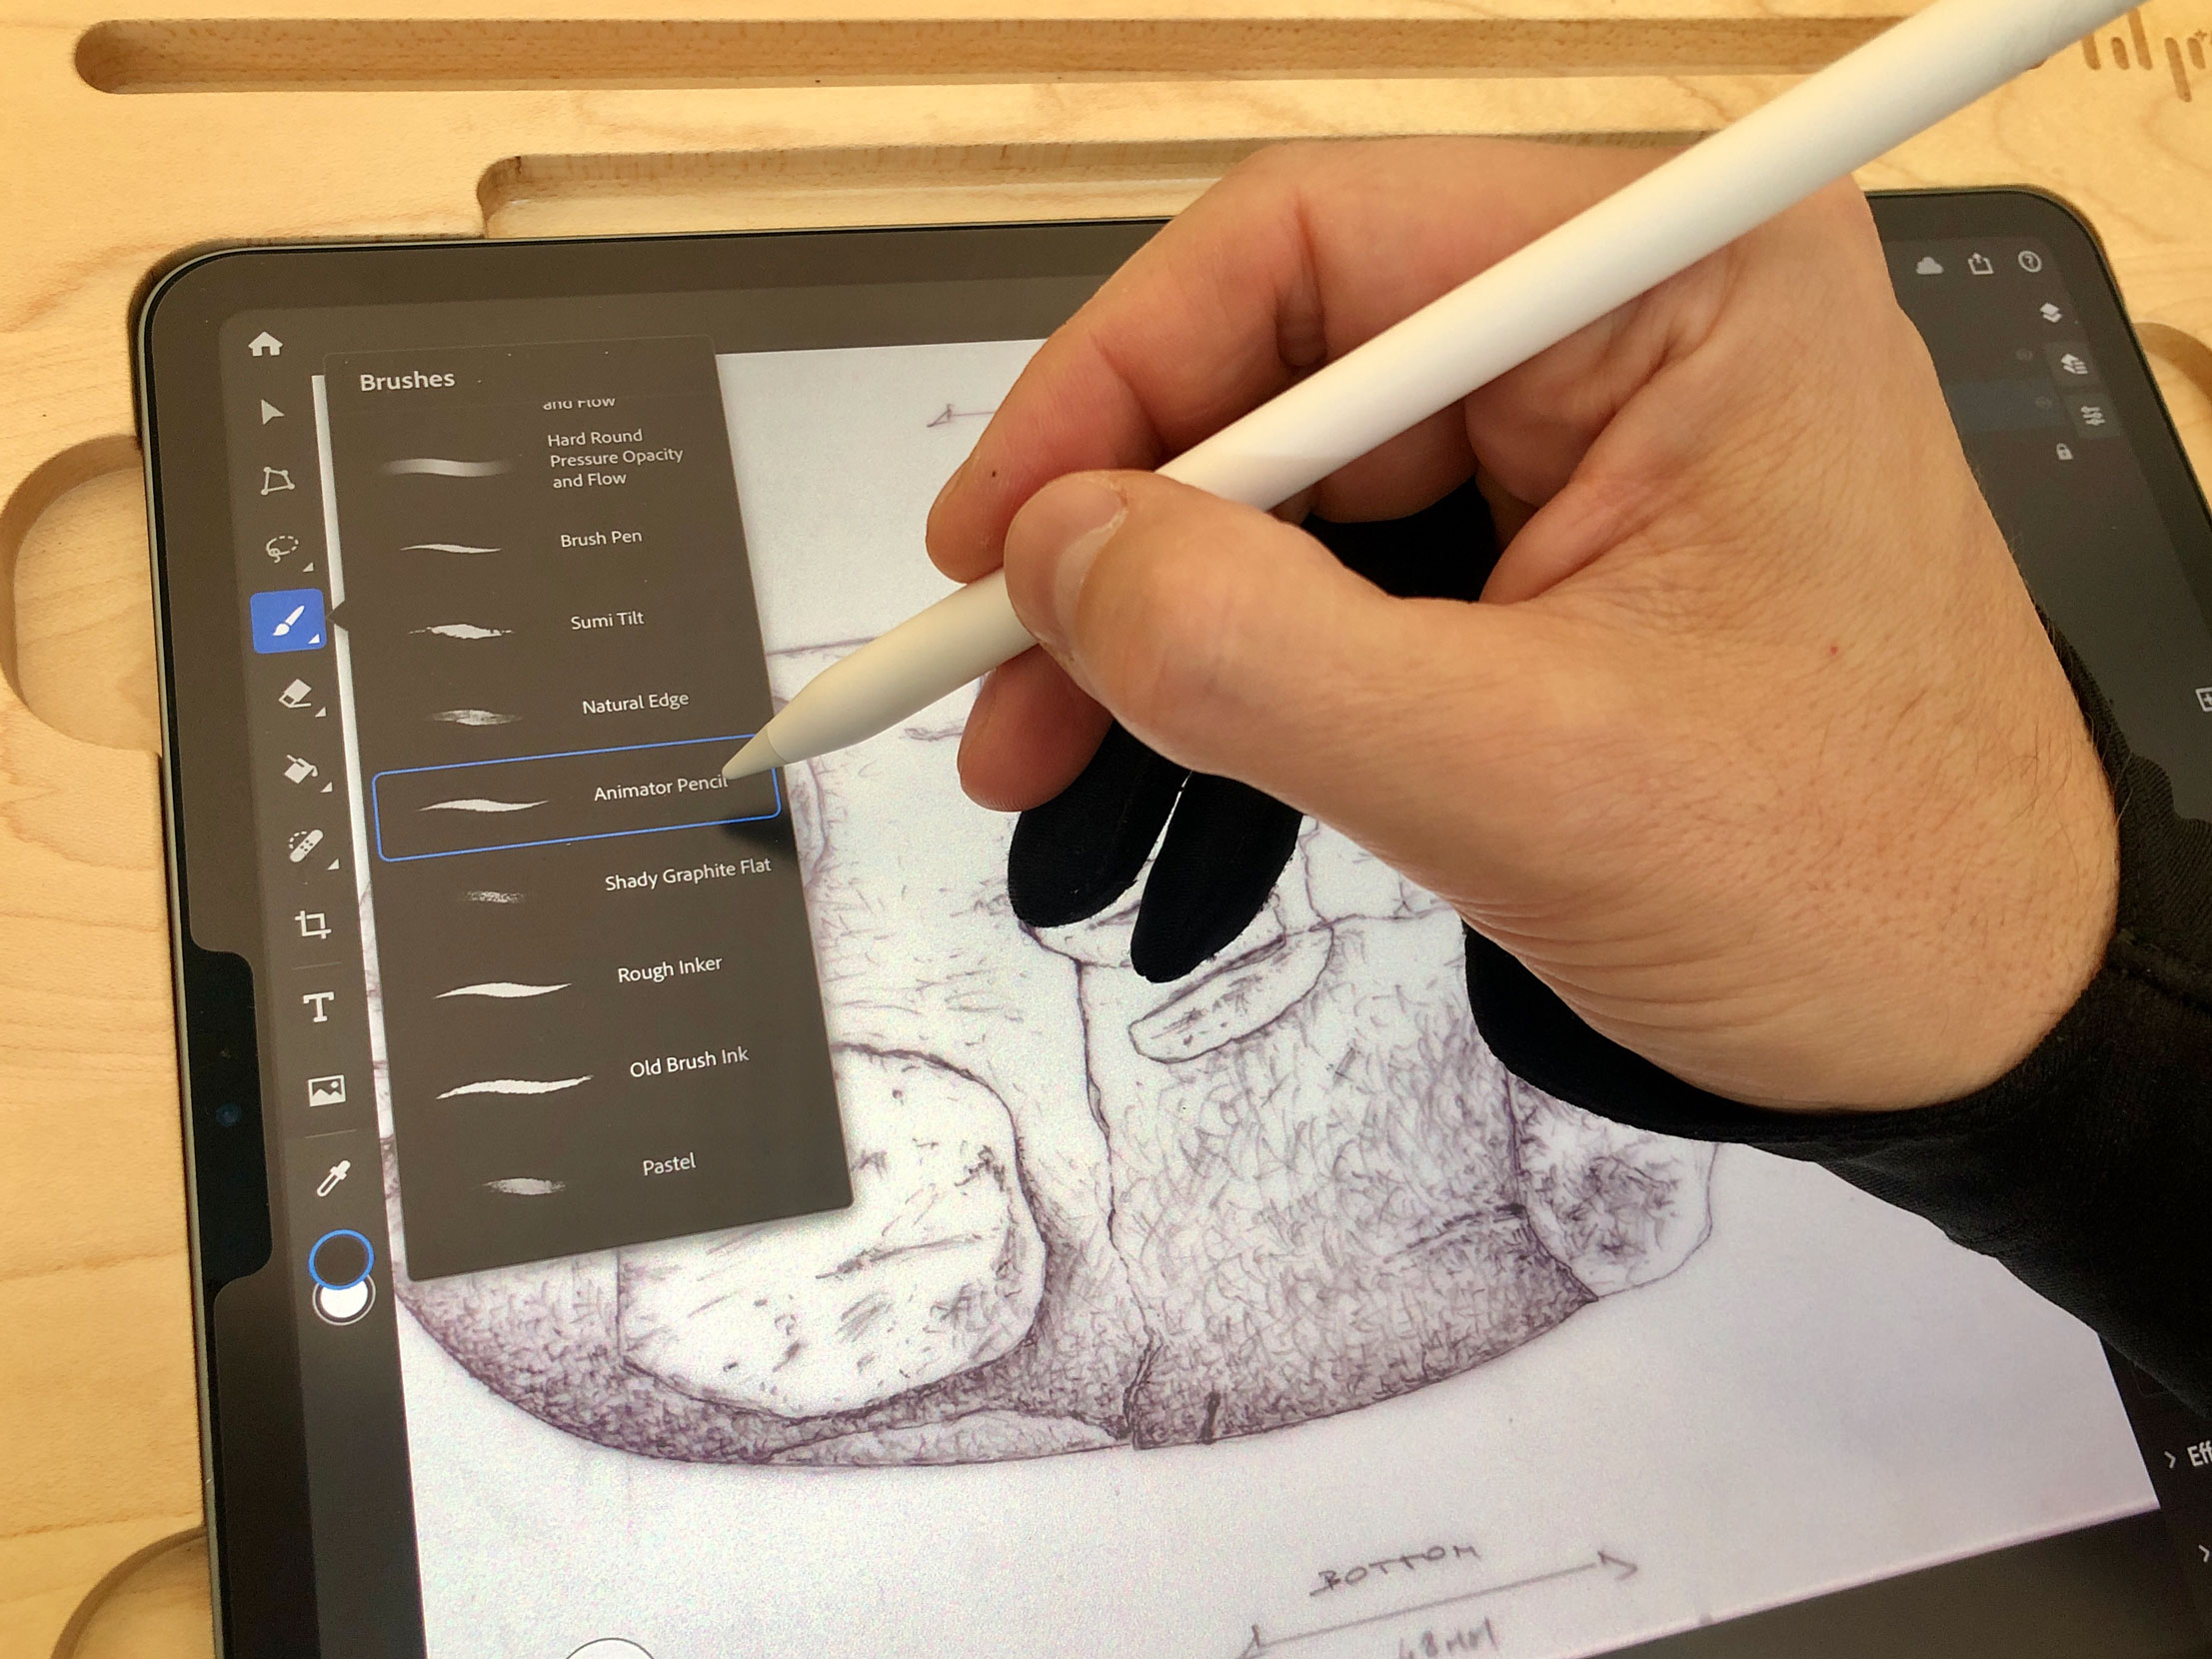
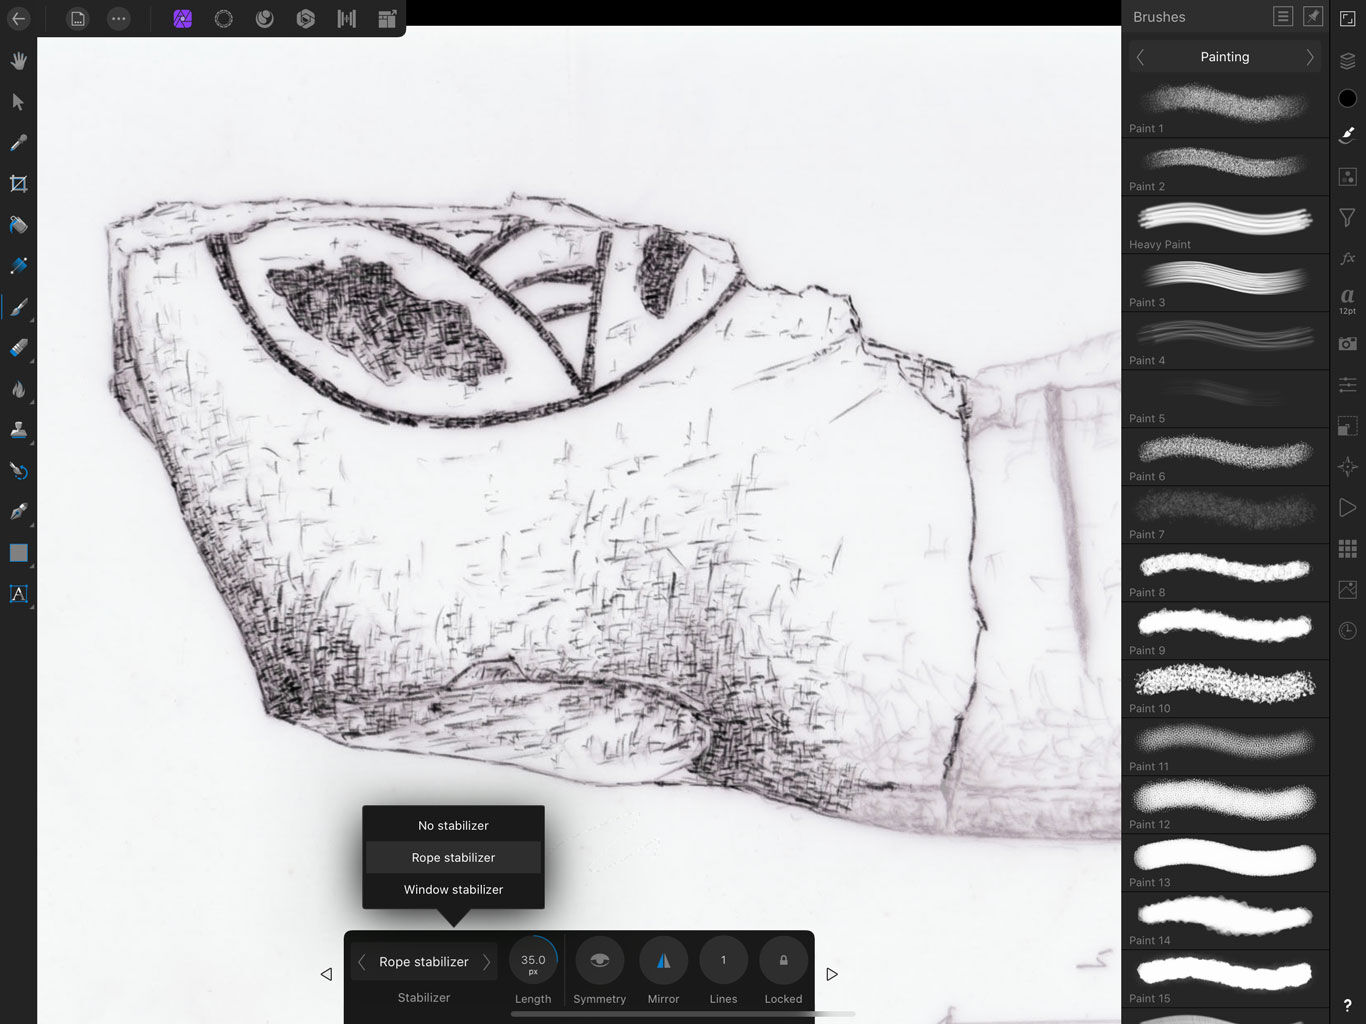
There is a basic selection of different brushes accessible in the app but there is no way to save or import our own sets just yet
But let’s go back to the features we already have access to and talk a bit about drawing with the App. Clicking and holding on to the brush icon from the Toolbar brings up the tool options. While searching for the ideal workspace, we essentially ended up docking this entire secondary options panel to the toolbar, just to eliminate one extra step in the drawing process. Once again, we wish that such level of customization would be available throughout the entire UI. Anyway, once you find them, you can select and modify the following options:
- Color chip: allows you to choose a color from the color picker, enter a hex color code, or enter numbers for HSB, RGB, Lab, or CMYK colors. You can swipe the color chip vertically to easily switch between the foreground and background colors.
- Brush size: allows you to choose the diameter of your brush, which can vary in size from 1 to 1000 pixels.
- Opacity: sets the maximum transparency of the color you apply per brush stroke. As you paint over an area, the opacity doesn't exceed the set level until you complete the stroke (even when you paint over an area several times).
- Hardness: controls the size of the brush’s hard center. Select a value that is a percentage of the brush diameter.
- Blend mode: determines how the active layer blends with the layers below it. Tap the blend mode icon to see a list of available modes.
- Roundness: specifies the ratio between the brush’s short and long axes. Select a percentage value. A value of 100% indicates a circular brush, a value of 0% indicates a linear brush, and intermediate values indicate elliptical brushes.
- Angle: specifies the angle by which an elliptical or sampled brush’s long axis is rotated from horizontal.
- Flow: sets the rate at which color is applied on your canvas as you move your finger or stylus over an area in your document.
- Smoothing: as one of the most-used features for digital inking, the feature produces smoother curves in brush strokes. Higher values apply increasing amount of intelligent smoothing to your strokes.
- Use pressure for size: varies the diameter of the brush based on the brush pressure applied while painting.
- Use pressure for opacity: varies the opacity of the brush based on the brush pressure applied while painting.
While painting with the Brush tool, one shouldn’t forget about the Touch shortcut either, providing quick access to the Eraser and the Eyedropper tools, depending on the interaction. With the latest iPad Pro and the second-generation Apple Pencil, we can double tap to zoom out for a quick overview. Nonetheless, Photoshop for iPad still lacks many serious brush customization options and it feels especially limited in comparison with both Procreate and Affinity Designer.
Photoshop for the iPad - brush settings
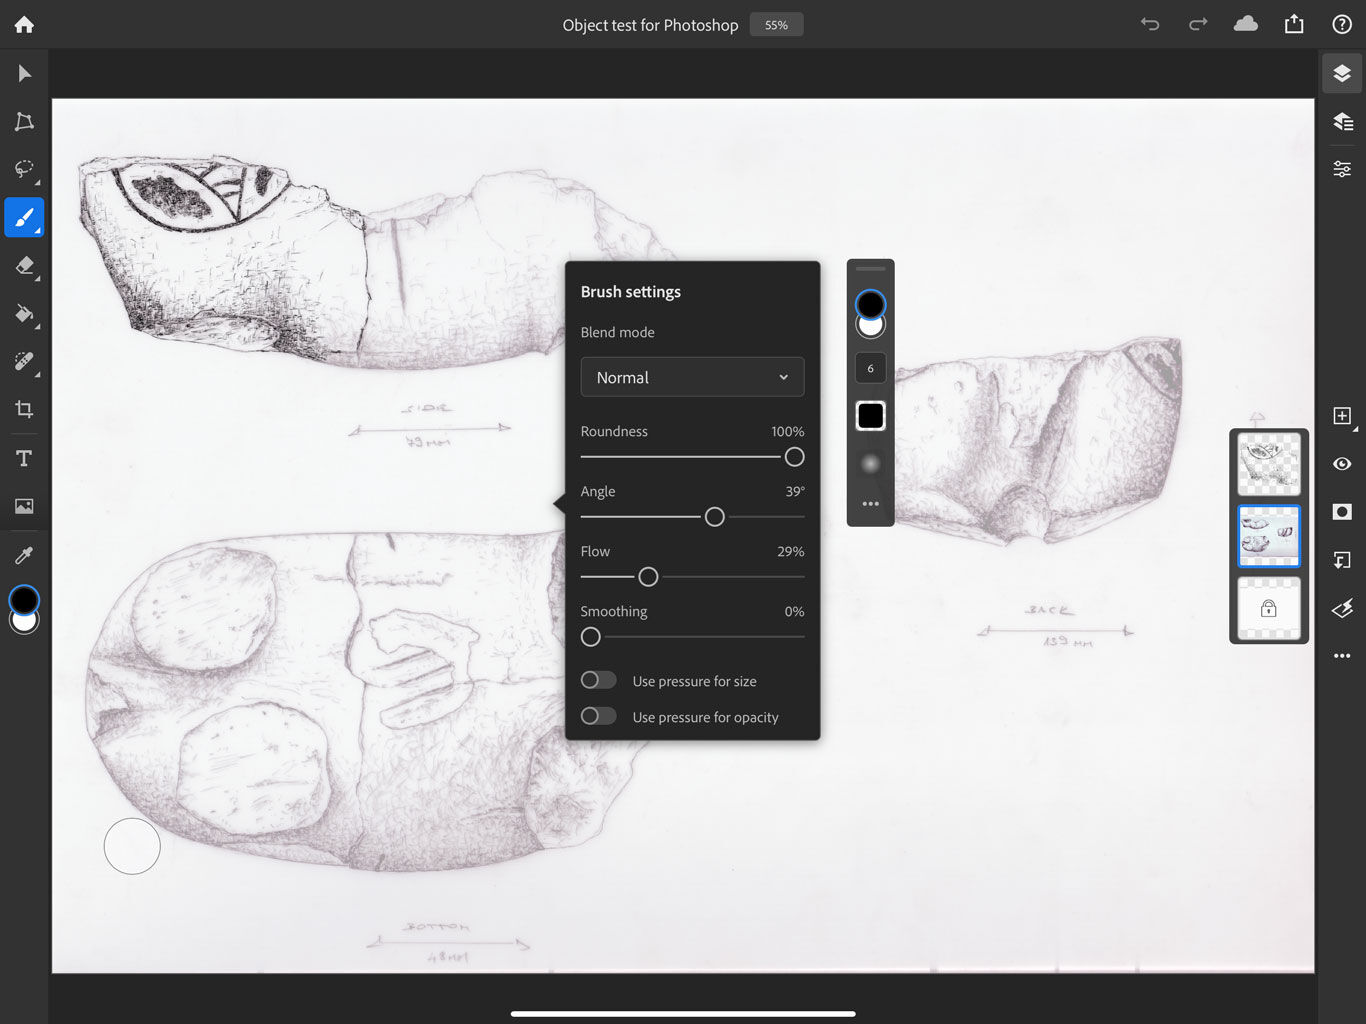
(1) Photoshop for iPad has a useful selection of brush customizations; however, brushes are nowhere near as flexible as in the desktop version.
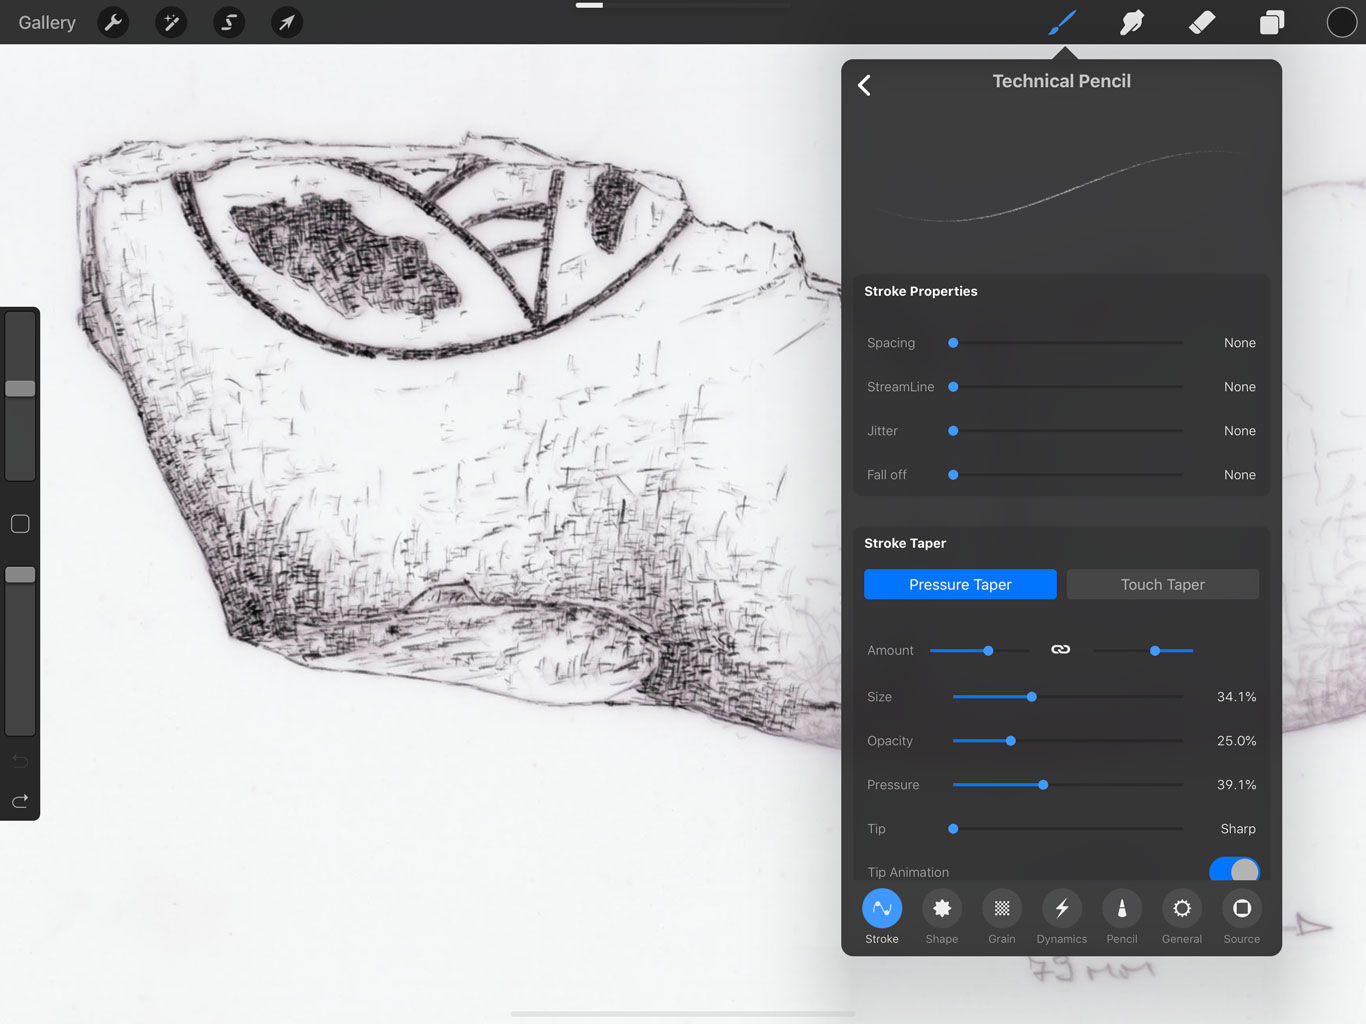
(2) Procreate doesn’t only let you design your own brushes (based on any texture), but in its upcoming iteration it will allow Photoshop brushes to be imported.
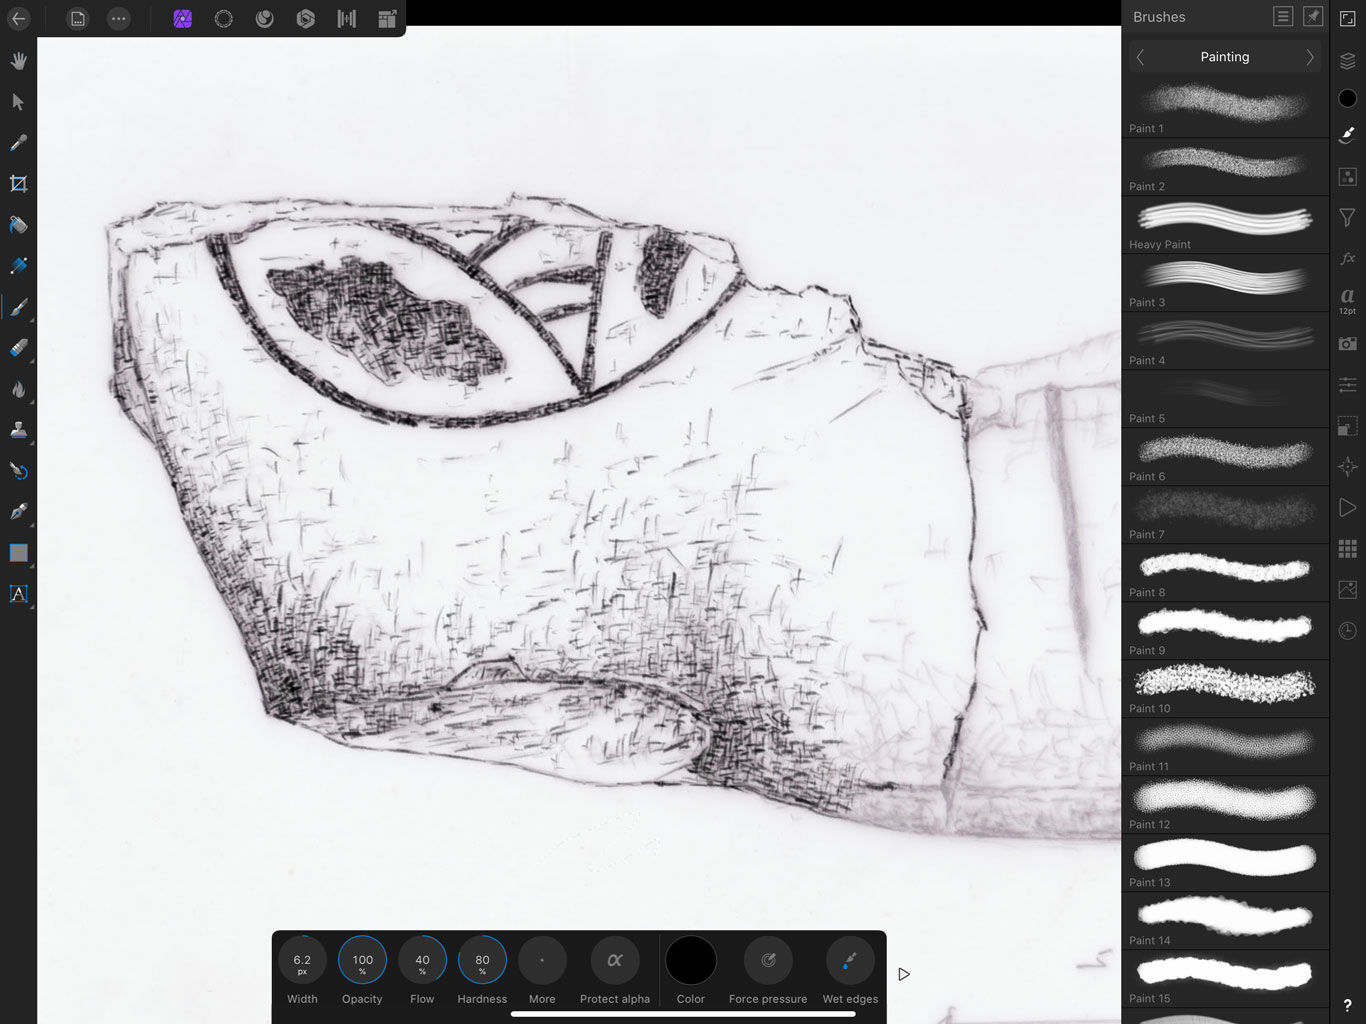
(3) Affinity Designer has a huge selection of predefined brushes with the most sophisticated brush customization options to date.
(4) In Affinity Designer, brushes can be attributed and saved with a specific behavior, letting the artist create custom sets for certain epigraphic projects.
Sketching with a preset brush felt intuitive and smooth enough once we figured out how to prevent accidental input caused by our fingers. It is worth poking around in the main screen’s App settings panel, as Photoshop not only provides additional touch/gesture customization options here, but this is the place to find all the shortcut options currently available. The object drawing we created for our test was easy enough to work on, we had no issues with changing colors or selecting part of the drawing for basic transformation. Input could be more precise, especially when executing a selection; we thought that the sensitivity of the Apple pencil was good for broad strokes but nothing finer. Another annoyance came when we realized that there is no option to draw straight lines, hitting Shift while painting does absolutely nothing, even with a keyboard attached to the iPad. Again, it all goes back to the lack of tools when creating precise linework; although brush stroke smoothing exists, with the annoying absence of a painting cursor precise line placement or erasing is a hit and miss. While we could get away with these limitations when sketching our test object, we would have a hard time inking sun-shadow transitions using the mobile version of Photoshop. We must also mention that owing to the limited graphics memory of the iPad, as the canvas size and resolution go up, brush strokes start lagging severely. If you were hoping to draw damage textures using rapid brushstrokes, you’ll have to put your desire on hold for a couple more years. It’s no coincidence that we didn’t mention textures in our review, since the Pattern tool the Survey uses for damage texturing and digital scalpel was also completely left out of Photoshop for the iPad. Again, what is painful about using Adobe’s new creative tool is that we can’t stop thinking about what is missing. If we had those basic tools along with the option to save and import/export brush sets, patterns, swatches, actions etc., Photoshop for the iPad would be a real game changer for content creation on the go.

A 1200 dpi PSD file with editable layers, opened for the first time in the native Photoshop iPad app
A year ago Adobe reassured us that the iPad version wasn’t going to be a “watered down version of Photoshop, this is real Photoshop”. Unfortunately, we can only conclude that what Adobe shipped to customers is only a mix of the desktop version’s most popular features mishmashed all over a half-baked interface. Coping with the lack of core features such as the Pen tool, or even just executing the simplest tasks such as selecting a portion of a drawing onto a separate layer, takes a great effort using the iPad. As we created our sample drawing, we kept thinking how much simpler it would have been to do the same using the desktop version tethered to the iPad. And this proves the point that experienced artists don’t want an iPad version of Photoshop, they want Photoshop running on the iPad! In case you are already subscribed to a version of Photoshop, it is well worth the free download - if only to experiment with it as an extension of the full desktop app, allowing a smooth transition to continue projects on the go. The ability to open and work with large, multilayered Photoshop files and the desire to minimize the cluttered UI of the desktop version are both promising efforts. It is a clear sign of Adobe taking the more difficult path when bringing the full Photoshop engine to the iPad, with a ground-up reconsideration of the interface. However, in its current state, Photoshop for the iPad can’t be taken seriously as a true replacement for the PC or Mac version, at least not for the asking price of $10 a month.

0 comment(s)
Leave a comment(We'll keep your email address private)