
Having an iPad Pro and Astropad Studio you may never need to invest in a Wacom tablet
Back in 2015 Astro HQ released an iPad app called Astropad with a unique mission: to map the iPad to your Mac’s screen! At that time Astropad filled a unique space for creative pros. While its immediate competition, Duet Display aimed to enthrall second-screen enthusiasts, Astro HQ had a mightier goal: replace your Wacom tablet entirely. Don’t forget, however, that it was 2015, there was no Apple Pencil on the market yet and – although iPad was used for quick sketching by many – second party digital styluses were plagued by imprecise screen mapping and couldn’t replicate pressure.
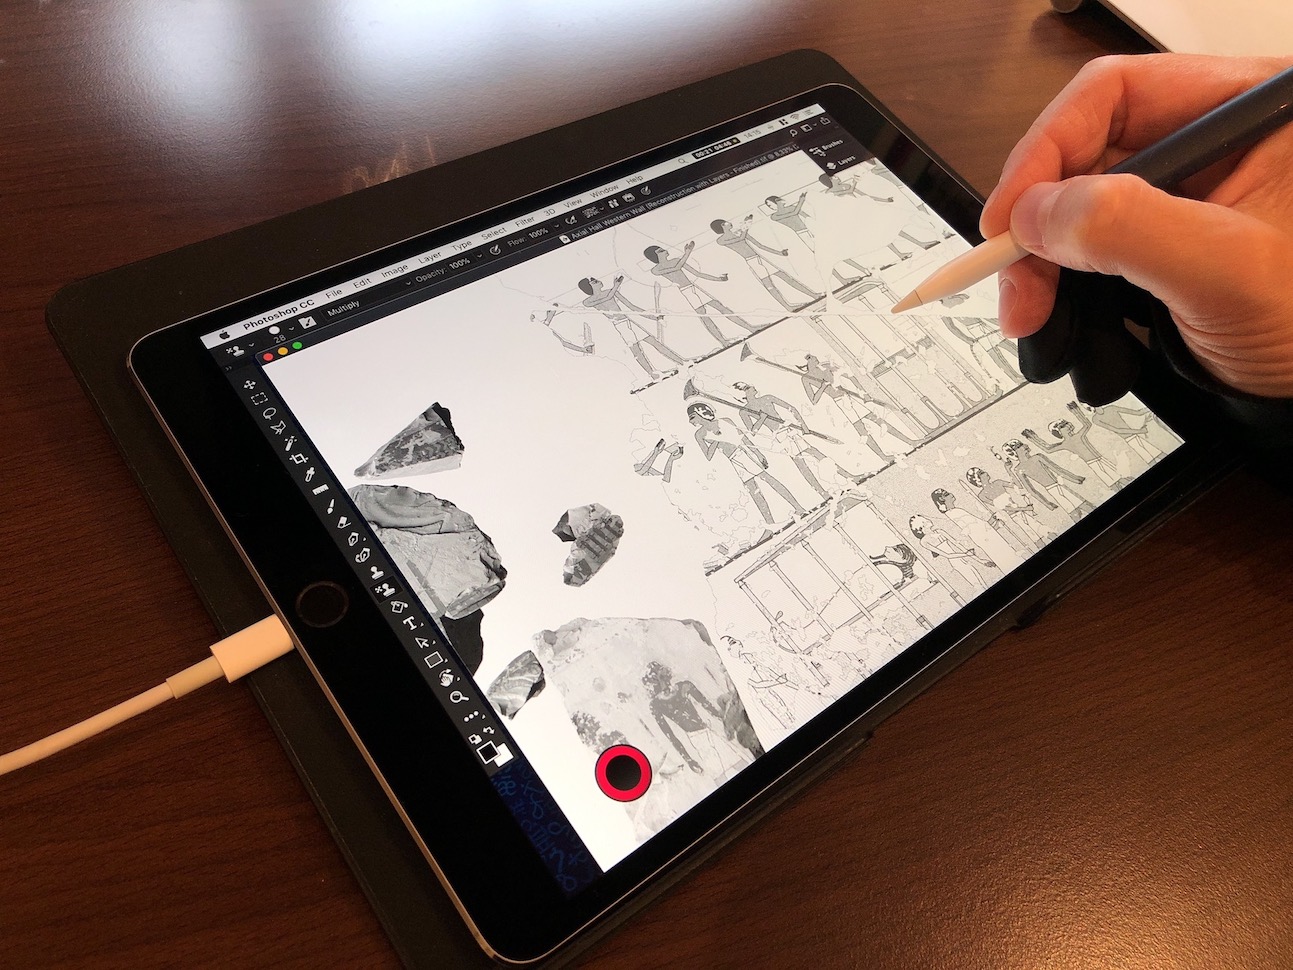
I have been aware of Astropad since it was released, however, I only started experimenting with it when the first iPad Pro with Apple Pencil came to life. In October 2015, the Epigraphic Survey was in the middle of an ongoing project developed to document the roman frescoes in the King’s Chamber at Luxor temple. We’ve already documented one of the most complicated walls applying a unique hybrid method that still involved using a large format camera as the crucial initial step. When the photographs were developed in 1:4 the remaining traces of the roman pigment were traced directly on the photos by using regular pencil and a special crisscrossed pattern. Once a section was done and the photograph was scanned, this pencil pattern needed to be meticulously reproduced – stroke by stroke – digitally. Although we could occasionally use a digital pattern on large homogeneous surfaces, the lack of any satisfying digital equipment in the field made most of the studio work repetitive and rather tedious.
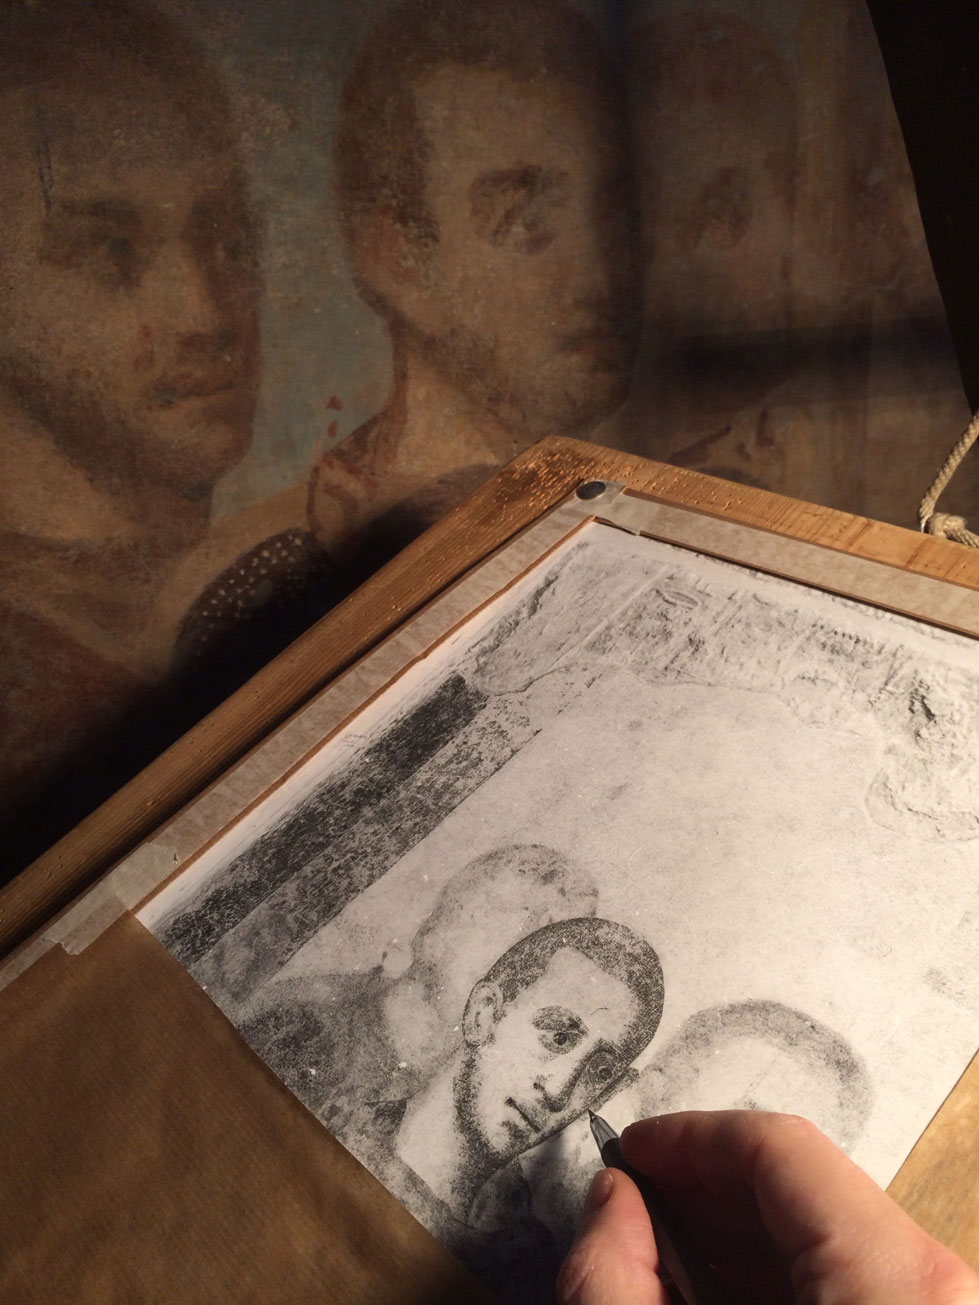
Working on a pencil drawing section of the roman fresco at Luxor temple
Knowing the conditions when working at Egyptian monuments, taking one’s laptop computer to the temple was never really considered as an option before. However, as we brainstormed about speeding up the process, the idea of using Astropad as a vehicle to let us work on final (studio grade!) layers in the field kept coming up. At the end the possible advantages slowly started to outweigh our concerns. Obviously, I would never recommend pulling out one's pricy equipment when lying in the sand documenting a multi-ton block under direct sunlight! Luckily, at Luxor temple we could provide the right amount of artificial shade to be able to see our computer screens and the scaffolding had plenty of space to securely accommodate both computer and iPad – so the experiment with Astropad could begin! (I wrote about my inital impressions using Astropad in the digital Epigraphy Manual, which you can find here.)
To tell the truth, the original Astropad – although it had a lot of features that helped our documentation work – always felt a bit like an experiment. One could set up a few shortcuts but not command sequences. One could mirror a laptop screen to the iPad, but the connection wasn’t always smooth, sometimes crippling productivity and turning drawing sessions into troubleshooting nightmares… Furthermore, the lack of pressure-sensitivity wasn’t a deal-breaker yet when working on the roman fresco textures, but it became a burden as soon as I needed to do digital penciling!
Fast forward 3 years and I couldn’t even imagine life at Luxor temple without my Macbook Pro connected to my iPad Pro by Astropad Studio, the professional-oriented second iteration of Astropad! It is every bit as innovative and smart as its predecessor, adding must-have features for true professional graphics artists — and making me wonder whether I'll ever need to buy a new Wacom tablet again!
A few things one should know about Astropad Studio if unfamiliar with the original Astropad: It turns an iPad Pro into a second-screen experience for one's Mac (Astropad only favors Apple’s hardware at the moment), providing practically lag-free drawing, sketching, or photo retouching using the company's patented Liquid rendering engine. It works either connected via USB or via Wi-Fi alone – a nice bonus when I’m sitting on my living room couch and want to sketch directly on a Photoshop canvas on my MacBook Pro. Ideally, one also needs a Bluetooth pressure-sensitive stylus – preferably an Apple Pencil - to get the full sketching experience in apps like Photoshop.
Astropad Studio builds upon the promise of the original Astropad by designing the app around the iPad Pro and Apple Pencil, and by not only maintaining a minimal-lag second-screen experience for the iPad but adding full pressure compatibility with Apple Pencil and customizable settings across the board. In the meantime, the original Astropad is still available for more casual users, the developers are continuing to support it under the name Astropad Standard.
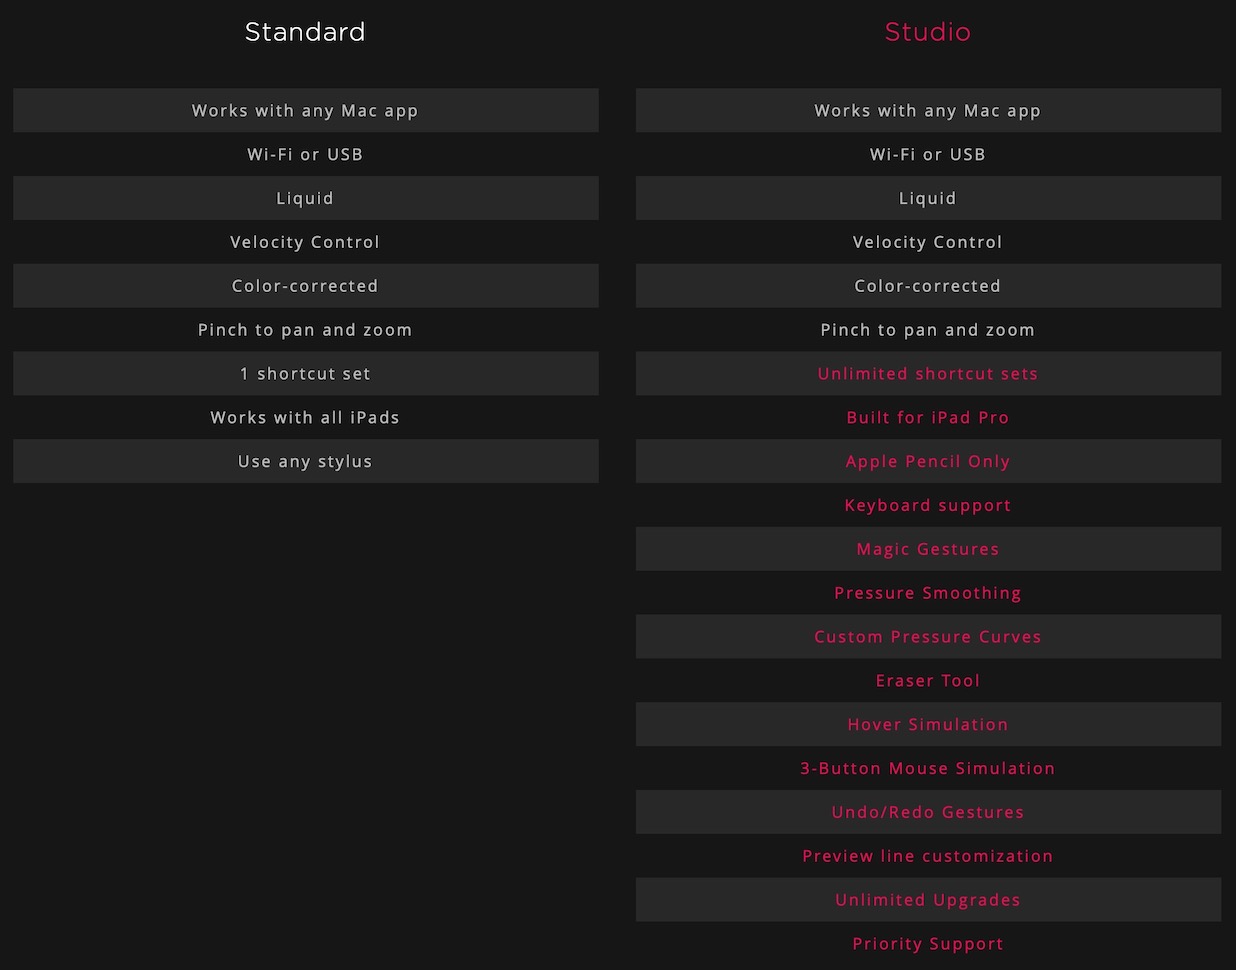
Quick comparison chart of specific features available for each versions of Astropad (photo by Astro HQ)
First impressions
First of all, it is astonishing how much one can customize Astropad Studio in comparison with the original version. Let me give you a short list of our extra options specific to Astropad Studio:
- Shortcut sets – Customizable sidebar shortcuts automatically adapt to match whatever Mac app you are using.
- Tailor-Made Gestures – Create your own gesture shortcuts with touch-Pencil combinations.
- Introducing Keyboard Support – Use Astropad Studio’s on-screen keyboard or add your own Bluetooth or Smart keyboard.
- Pressure Smoothing and customizable pressure curve settings.
- Choose the color for the stroke preview line (it comes handy when there is some lag that delays your line drawing).
- Decide whether you want to see or hide the cursor (think about the advantages of being able to see the center of your brush stroke when drawing precise sun-shadow transitions in the studio!).
Magic Gestures, one-tap and multi-tap shortcuts

(1) In General Settings one can adjust a slider of screen brightness along with some other basic options, such as toggling between Retina (default) and Non-Retina resolution on the iPad and using or omitting Astro's ColorSync mechanism.
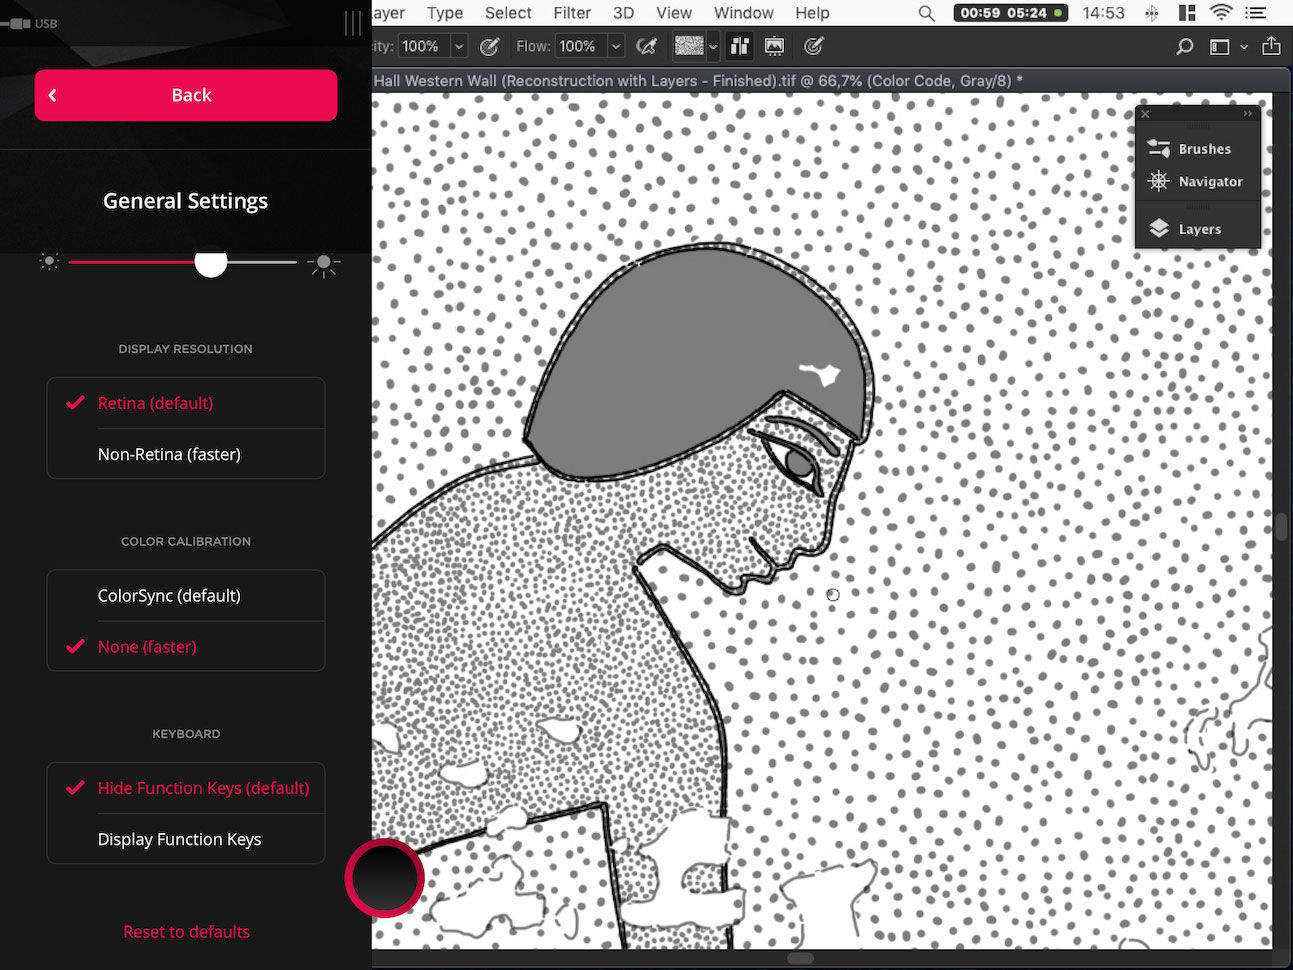
(1) In General Settings one can adjust a slider of screen brightness along with some other basic options, such as toggling between Retina (default) and Non-Retina resolution on the iPad and using or omitting Astro's ColorSync mechanism.
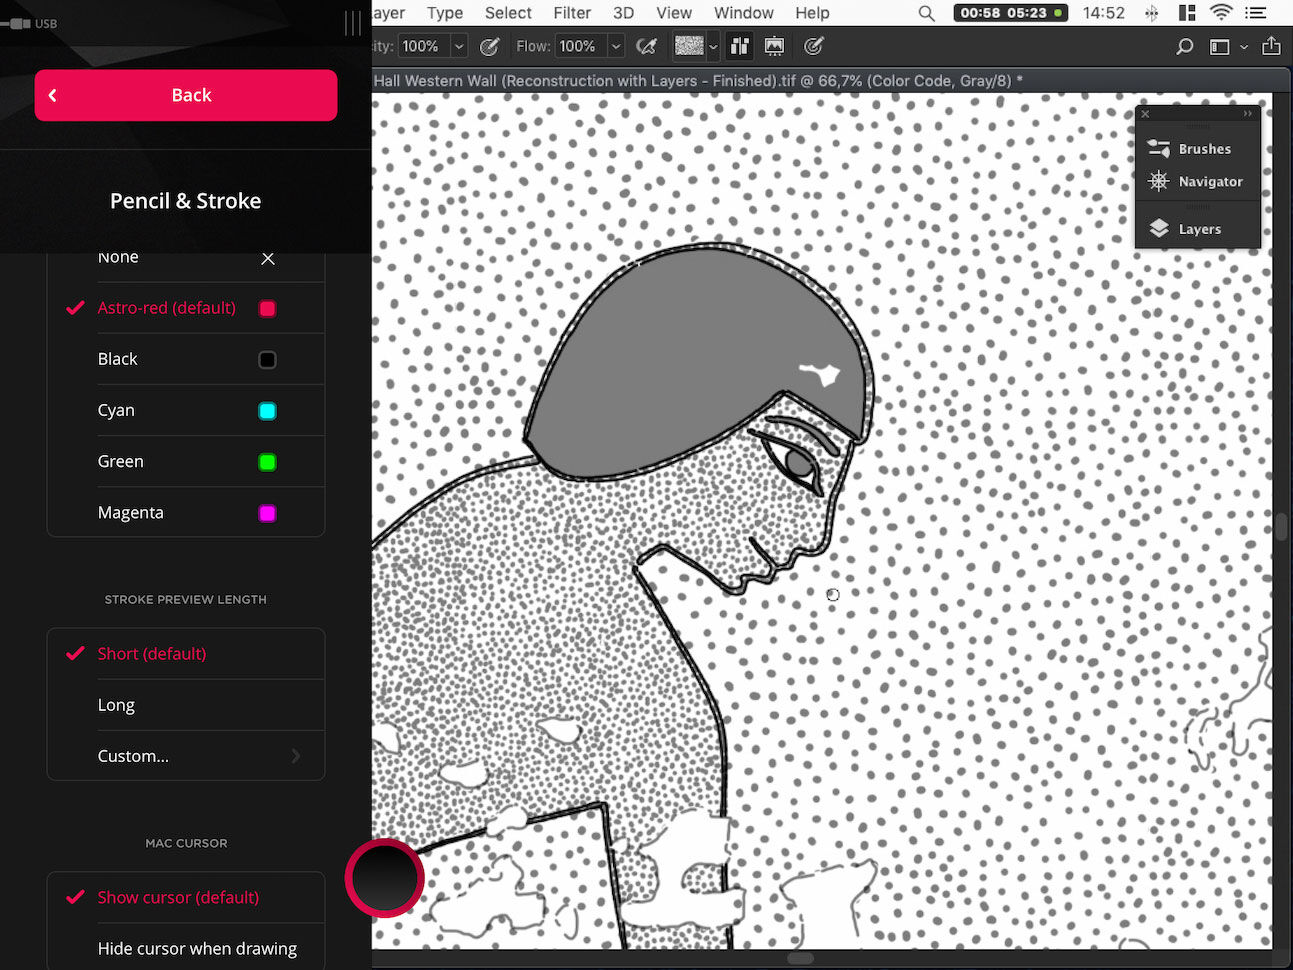
(2) In the Pencil & Stroke setting one can make decisions about the color and appearance of the brush stroke guide that appears when drawing, or disable this feature all together. A really useful setting to pay attention here is the ability to show the cursor while drawing.
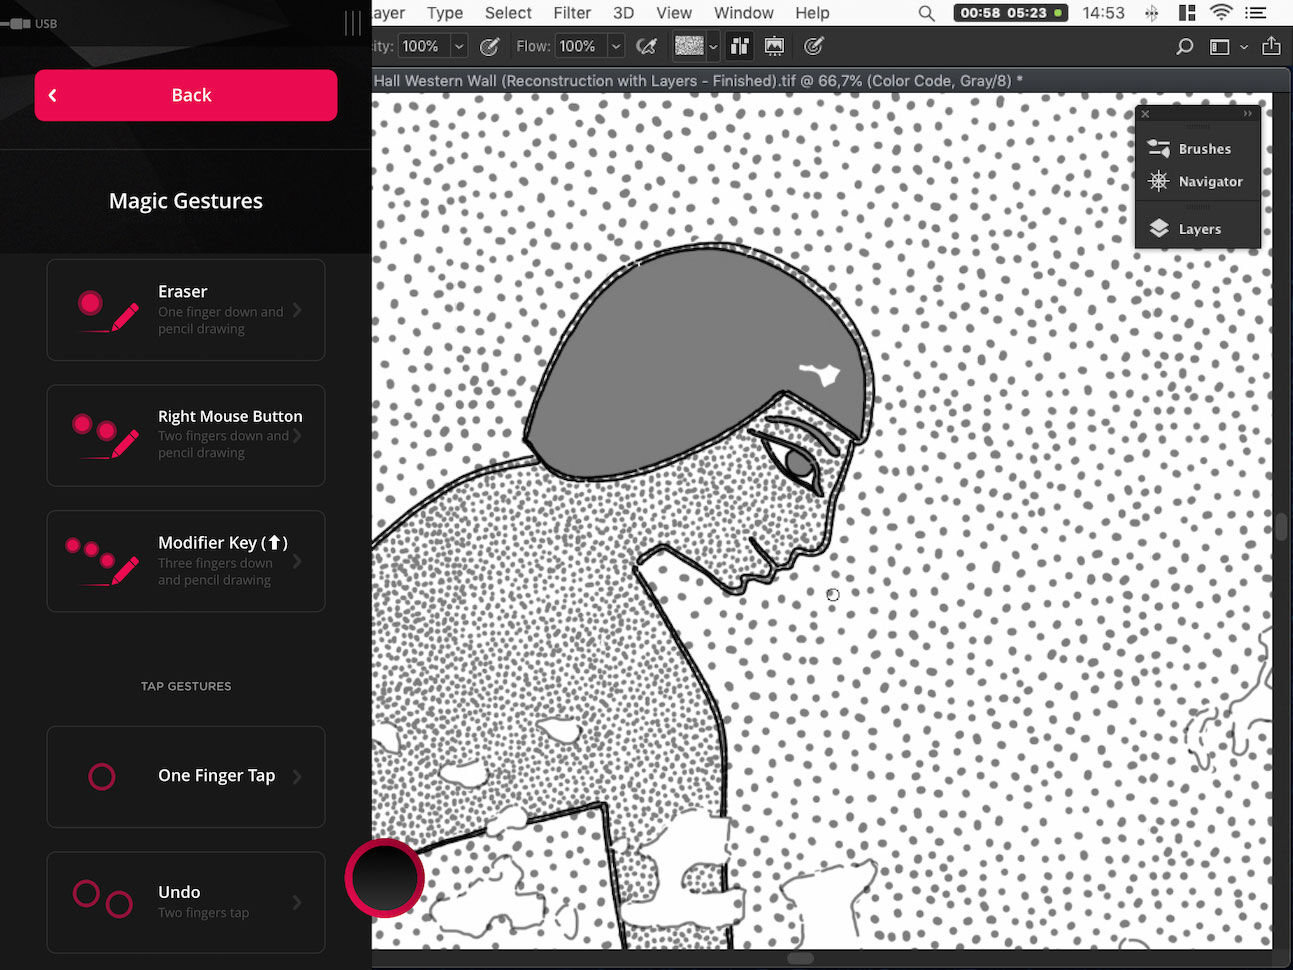
(3) When it comes to setting up the Magic Gestures one has to keep in mind what are the most used commands in Photoshop that he/she would normally set up first when customizing a Wacom. Everyone's top candidates are usually erase, undo, redo, right click etc.

(4) Astropad Studio's keyboard is very responsive, residing only a button away at all times and contains every possible characters and special keys one might need for setting up even the most complicated shortcut sequences.
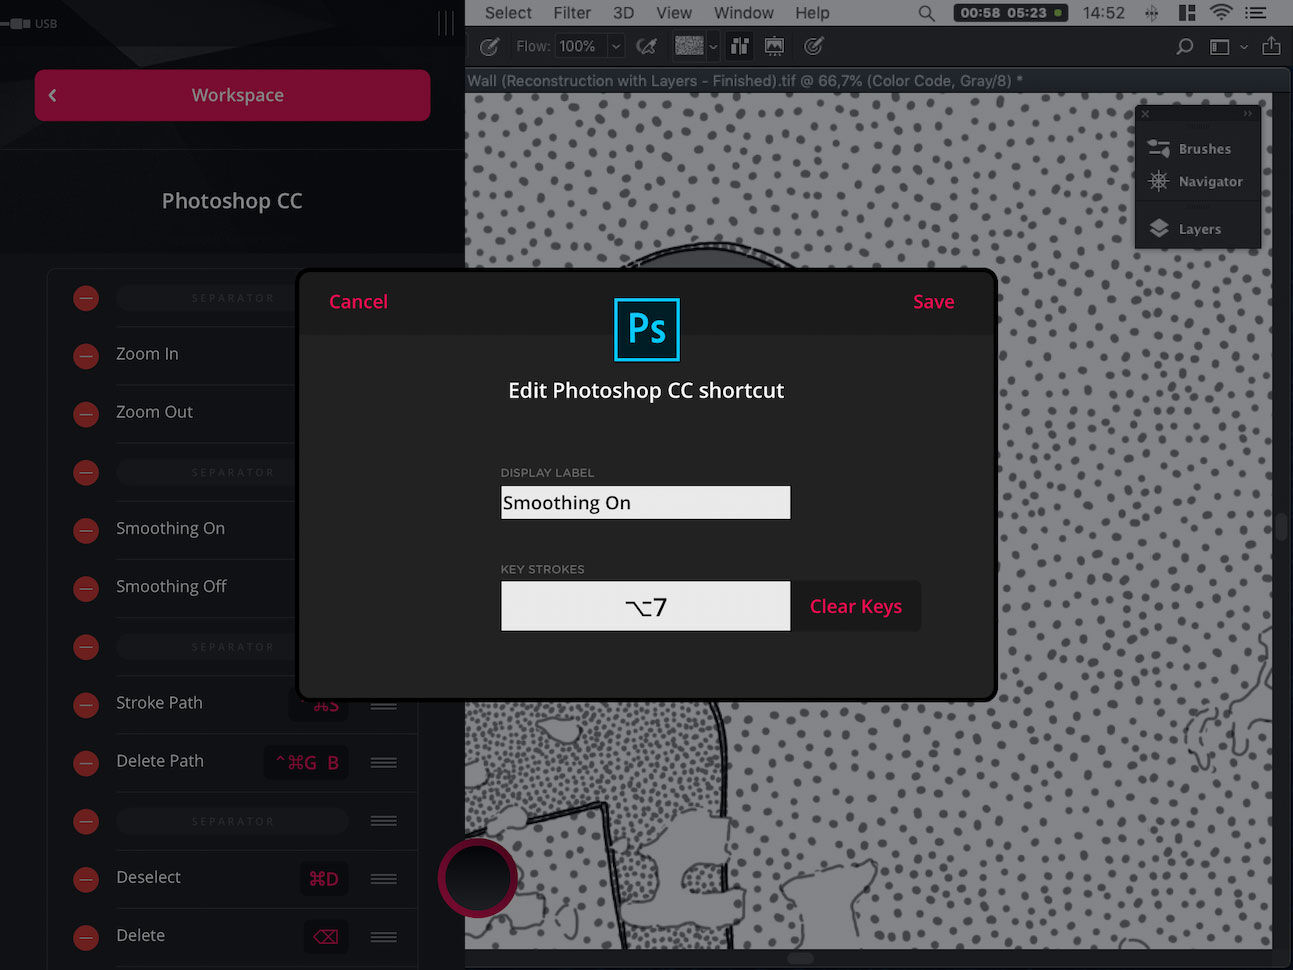
(5) The shortcut setup menu offers a display label for each command or command sequence you create. The option to add separators in between certain shortcut groups helps avoiding accidental hits when drawing.
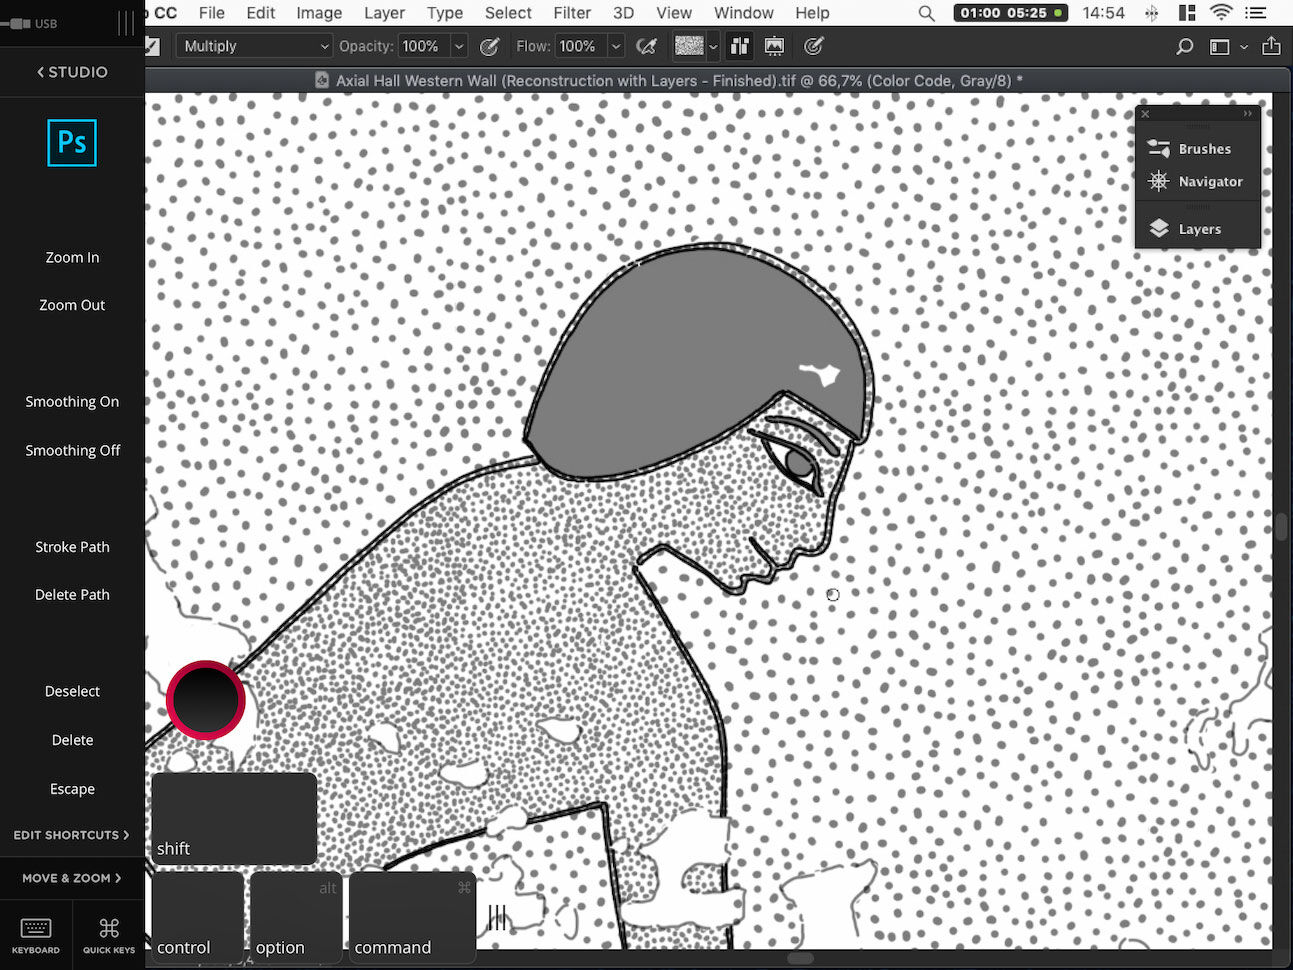
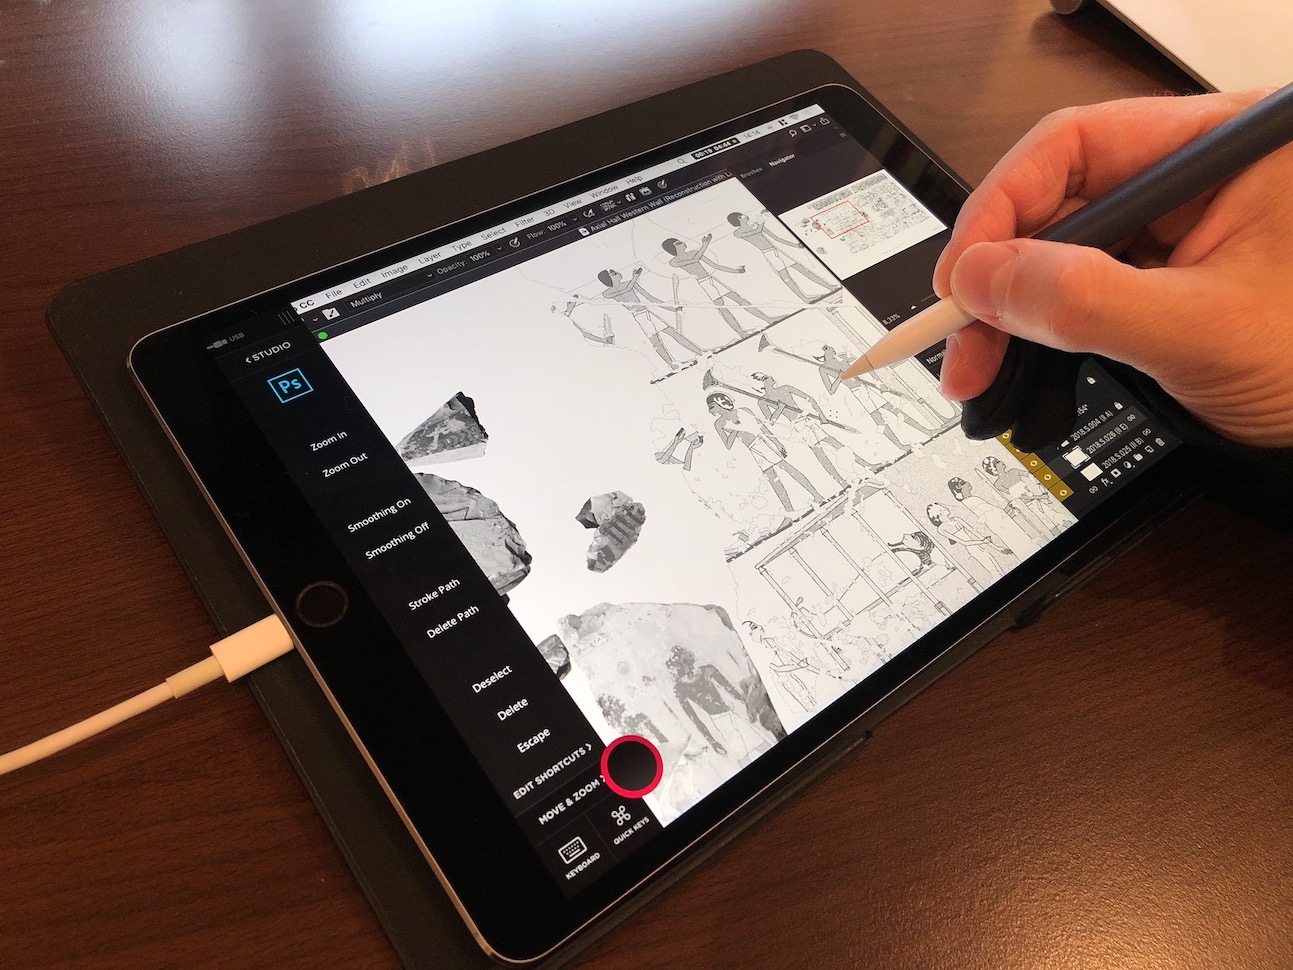
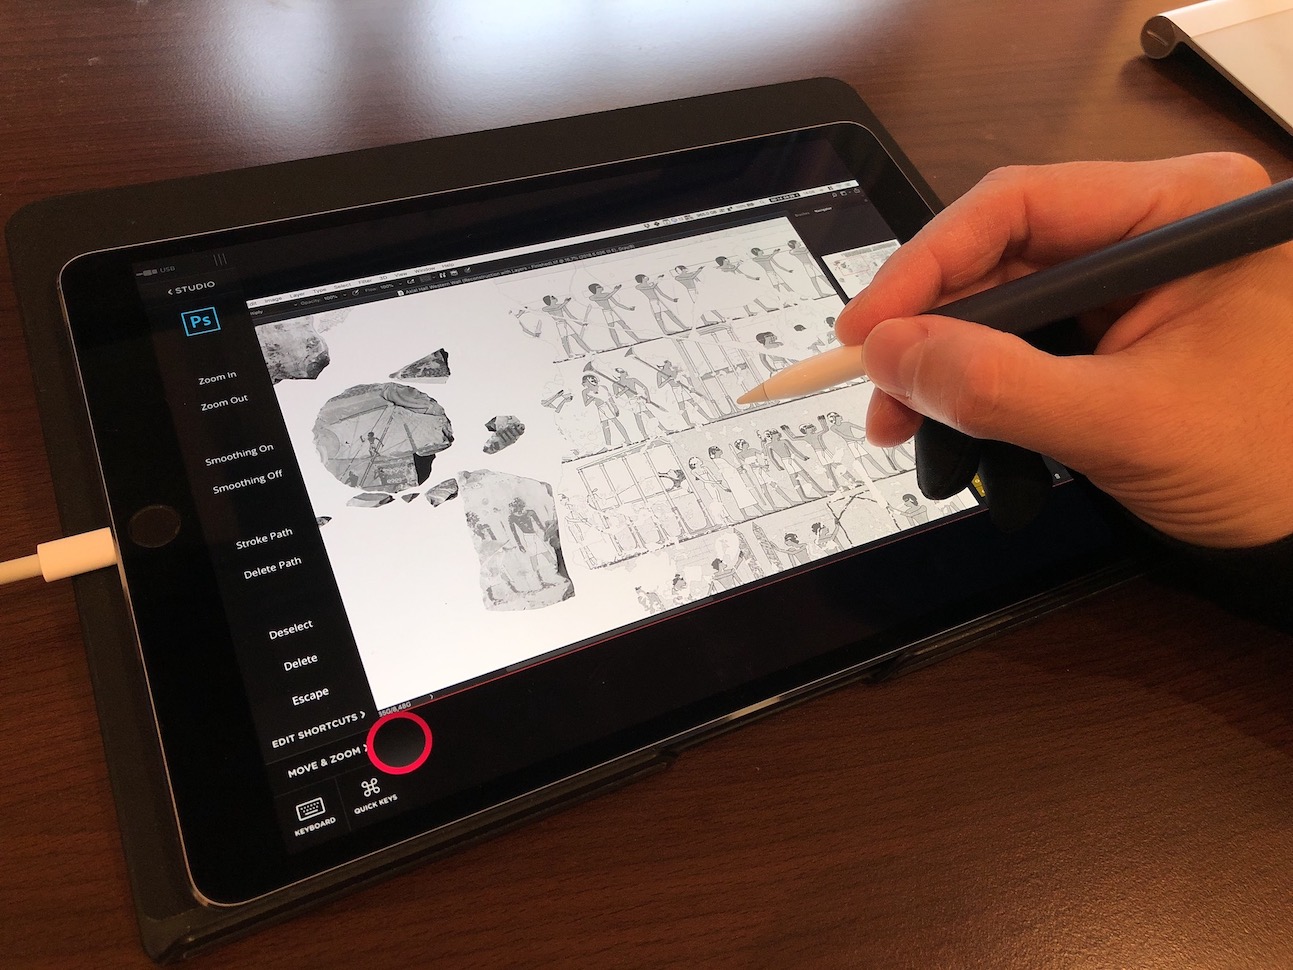
(6) The most important shortcuts as set up on my 10.5 Inch iPad Pro. It is amazing to be able to trigger both simple commands such as Zoom In and Zoom Out and more complicated command sequences, such as Stroke Path by the touch of a virtual button.
Magic gestures are the best way to integrate complex commands into the Mac. There are three Magic Gestures shortcuts and two tap shortcuts to set up, all customizable. By default, the gestures consist of the Pencil held in hand, along with one, two, or three fingers down on the screen. They can trigger things like auto-Eraser (default Pencil + one finger touch and hold), Right Mouse Button (Pencil + two fingers), modifier keys like Command, Option, Shift, or Control (Pencil + three fingers), or a mode called Hover, which lets you move your Apple Pencil to pinpoint a drawing location.
I really like the ability to instantly switch between drawing and erasing (a revelation in comparison with constantly selecting the proper tool from the toolbar in Procreate) just by holding my finger on the screen while drawing. I reserve two-finger touch for right click and set Shift as the three-finger touch and hold option. I quickly realized that applying magic gestures becomes exponentially harder the more fingers need to be used simultaneously, therefore I rarely use the three-finger option for drawing straight lines, but rather access the modifier keys via the Astropad Tool Panel.
I especially like that I can set up two-finger and three-finger taps for any shortcuts. I reserve this option for Step Back (multistep Undo) and Step Forward (multistep Redo) to be consistent with my Procreate setup, the other program I rely on heavily on my iPad. As a matter of fact, I have never set up a one-finger tap because three times out of four it interfered with switching to erase, but you might have different preferences when it comes to Magic Gestures customization.
One of the Pencil's main criticism over the years has been its lack of programmable buttons, like you find on Wacom's styluses; however, with Magic Gestures, Astropad seems to be able to provide a better way to do such shortcuts. Gestures let us take control of the canvas without having to worry about accidentally holding down a button while drawing or getting wrist pain from holding the bulkier Wacom-style pens while pushing side-switches at the same time.
Other setting options
I don’t have to rely much on color accuracy when I work on the roman fresco or ink digitally in my studio beacause I mainly work in greyscale. Therefore I went ahead and disabled this option in the settings – it makes working on the iPad a whole lot faster! In turn, retina display resolution must be turned on, otherwise you won’t be able to see or create any fine lines ever again! Some compromises are worth it for a little speed gain and some aren't… Obviously, all of the above features are welcome, but the top consideration with a setup like this is performance. On a 10.5-inch iPad Pro, connected via USB to a previous 2016 MacBook Pro with Touch Bar, the app reports a 2-millisecond(!) response time. On my home Wi-Fi network, running at 5GHz, that time is 4-5 milliseconds. There don’t seem to appear any noticeable lag while I work on a multilayered multi-gigabyte drawing in either situations.
Moving the active area around does introduce a slight delay while the screen re-renders; it displays a low-resolution proxy for a second and then the higher-resolution version rules it over. (Disabling retina resolution renders these transitions much smoother, however, as I mentioned above, it’s not recommended for quality purposes.)
Shortcuts and command sequences
We have plenty of slots to set up our favorite shortcuts we use the most in Photoshop. Needless to say, if you use a different program on the Mac that you’d like to attach shortcuts to, you can do so, and the relevant set will be displayed accordingly whenever your program is active. One would set up shortcuts on the iPad in a similar way as in Photoshop or elsewhere, by using a built in or an external keyboard. One needs to be careful with external keyboards, though, because sometimes they map their keys differently than your Mac – therefore I recommend using Astropad Studio’s excellent on demand touch keyboard instead.
As you can see in the introductory video, I use my Delux Keyboard for commanding my iPad while I’m working in the studio but I rely on the set of on-screen shortcuts and commands when in the field. Here is a quick look at my preferred setup just for reference (I use dividers to add a little gap in between important groups – some might consider this a waste of space that could be filled with even more shortcuts...):

Content arrangement on the iPad screen:
Initially, Astropad provided only one option to have the entire Mac desktop shown on the iPad: screen mirroring. I don’t want to suggest that it was a bad solution, especially if you have the larger iPad Pro, but with all the unusable screen real estate and the minuscule text it was not a very appealing scenario.
Screen aspect ratio differences causing black bars below and above the usable screen area on the iPad Pro 10.5
Therefore, as an additional option, Astropad decided to offer the ability to stream only a specific part of your screen (fitting with the iPad Pro’s screen aspect ratio). Astro HQ even offers a detailed tutorial on how to arrange your tool bars, menus etc., to make the most of your iPad screen real estate when working with Photoshop.
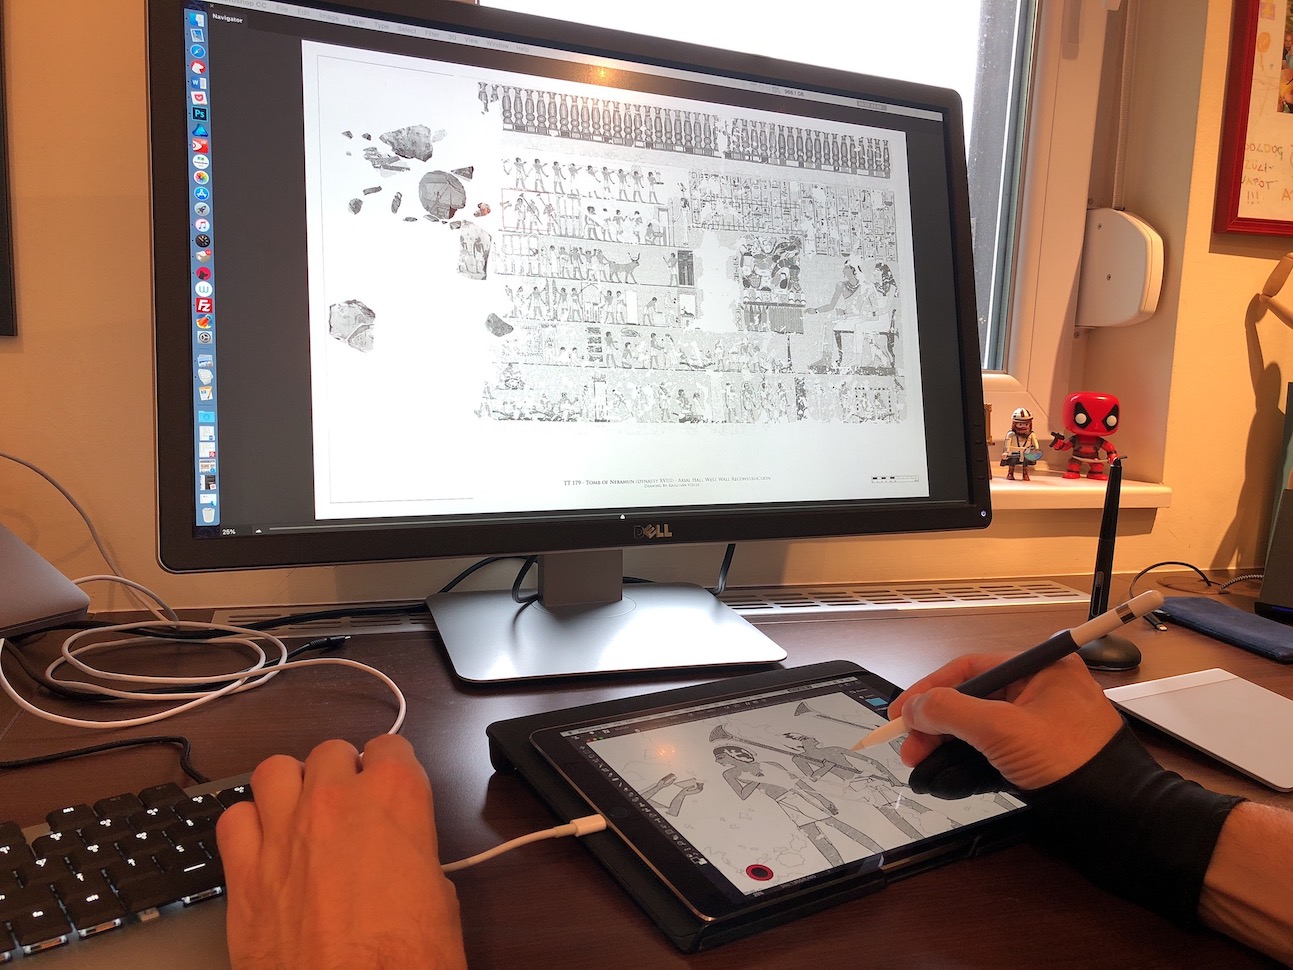
However, in 2018 Astro HQ introduced a new product, their first piece of hardware called the Luna display, that simplifies the set up process tremendously. Since I have Luna plugged in my Mac, my iPad Pro acts as a proper secondary monitor. As a result, the content I want to see on my iPad is highly customizable and extra elements such as my Mac’s Menu Bar and Dock don’t take precious space on my tablet when drawing. Additionally, I can display specific information (for example pull up Navigator to show the overall view of my large drawing) on my large external screen when working in my studio.
Conclusion
Astropad Studio, like many of the creative pro softwares out there, has chosen to go the subscription route for this app: one has to pay $11.99/month or $79.99/year to gain access to the iOS app along with the free companion Mac app that enables the second-screen functionality. I wouldn’t quite say that drawing in Astropad provides the same experience in every regard as working on my 16-inch Wacom Pro (for example the matte “paper-like” feel of the Wacom screen might always feel superior for some…), however, it is astonishingly close. All and all, Astropad probably won't replace the Wacom Cintiq in your studio if you already have one, but it's an incredible tool for working in the field or when you travel.
I rely on Astropad every single day when working on the roman fresco at Luxor temple and, occasionally, even grab my iPad instead of my Wacom when working in my studio. Considering the price of a Wacom tablet, the real appeal of Astro’s solution is being able to use an equipment you might already have instead of forcing you to engage with yet another investment. Not to mention that as long as there isn't a full-fledged Photoshop CC running on the iPad, using Astropad is the closest we can get.
Additional Reading:
For the most thorough setup guide explaining Astropad Studio's Workspace Sidebar, visit Astro HQ's official site.
1 comment(s)
Ovidiu Cimpean
Aug 18, 2019Excelent review. I was looking at the Wacom review too, and I appreciate your effort. I am still waiting for Astropad for Windows and Photoshop on iOs. Do you have by any chance a picture showing ipad 12.9 and a Cintiq side by side to get a feeling of the real life dimensions for the Wacom compared to iPad?Thank you!

Oct 17, 2019Hi, dear Ovidiu, we’re glad you liked our reviews, there is more to come in the future, so stay with us! Regarding Astropad for Windows, we’ve heard rumors that it’s nearing completion so you don’t have to wait much longer. As a beta tester, I would like to add that Photoshop for iOS has been a huge disappointment so far, it’s lacking too many essential features of the desktop version...
Leave a comment(We'll keep your email address private)