
Tidbits of the digital Chicago method Part 6 - Initiating selections and transformations in Procreate

The Freehand Selection tool is Procreate’s most used aid when adjusting certain elements of a drawing
As it has been discussed and propagated in many of digitalEPIGRAPHY's previous articles, there should be a practical distinction between the hardware and software tools used in the field versus the ones used in the studio. While documenting in the field should be about making and recording all the necessary observations regarding our subject, the studio is more suited for the complex editing and precise rendering of these results. We can get accustomed to reaching for Photoshop whenever serious retouching is needed, while we tend to forget the hidden complexities of Procreate that are readily available to take upon some of these tasks right in front of the wall. Informing you about these options doesn’t necessarily mean that we’d like to promote the iPad Pro as a one device for all solution. Nonetheless, being able to do quick editing at the wall can be undeniably rewarding at times. In the next entry of our “Tidbits…” series, we’d like to show you how to make precise selections and interact with the selected elements on the go.
At the moment, Procreate is utilized by the Survey to do only one task, that is digital penciling at the wall. Nevertheless, the app has many complex functions that might be useful beyond the relatively straightforward chore of accommodating pencil lines. To demonstrate these functions, we’d like to use LD 178, a wall segment in the First Antechamber at Luxor temple, as our sample scene. This section displays a complex mixture of late Third Century frescoes superimposed over the pharaonic relief decoration. Originally, the process of documenting the Tetrarchic remains was designed in a way that some contextual information would be provided by indicating a narrow strip of the Eighteenth Dynasty background. Now, extensive epigraphic work is planned to be carried out in order to document all the pharaonic remains in the room. With the Survey’s renewed focus being on the carvings, all scenes had to be reshot (integrating the latest photogrammetric results) with the intent to refine our previous photographic records. Naturally, the existing epigraphic material had to be revised and modified as well, wherever necessary, to be able to seamlessly integrate into these newly provided digital backgrounds.

Inked relief drawings, originally created to provide contextual information, repurposed over the digital background (LD 178 detail)
The original sun-shadow representation of the relief was created based on a traditionally developed photographic background; therefore, certain misalignments occurred when realigned with its digital counterpart. As a solution, the artist turned to the iPad to add the necessary corrections while sitting in front of the wall. Needless to say, that this particular choice had a positive effect on accuracy. Selecting, repositioning, and occasionally distorting certain segments of the line drawing was only possible with Procreate’s sophisticated Selection and Transform tools. Let’s have a closer look at the various options these tools offer.
Selections
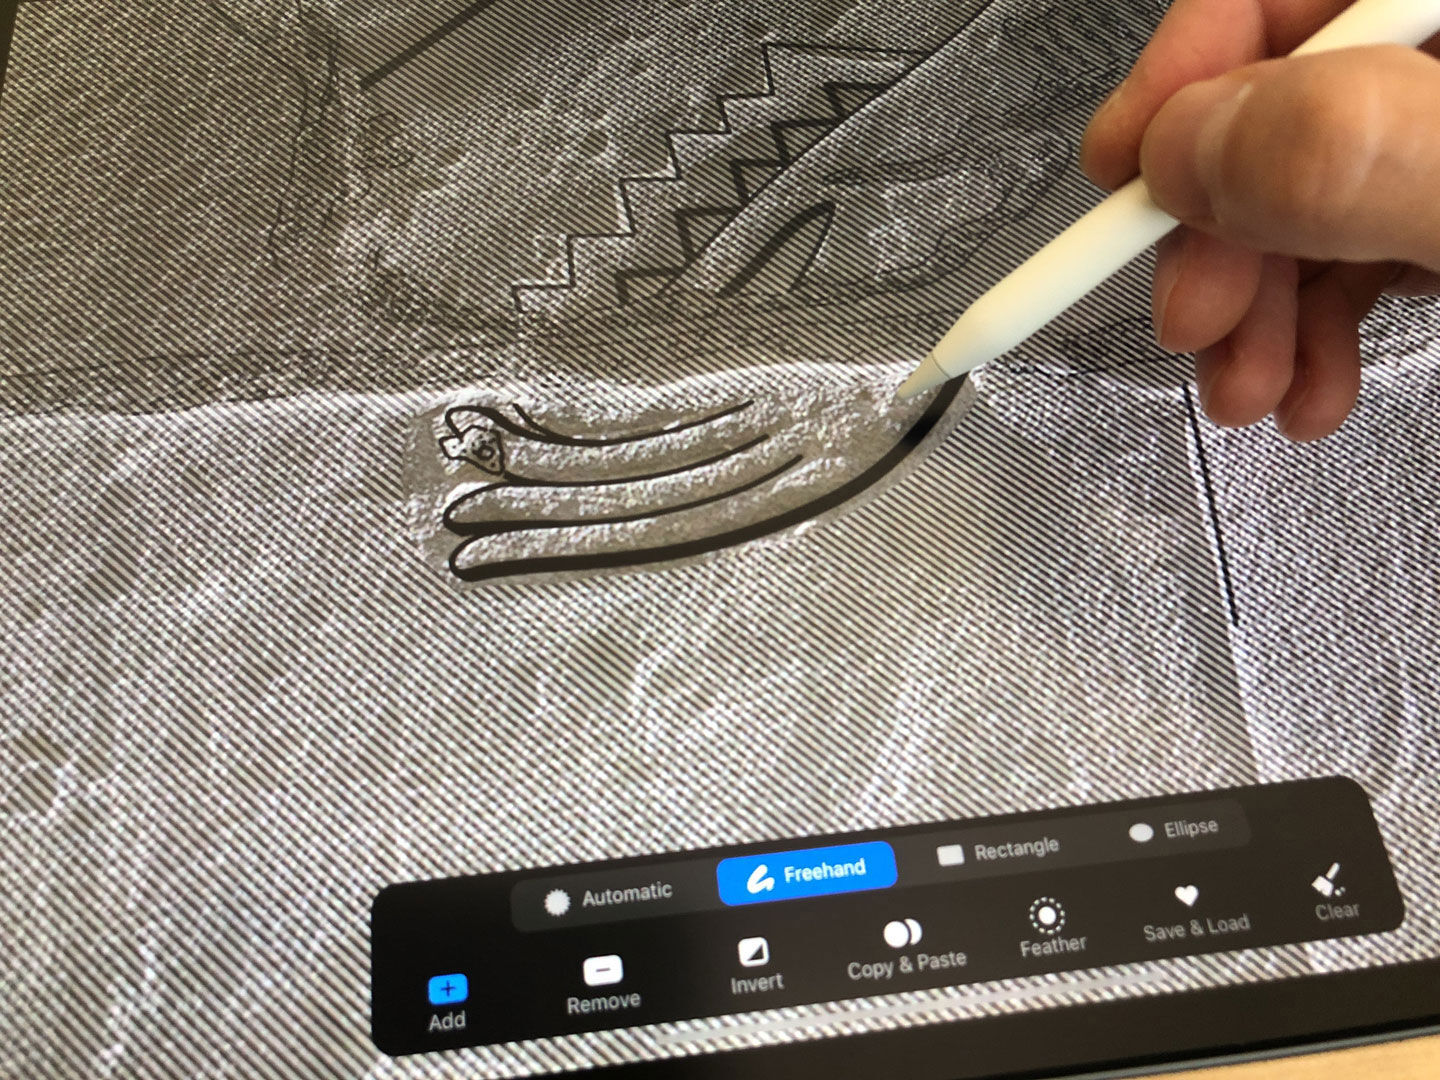
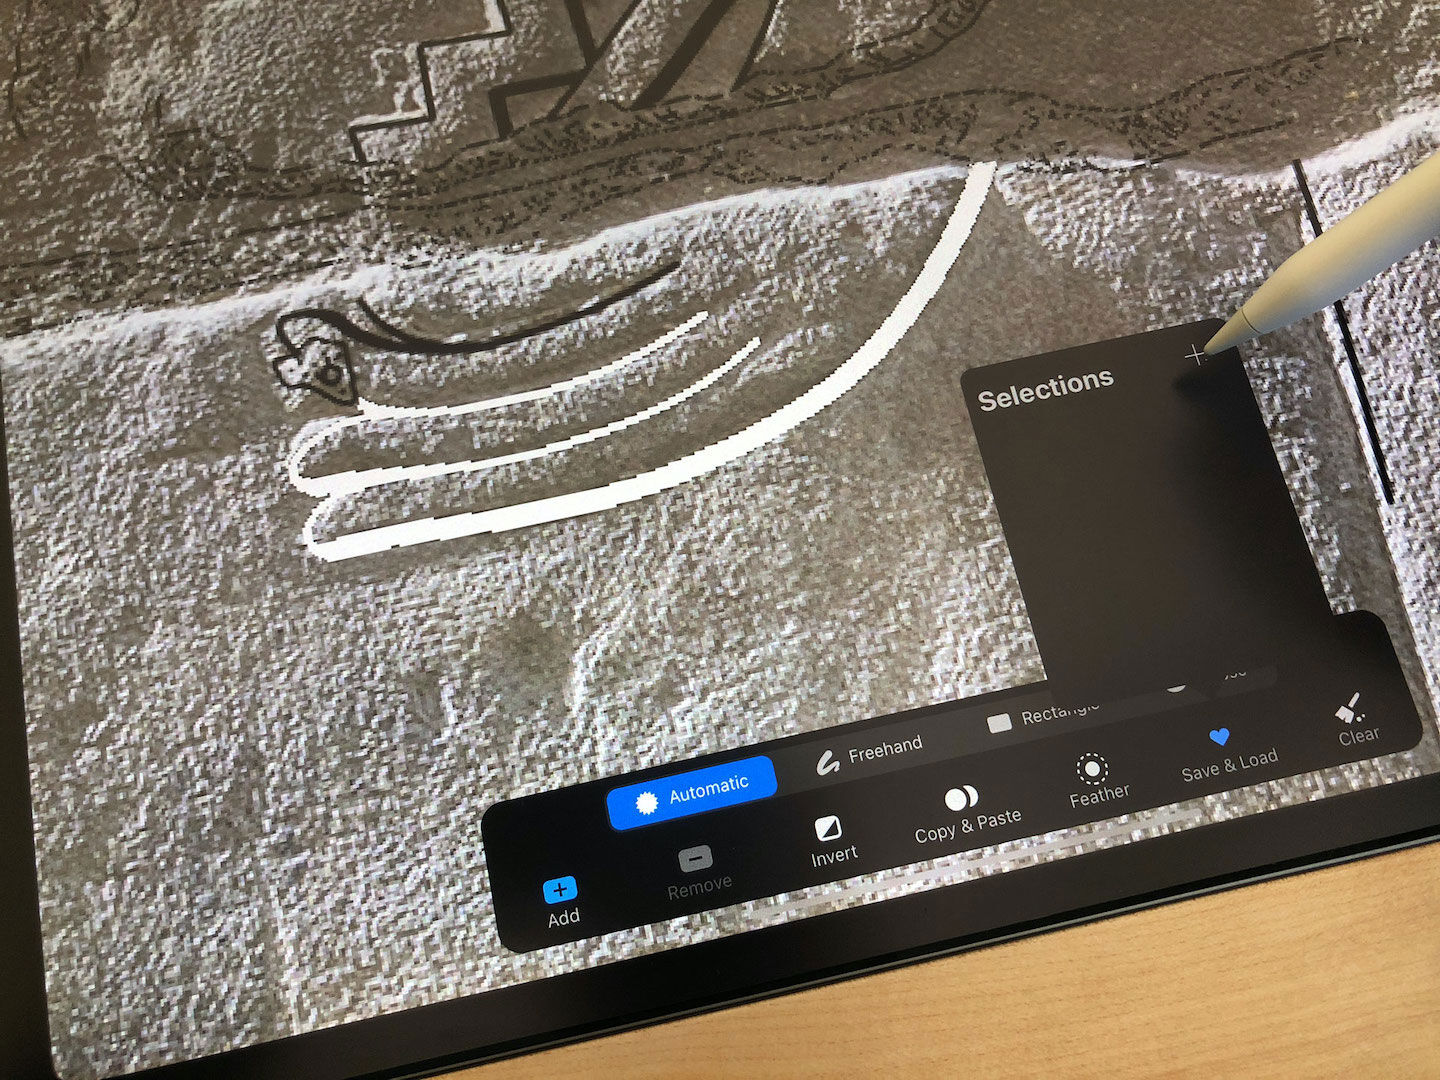
Similarly to Photoshop, Procreate’s Selection tool is intended to isolate an area in order to interact with its content. To activate the tool, one must tap on the icon with the dashed “S” on the top menu to call up its options at the bottom of the screen. When creating selections, there are 4 different ways offered in Procreate: automatic, freehand, rectangle and eclipse. Each of these selection modes contains more sub-selection options, such as add, remove, invert, copy & paste, feather, save & load and clear. Starting with freehand selections, we need to zoom in on our subject and draw a continuous line on the canvas to create a selection loop around the area. The starting point of our loop is marked by a dot. Unlike in Photoshop, lifting the Pencil away doesn’t automatically close the loop, so one can really zoom in on areas and be very precise about selections. Tapping on the dot will close the loop. If less precision is needed, we can also make polygonal selections by tapping out points, whereby a straight line is drawn between each tap. It is also possible to freely use the combination of the two to our liking. While making selections, we can use two fingers to zoom and rotate the canvas, making the whole process fast and as accurate as needed. Furthermore, when making mistakes, we can also undo those steps with a two-finger tap, just like when drawing pencil lines. In case further refinements are needed on a selection, we can add or remove additional segments by simply clicking on the relevant button and drawing additional selective loops on the canvas. Once we are happy with our selection, we can tap any of the tools (brush, eraser or any of the adjustments) and start working within the selected area. If we ever need to go back to editing a selection mask, we can do so by briefly holding the selection menu button.

Tap and hold the Selection button brings back the last selection initiated on the canvas.
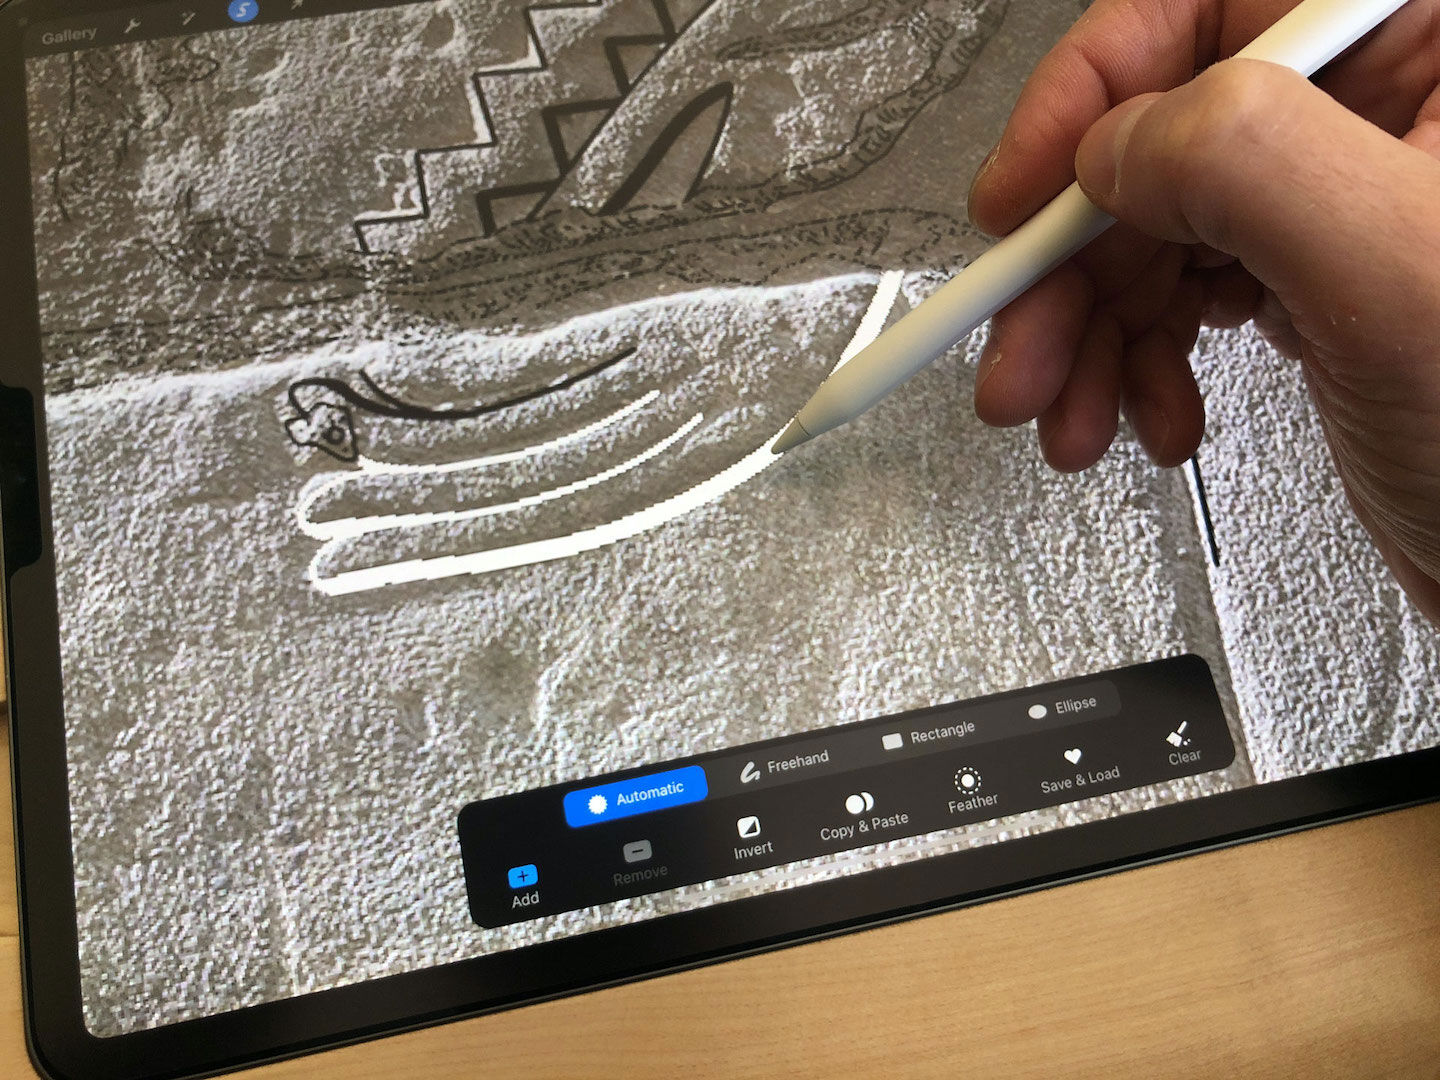
After making a selection, we’ll notice that the unselected areas are shaded with diagonal lines and only the selected area appears to be clear. In its default setting, this shading might seem rather transparent or too opaque and could alter background visibility in a negative way. In this case, we can change the opacity of the shaded areas by moving its slider in Actions / Prefs / Selection mask visibility.
One doesn’t necessarily have to lay out the selection path manually, as Procreate offers a quite sophisticated automatic selection tool as well. With this option, we can simply add an area to a selection by tapping on the desired spot on the canvas. If we grab only a little or too much of the desired area, we can drag our finger (or the Apple Pencil depending on the settings) to adjust the selection threshold. As we lift away, this new threshold will be remembered and used as default for the next selection. Automatic selection can be used in combination with any other selections. The other two options are also worth mentioning for when much simpler selections are needed. Using either the Rectangle selection tool or the Ellipse selection tool, one can create the relevant selection by tapping and dragging one finger across the screen (tap and drag with two fingers results perfect shapes). Of course, if it gets too complicated, we can just clear the actual selection (tapping on the broom icon) and start over.
Modifying a drawing segment in Procreate
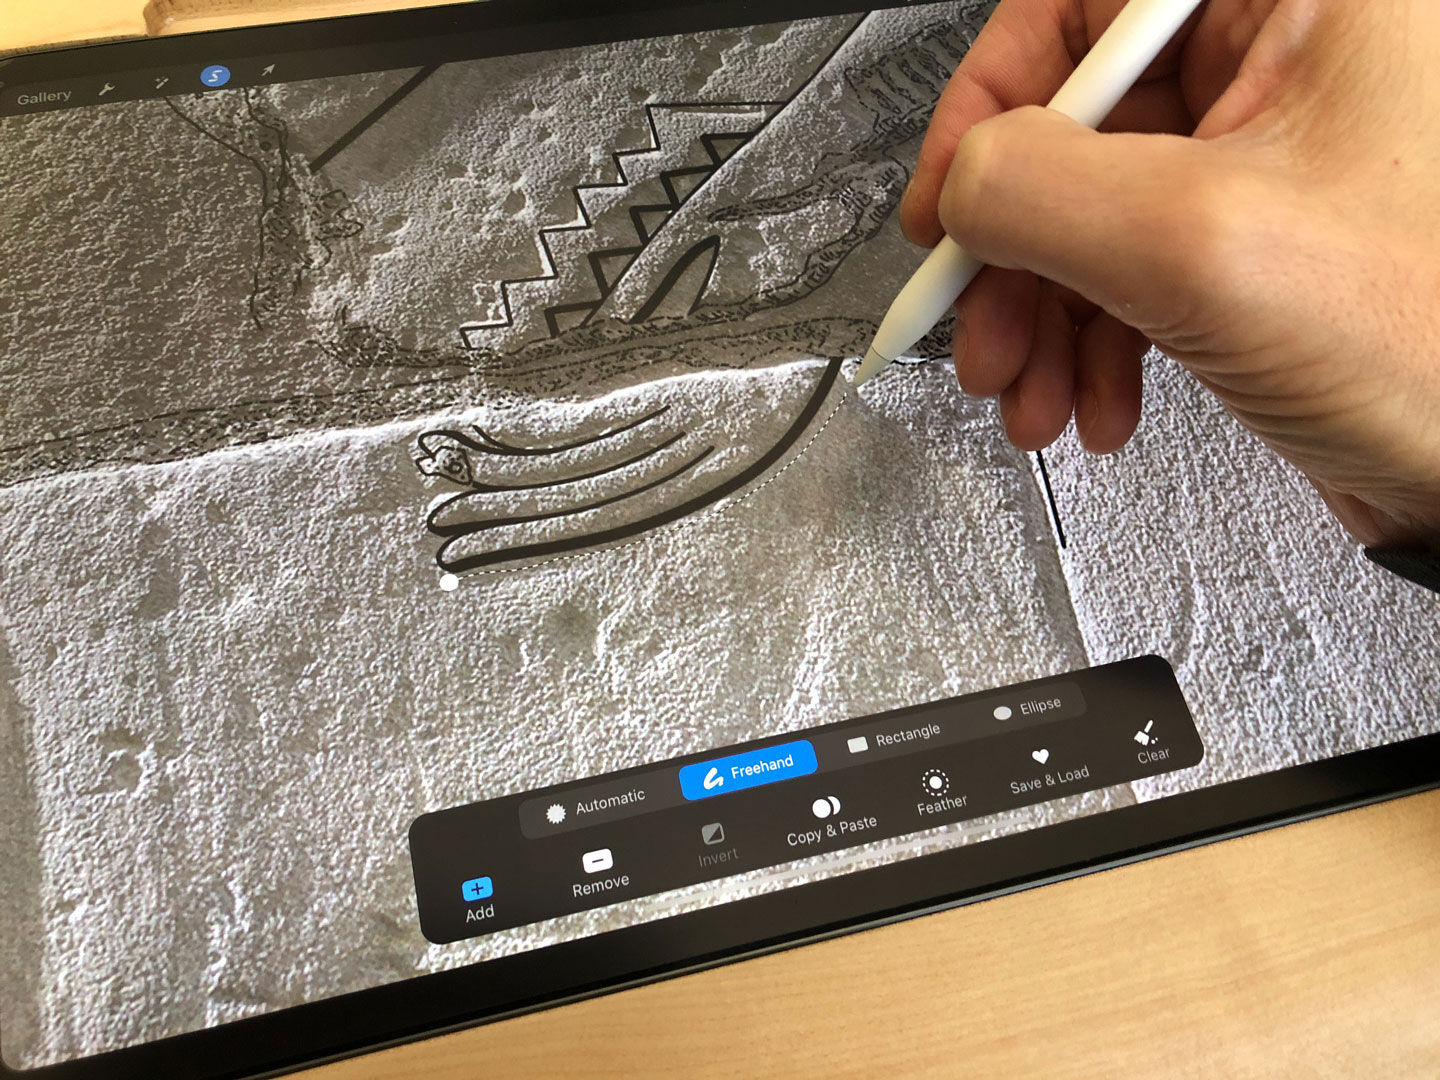
(1) Draw an outline around the area to be modified using the Freehand Selection tool.
(2) Alternately, you can use automatic selections and refine the selection by moving the Pencil horizontally.
(3) The selection can be closed by clicking on the starting point marked by a white dot. The unselected area becomes shaded.

(4) One can add to or deduct from a selection in order to achieve the desired precision necessary for initiating modifications.
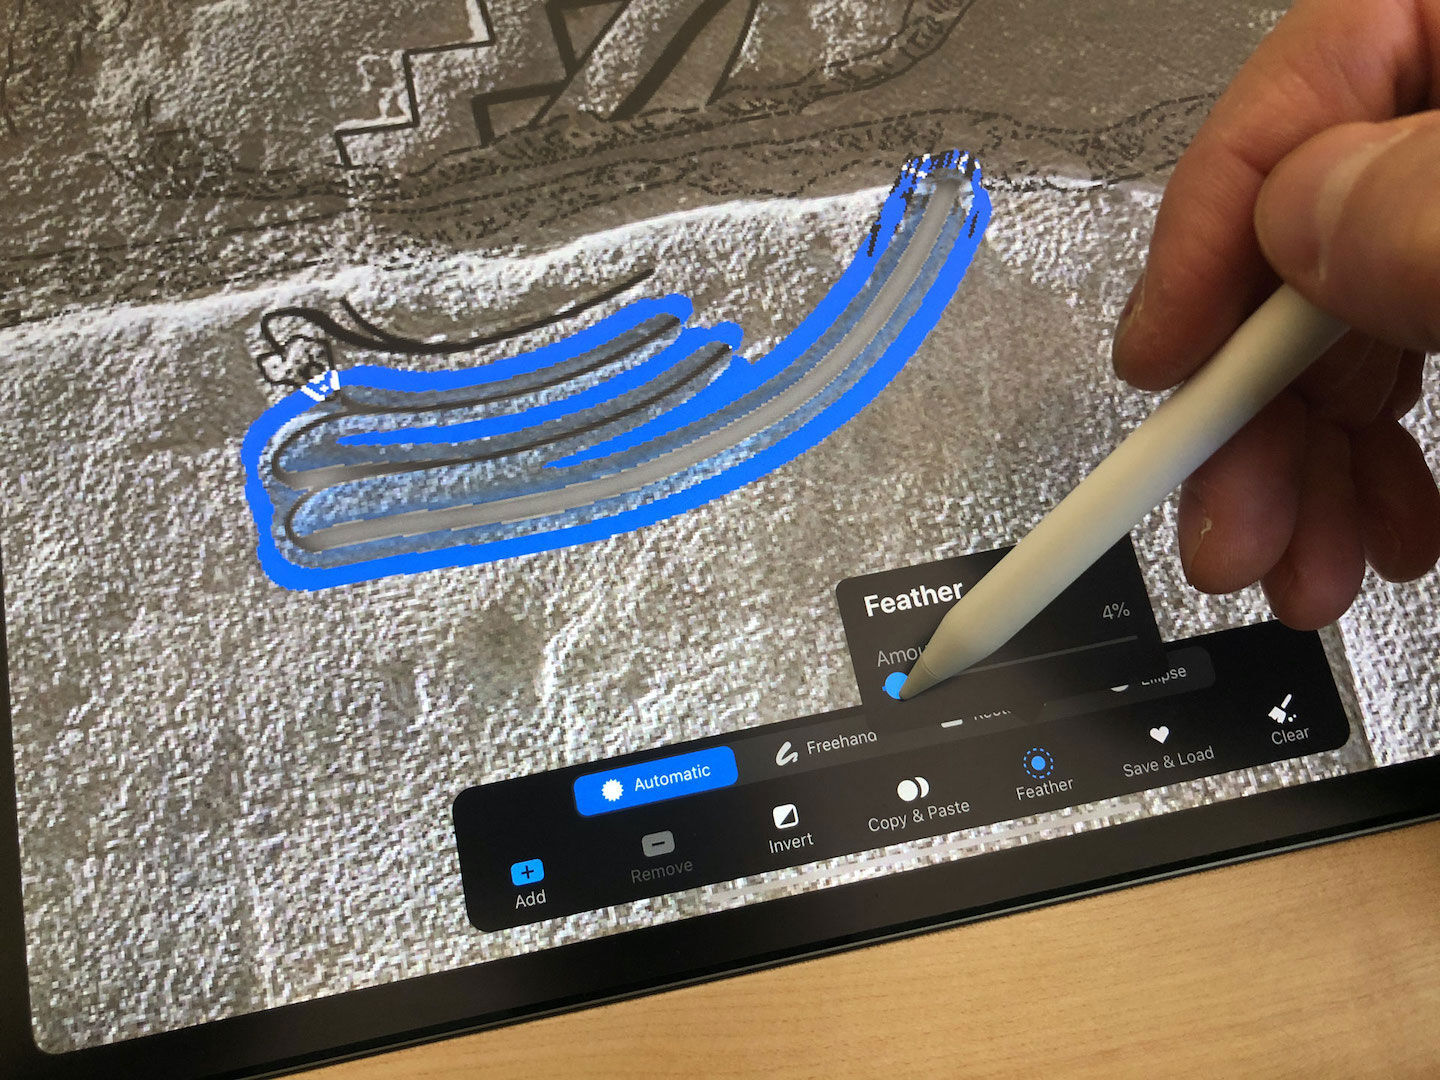
(5) If you need to adjust the sharpness of the selection border, pixels can be added/removed along the selection edge using the Feather slider.
(6) A selection can be saved and loaded up again at any time during the drawing process, even after closing and reopening a drawing.
(7) Transformations are to be commenced either by pulling or holding and pulling the anchor points along the boundary box.
Transformations
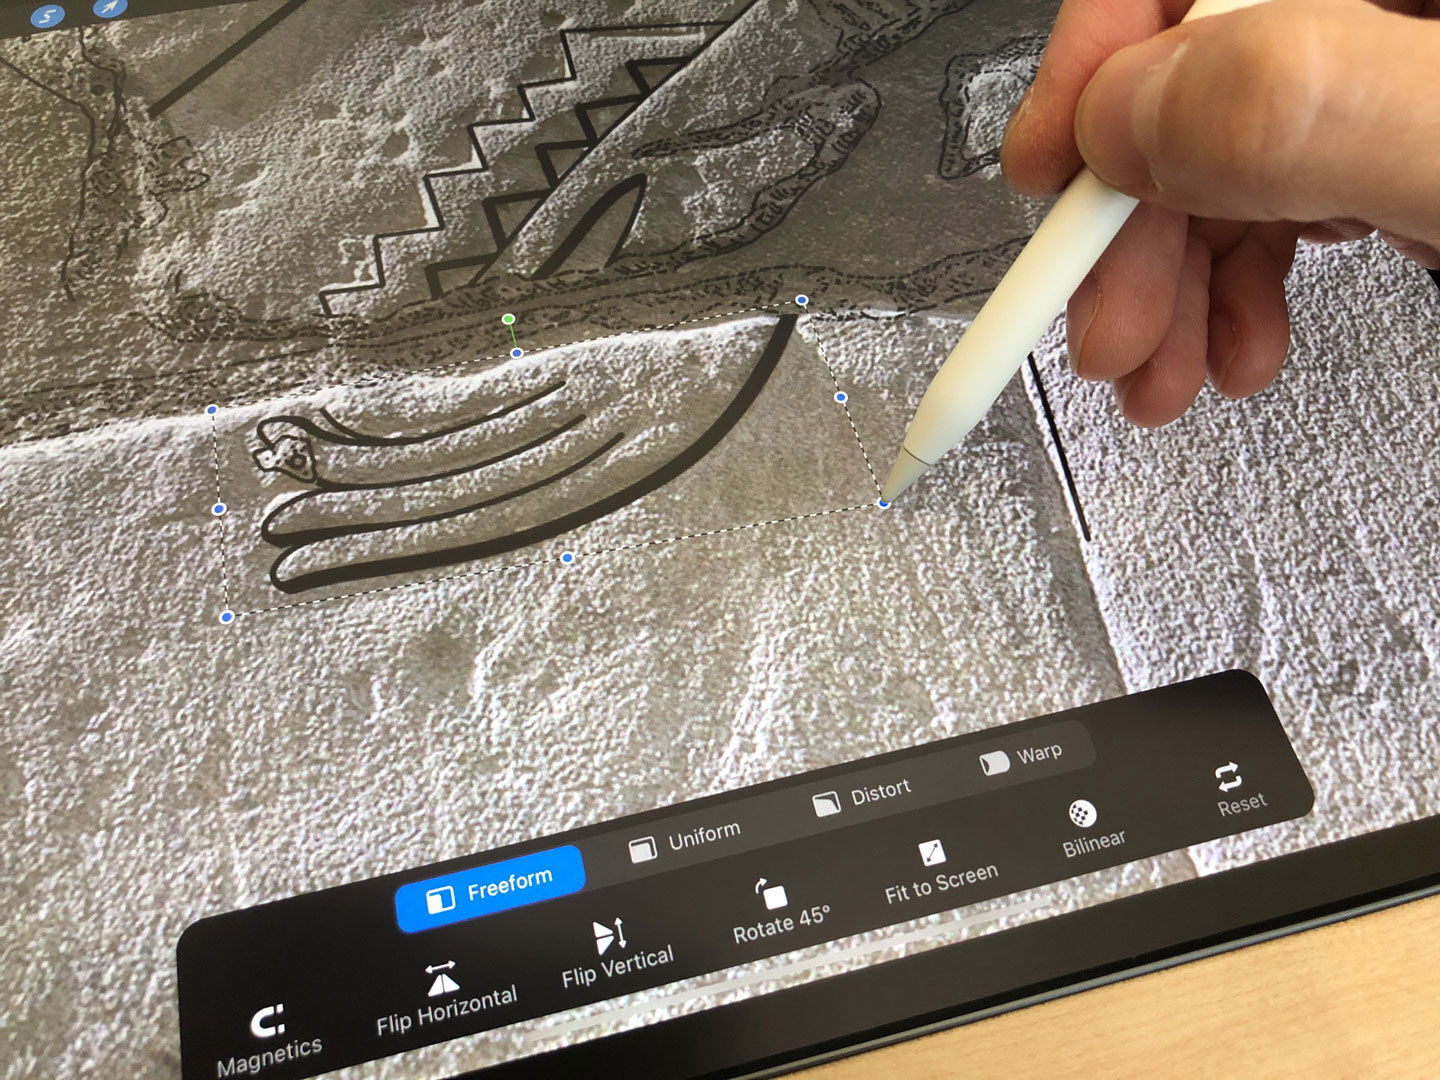
Now let’s get to the more interesting part and see what kind of transformations can be applied to our precisely selected drawing segments. Same as with selections, tapping on the icon with the arrow on the top menu calls up its options at the bottom of the screen. Simplest among all modifications is dragging the selection around with one finger (one can also rotate the selected area by dragging the green node on top of the bounding box). We recommend using this option when repositioning line segments that appear slightly off. We have further choices beyond the simple drag: the four main ways to transform a selection are freeform, uniform, distort and warp. Each method has subfunctions providing more options, such as magnetics, flip horizontal / vertical, rotate 45, fit to screen, bilinear and reset. Among all these alternatives, freeform transformation is the real solution when it comes to applying fine adjustments. When freeform is selected at the bottom, pinching and dragging with two fingers allows us to move, rotate and proportionally scale the selected area. By selecting the uniform option, we can provide more control over proportional transformations. With the uniform function turned on, holding and dragging any blue node around the selection border will scale the selection in proportion. To make non-proportional transformations, one must drag one of the blue nodes along the boundary box while uniform is turned off. Briefly holding one of these nodes before moving around lets us perform more complex distortions, suited again for fine adjustments. Additionally, by selecting magnetics at the bottom, which draws up a blue vertical or horizontal line, these transformations can be performed as shear adjustments, allowing the actions to be performed only along these guides.

Magnetics mode provides you with smart guidelines (in blue) snapping transformations to certain areas while initiated.
When talking about more complex transitions, we must spend a little time with Procreate’s Warp tool as well. Just like in Photoshop, warp mode superimposes a mesh of guidelines over the selected area, in order to help us visualize how the surface of the selection would be distorted if it were in a three-dimensional space. One can hold and drag anywhere within this selection (or alternately grab the blue nodes) to adjust its content. When in warp mode, the magnetic option is exchanged to an option called Advanced Mesh. This option specifies more nodes, thus providing more control for more nuanced transformations. After selecting and repositioning a drawing segment that is misaligned with the photo background, warp is the tool to use for refining the details.

Warp can be used to stretch a line into the right position without effecting the rest of the selected area
If you wish to get a closer look at a detail while the Transform tool is activated, you can only do so by tapping and holding the transform icon (the arrow in the upper menu) as you move around or zoom in and out on the canvas. When finished, you can release your finger and continue with your transformation (note that this rule doesn’t apply to warp mode). Finally, we should mention a setting oriented towards more advanced users, called Interpolation. The interpolation function allows us to make decisions about how the pixels are arranged and adjusted when being transformed. The three interpolation methods distribute modifications differently, with Nearest Neighbour producing a sharp, pixelated edge, Bilinear resulting in a softer edge and Bicubic generating the blurriest / smoothest edge to the line. Naturally, we can reset all transformation steps or undo / redo as many as we wish, just like with any other tool Procreate has in its repertoire.

One can move a selection in small increments by zooming in and tapping the canvas in the desired direction
At the end, Procreate can be a real timesaver if it’s used to its full potential. We know from experience that the best camera is the one we have with us and the same applies to digital epigraphy. The versatility of the iPad is incomparable with desktop or even laptop computers and when used for the right purpose, Procreate provides much better and more accurate results than its overly complex siblings reserved for the studio.
0 comment(s)
Leave a comment(We'll keep your email address private)