
Xencelabs’ Quick Keys Remote Promises a More Streamlined Workflow for Digital Artists
Written by Krisztián Vértes

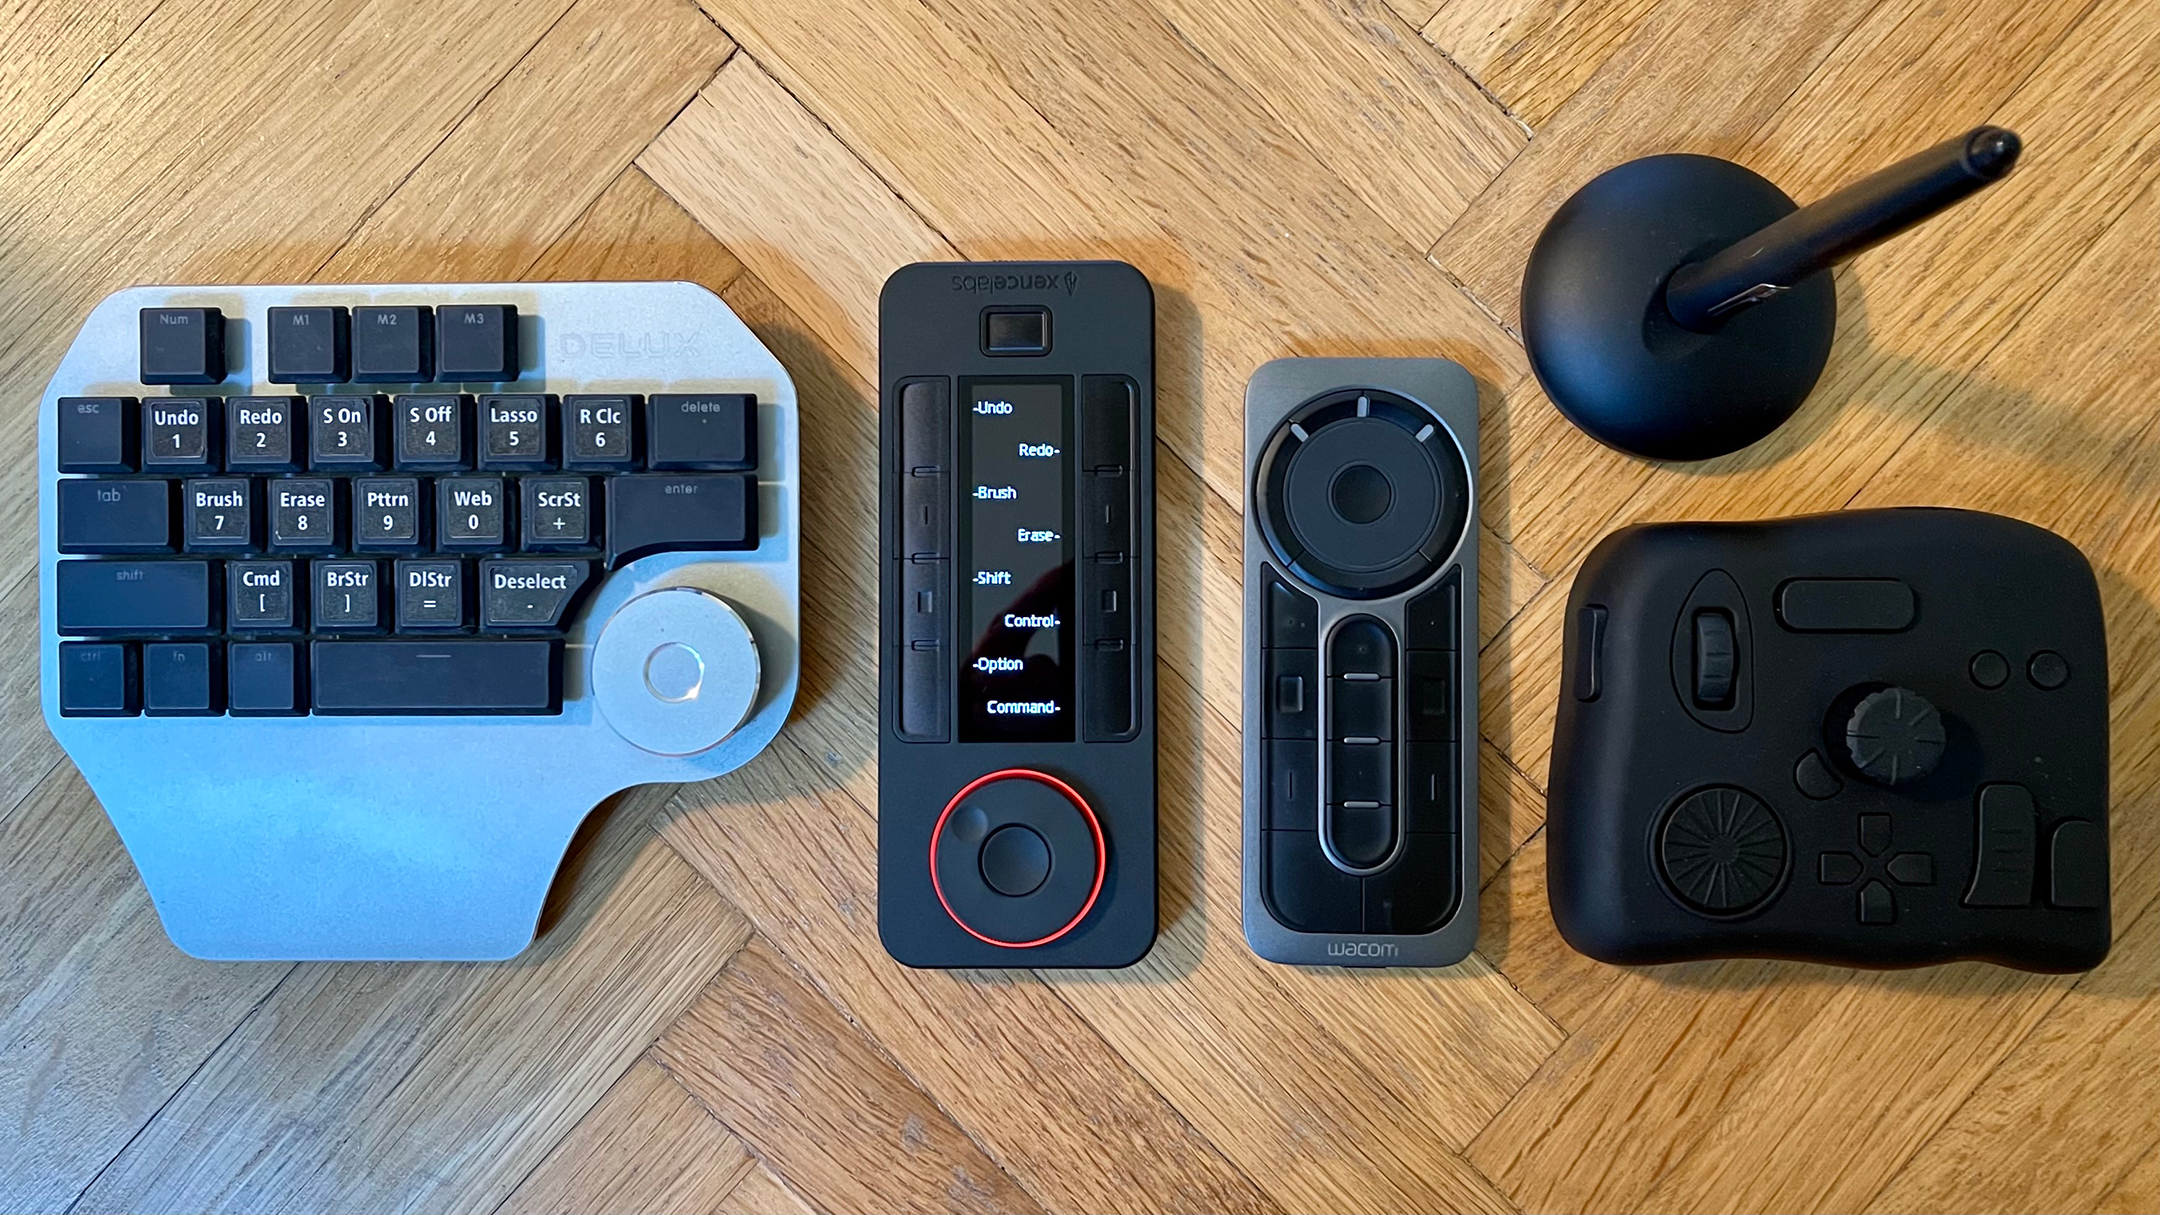
Shortcut wizards for Photoshop (from left to right): Delux T11 Designer Keyboard, Xencelabs Quick Keys Remote, Wacom Express Key Remote, and TourBox Controller
There is always the lingering question when working with the complex interface elements of Photoshop: could it be used more efficiently, or does one always have to poke around for every slight adjustment to be made?! Creating a multilayered outline drawing with Adobe’s software requires constant interaction from the artist, changing brushes, erasing, selecting, modifying certain elements while navigating an often-enormous canvas. When you use Photoshop every day, shortcuts become an essential part of your workflow, and your preferences will set you apart regarding Adobe tools. digitalEPIGRAPHY has been on the quest to streamline the digital inking process ever since the Survey’s implementation of Photoshop as their leading inking software. Although creating pre-calibrated brushes that behave as required in a given situation certainly helps, the artist still maintains a great amount of control while drawing.
During the past few years, we tested several shortcut devices, pointing out their strengths and shortcomings. Most straightforward and most portable of all is Wacom’s rugged Express Key Remote, which can be easily picked up and dropped onto a large Wacom Display or just held in the hand while drawing. With 17 programmable keys and a touch ring, Wacom’s little device is quite capable, even if it’s hard to distinguish between its tightly arranged uniform buttons at times. Yet another time-saving option is offered by Delux with their Designer Keypad, mimicking a compact “half-keyboard” extended by a multifunctional dial. With its labeled keycaps and more conventional arrangement, it can be a charming alternative for those accustomed to reaching for their regular keyboard for shortcut execution. Delux’s Keypad is highly customizable, and using your own stickers on the keycaps makes it even more efficient (see the photo above). Finally, we should mention TourBox, which is - most unconventionally of all - a mix of custom-shaped buttons, knobs, and dials building its success around navigating a sea of options all at once. Although built around very different concepts, one common feature of these remotes is that they rely on the user’s visual muscle memory to remember what happens when a button is pressed or a knob is turned.

The fabric-covered hard case has pockets to store the remote, the charging cable, and the wireless receiver.
Now there is a new contender to steal the show in this segment, promising to be a real time-saver. By adding one missing feature to the mix, a crisp OLED display, indicating current shortcut functions, American graphic tablet specialist, Xencelabs created an appealing solution to those wanting a large set of quick tasks at their fingertips. The Quick Keys Remote arrives in a package that screams quality and care, with not only the essentials but a neat little carrying case also included in the box. Remote and case aside, a USB-A to USB-C charging cable, a USB-C to USB-A adapter, and a USB-A wireless receiver are also part of the package, providing all the necessary connectivity options.

Xencelabs' new Quick Keys is a Wacom Remote-sized, handheld slab with eight hardware keys and a helpful OLED display in the center (Xencelabs on the left, Wacom on the right)
The remote is designed to be held in one hand; its narrow and elongated shape allows the thumb to reach all buttons. Nonetheless, we still found it a tad on the bulky side (that might come from the device’s thickness), mainly when operating the dial AND the buttons simultaneously. Luckily there are several positions where the Quick Keys can be employed, but more on that later. The hefty Quick Keys’ build quality is excellent, the OLED panel is plenty sharp and bright (that is also adjustable through the software), and the back surface is made of matted rubber a’ la Wacom, so it grips nicely and won’t slide around on flat surfaces.
As expected from the included peripherals, the Quick Keys Remote connects to the computer wirelessly, using the little USB dongle. Unfortunately, there is no Bluetooth option available. Naturally, the tactile physical buttons are fully customizable. One can assign any keystroke, modifier, tablet, and navigation functions as well as mouse clicks and app-specific behavior to any of the eight keys around the OLED panel. To do so, downloading Xencelabs’ driver and pairing the device with its wireless receiver is necessary. Luckily, it is a straightforward and painless affair.

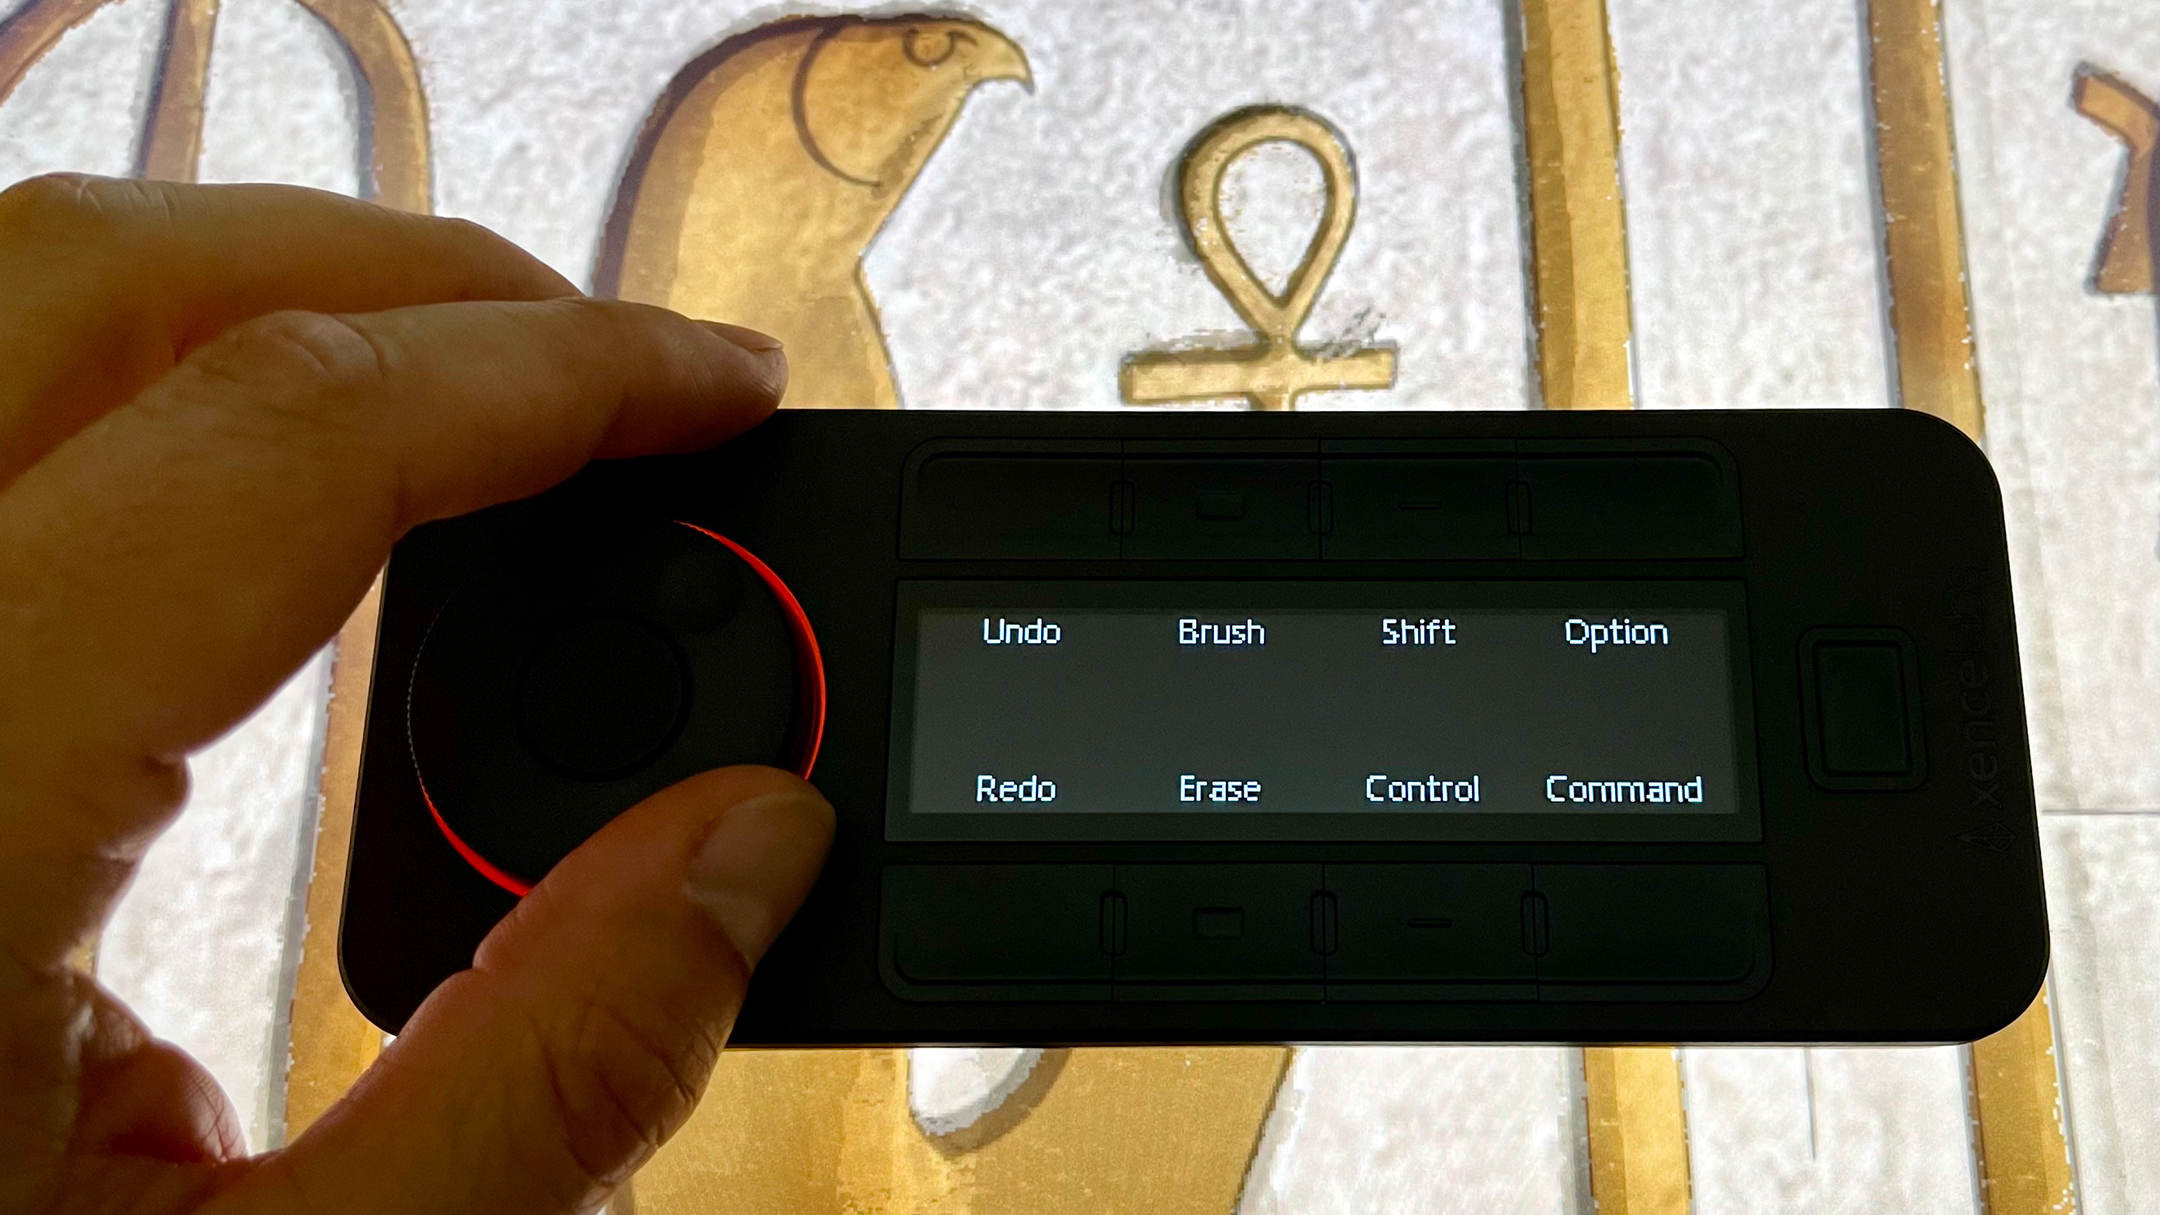
There is a center button allowing for switching between five shortcut groups. Naturally, the OLED display changes as you cycle through the sets
Setting up the Quick Keys is no more difficult than programming any other shortcut device; however, the sheer number of options require careful planning and more time from the user. There are only eight programmable buttons on the remote, which may not sound that generous at first. However, thanks to a physical switch button in the center, one can cycle through no less than five variations of these eight-button setups. It's worth mentioning that these can be assigned independently to each of your most-used applications as well. This means forty (40!) shortcuts per application, making the OLED screen displaying these functions in the center an inevitable part of the package.
Customizing the Xencelabs Quick Keys Remote

(1) Once installed, Xencelabs’ driver automatically finds the connected dongle and the device, indicating the actual battery level in a neat little product window. The app is well-thought-out and operates smoothly.

(2) One of the Quick Keys' biggest tricks up in its sleeve is that it can be held in four positions with the button layout changing dynamically. However, there is no gyro included, so orientation must be set manually.

(3) An adjustable light ring around the dial helps the artist find the desired functions when switching between the Quick Keys’ four programmable modes. It is easy to zoom, scroll, rotate, or execute a preset keystroke using the knob.

(4) Each of the eight side buttons can be programmed and differentiated by the actual app in use. There are five separate sets provided by the software which you can cycle through using the physical center button.

(5) Naturally, artists can save and import their favorite sets as desired. One of the biggest strengths of the Quick Keys is its endless customization options, from custom naming through the backlight’s color around the dial.
As various executions are being signed to each shortcut button, their function is immediately displayed on the central panel. When the device is set up to be used vertically, labels are shown in a vertical list with a hyphen connecting to their corresponding button. We found this arrangement less intuitive than having the labels arranged neatly side by side directly above and below their respective keys. But of course, for this arrangement, one must set the Quick Keys up to be used horizontally, which requires a particular learning curve.
Xencelabs’ remote can be placed directly onto the screen, thanks to the rubberized bottom, providing quick access to essential keystrokes right off the bat.
Finding the correct setup can largely depend on the user’s comfort. Therefore, it is recommended to be experimental with the Quick Keys, trying out all four positions. In specific scenarios, the dial can be in the way of managing the buttons and vice versa depending on your left – or right-handed orientation. We found the remote best placed right on to the screen while drawing, always having the labels in our vision. This is a must in our opinion, especially if you have more than one set of functions assigned to each button. All in all, one can either remember the assigned roles and blindly operate the controls (which defies the existence of the screen) or must constantly peak over to the device’s screen before executing a command (which can be a real distraction when drawing). And this brings us to a Catch-22 when operating Xencelabs’ Quick Keys.
First, the benefits: getting dynamically changing visual feedback on what commands are assigned to a specific button is a massive upgrade over the uniform black buttons offered by Wacom. Having several sets of them can serve any digital creator’s needs and lets us have not only the essential brush, eraser, pattern, and modifier keys but more complex macros set up as well, right at our fingertips. The interface is well-thought-out, and using the Quick Keys does speed up the drawing process, especially when placed right on the canvas. But (and there is a BUT, unfortunately), using Xencelabs’ little device is not all bells and whistles!
First, eight shortcut buttons are nowhere near enough to serve even the most basic drawing needs. Suppose you’ve ever looked at digitalEPIGRAPHY’s setup for any such remotes. In that case, you know that having Shift, Command, Option, and Control as well as shortcuts to Brush, Eraser, Pattern, Selections Tools is a must for inking line drawings in Photoshop. Once Undo, Redo, Incremental Zoom, Smoothing, Right Click, Delete, Escape, Save and macros, such as Stroke Path and Delete Path are added, we’ve occupied at least 15-20 of the available slots. While this is all possible thanks to the Quick Keys’ capability of distinguishing between individual sets, cycling through these sets is too slow and requires your constant attention.
For example, when I am inking with my current setup and want to select a portion of my drawing, I must press the switch and move from Set 1 to Set 2. Although this takes only a beat (briefly displaying the set’s name on the screen), it can be distracting. Now, if I want to go back to drawing, I must cycle forward, skipping my Set 3, before I have my Set 1 displayed again, where I can hit the button set for the brush. Not too cumbersome, but just slow enough to consider simply pressing “B” on my keyboard instead. And that is the biggest drawback of this clever little device. If these OLED labels were ON the physical buttons and enough of them to accommodate all my commands, the Quick Keys would be perfect. But then it would be a lot more expensive, and it would be called the Loupedeck CT...
Still, there is a lot to like about Xencelabs’ solution. Having the colored light ring around the multifunctional dial helps to differentiate between its four options. Again, assuming you don’t get confused by assigning separate dial functions to individual apps. Consistency and planning can make or break the Quick Keys’ usefulness in your creative workflow. Luckily, the dial has its function switch in the center, and a slight indent helps with rotation control. Although the tactile dial on the Xencelabs is superior to Wacom’s overly sensitive touch ring, we still prefer Delux’s click wheel, which is a godsend when making incremental changes in Photoshop.
Positioning the Xencelabs Quick Keys While Drawing

(1) We prefer using the Quick Keys horizontally, with the dial on the right, holding the index finger on the shortcut buttons. This setup provides easy access to the function switch button while the left edge of the dial is also within reach.

(2) The dial is at the top in the more traditional setup, so it doesn’t get accidentally “bumped in” while operating the shortcut buttons. The set switch button is right beneath your thumb.

(3) A vertical position with the dial at the bottom makes a somewhat unusual setup, especially compared with Wacom’s remote. Nonetheless, getting instant access to zoom and canvas rotation functions can be immensely useful when drawing with a single brush.

The USB-C charging port is positioned on the “top” while the on/off switch and the power indicator is placed at the “bottom” of the device. The green/orange light indicates battery level, the blue light designates connectivity.
The Quick Keys’ rechargeable battery provides 25-53 hours of usage, as stated on Xencelabs’ website. Of course, your mileage depends on how often you reach for the remote, the brightness settings of the OLED screen, and the allowed time before the device switches to standby. When it does, you must manually switch it on before being able to use the remote again. This might not surprise Wacom Express Key users, but is certainly less compelling than using the wired options provided by TourBox or Delux.
So, where does all this leave us when comparing the Quick Keys with similar devices. The answer hangs on your actual workflow, initially on the number of shortcuts you are contingent on. It is definitely recommended for those who don’t use many of them and appreciate having an OLED screen as a reminder of which presets are enabled. Xencelabs’ Quick Keys can be a real contender to Wacom’s remote with its exemplary build quality, good battery life, and portability. Miraculously, the company managed to keep the price slightly lower than Wacom even with the added OLED screen.

Xencelabs’ Quick Keys remote can be purchased as a standalone device directly from the American startup for $89.99 or from numerous retailers, including Amazon US, Amazon DE, Amazon UK, and many others. One can pair it with Xencelabs’ excellent Pen Tablet Medium saving $10 with the bundle price ($359.99), including everything needed for digital drawing.

0 comment(s)
Leave a comment(We'll keep your email address private)