
A capable Photoshop remote for shortcut champions - TourBox controller review
Adobe Photoshop is a robust desktop software with features and options that can be overwhelming at times. The metamorphosis of a drawing while getting its final appearance is a long process that requires the constant switching between tools and hunting for commands, sometimes hidden in sub-menus. Clicking our way through the many options/tools used in the studio can be rather cumbersome, especially without knowing the right shortcuts and finding an optimal way to execute these commands. For a long time, digitalEPIGRAPHY had its favorite device to take care of such chores, called the Delux T11 Designer. Nonetheless, back in November, we reported about another portable console in its early stages of realization that was supposedly a game changer in how we control Photoshop and other media creation apps. Now, after a very successful Kickstarter campaign and many production delays, the device is finally shipping to their first backers. Needless to say, we have one in our hands and have already put it through some extensive testing in the past week or so. In the following review we would like to share our first impressions using TourBox in the studio.
Hardware impressions and getting started
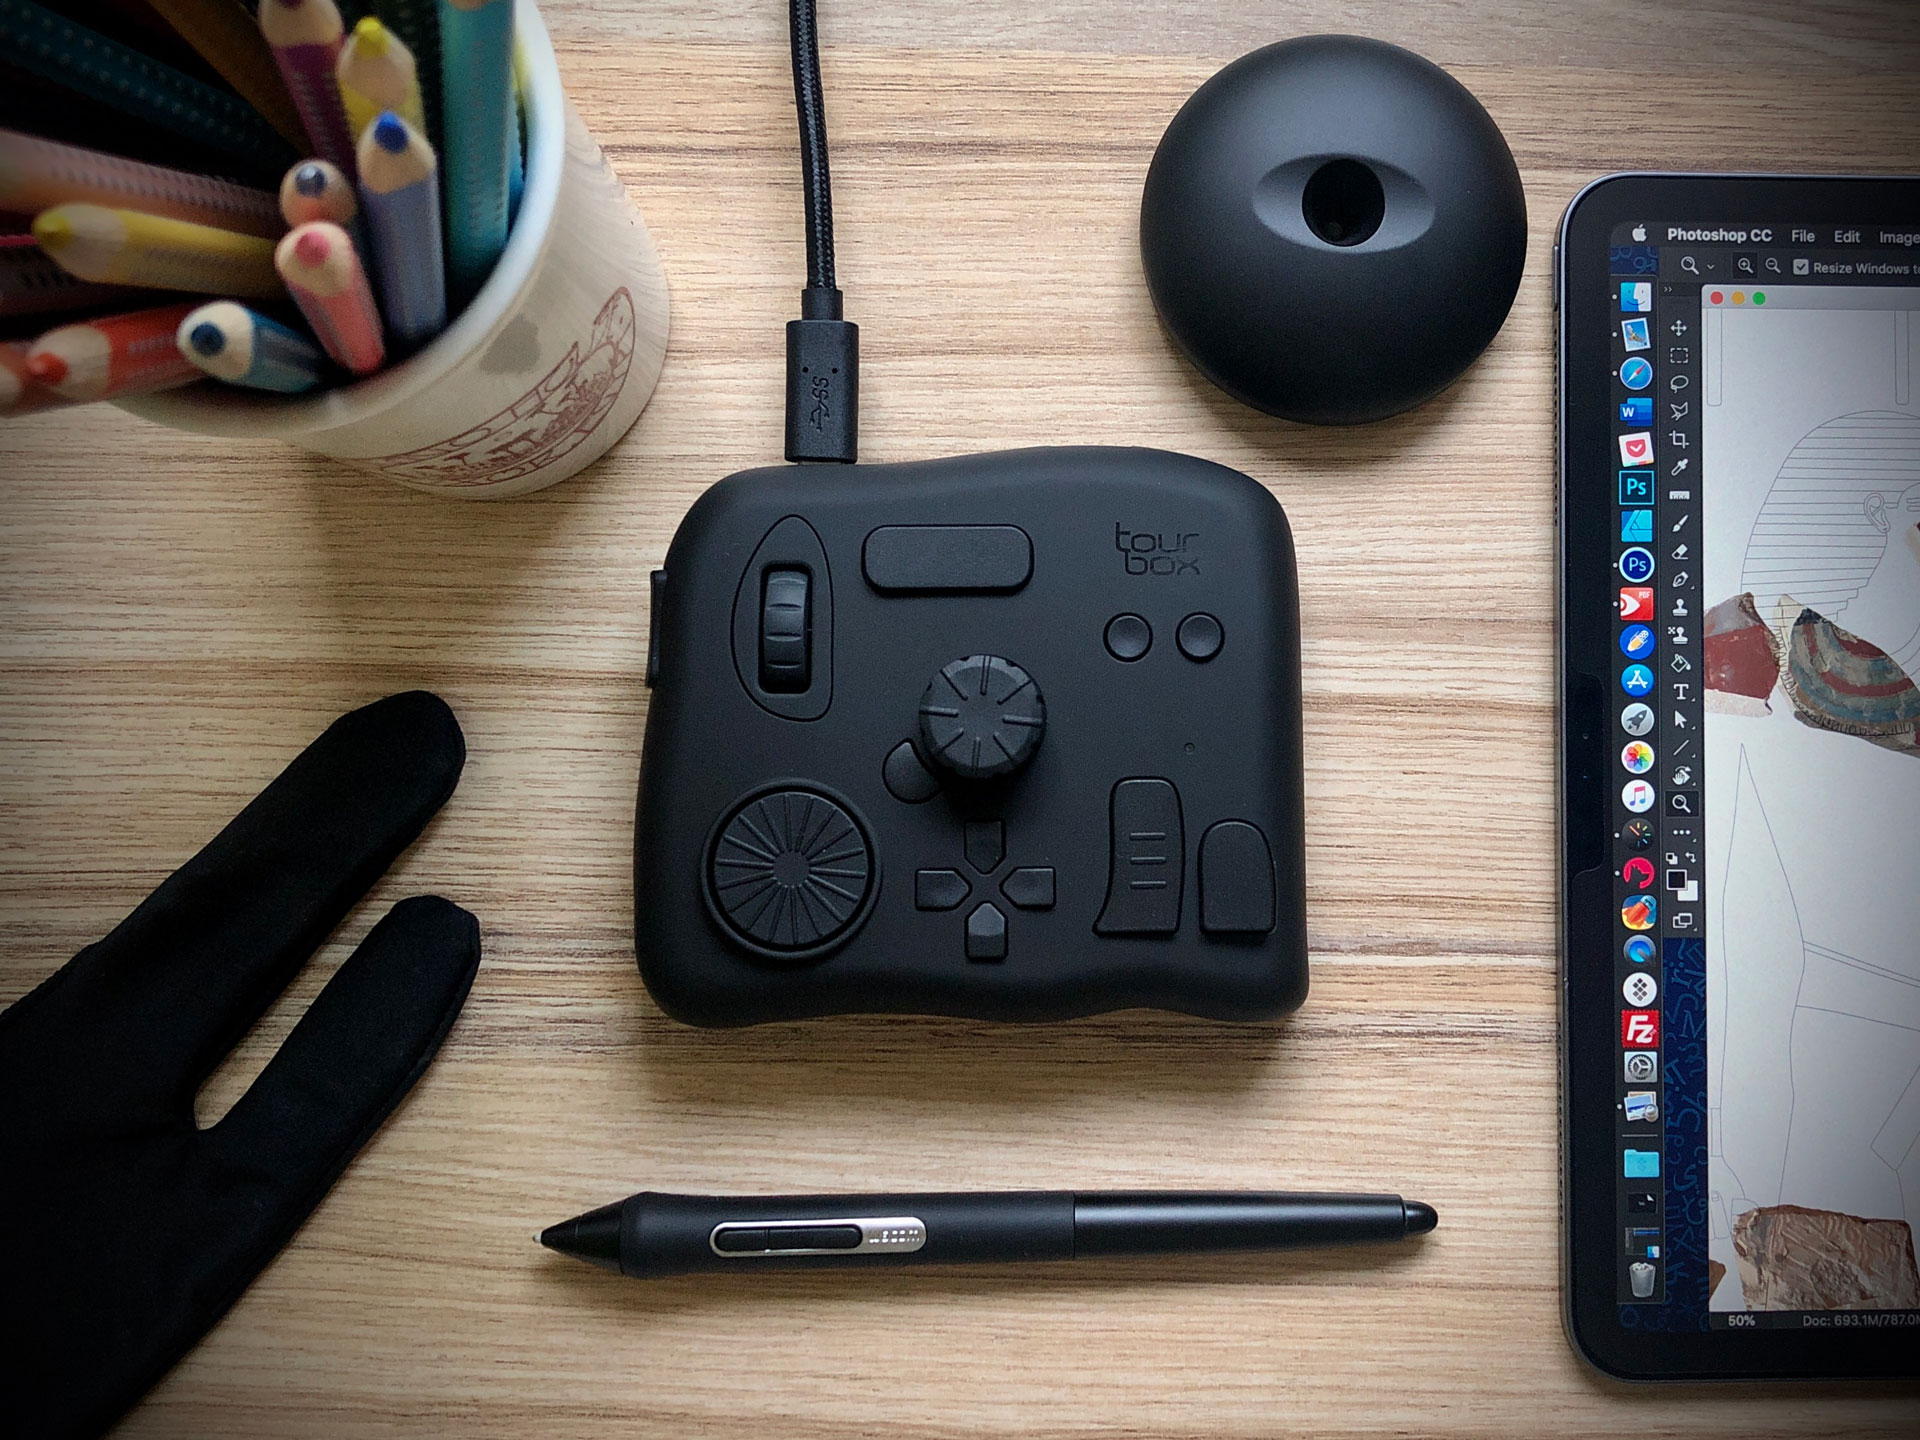
The controller comes in a small black box complete with a USB-C data cable and a little pouch for protecting the device on the go. When in hand, TourBox does feel positively small and attractive, a quality item that easily finds its place even on the tiniest workplace. The matte black (with a white variation coming later) chassis is surprisingly heavy (386g) for its size (117x100x30mm). The nice heft and the 4 rubber pads at the bottom give it some necessary grip, preventing the device from slipping around even on slightly slanting desktop surfaces. TourBox’s main attraction is of course its array of dials and buttons; the creators were able to cram 2 rotating dials, a central knob, a D-pad and 7 separate buttons into this little controller – all arranged conveniently for one-handed use. While TourBox isn’t the first to give digital creatives physical controls for their editing needs, its small footprint makes it appealing for editing and adjusting tool parameters with one hand while using a graphics tablet in the other. During our tests, we found the dials and buttons rather sensitive, providing minimal resistance that might be a problem for some when executing fine adjustments. Some of the buttons are closer to the surface while others stick out more, depending on the hoops and curves of the controller’s surface. This makes it difficult at times to execute the right command – especially considering that TourBox accepts double-clicks and button combinations for additional scenarios. But more on that later. TourBox works with both Mac and Windows PC, but only via its USB cable, there is no wireless option here. Finally, somewhat peculiarly, there is an extra USB 3.0 port on the device that adds a little hub functionality providing quick access to external drives through the controller.
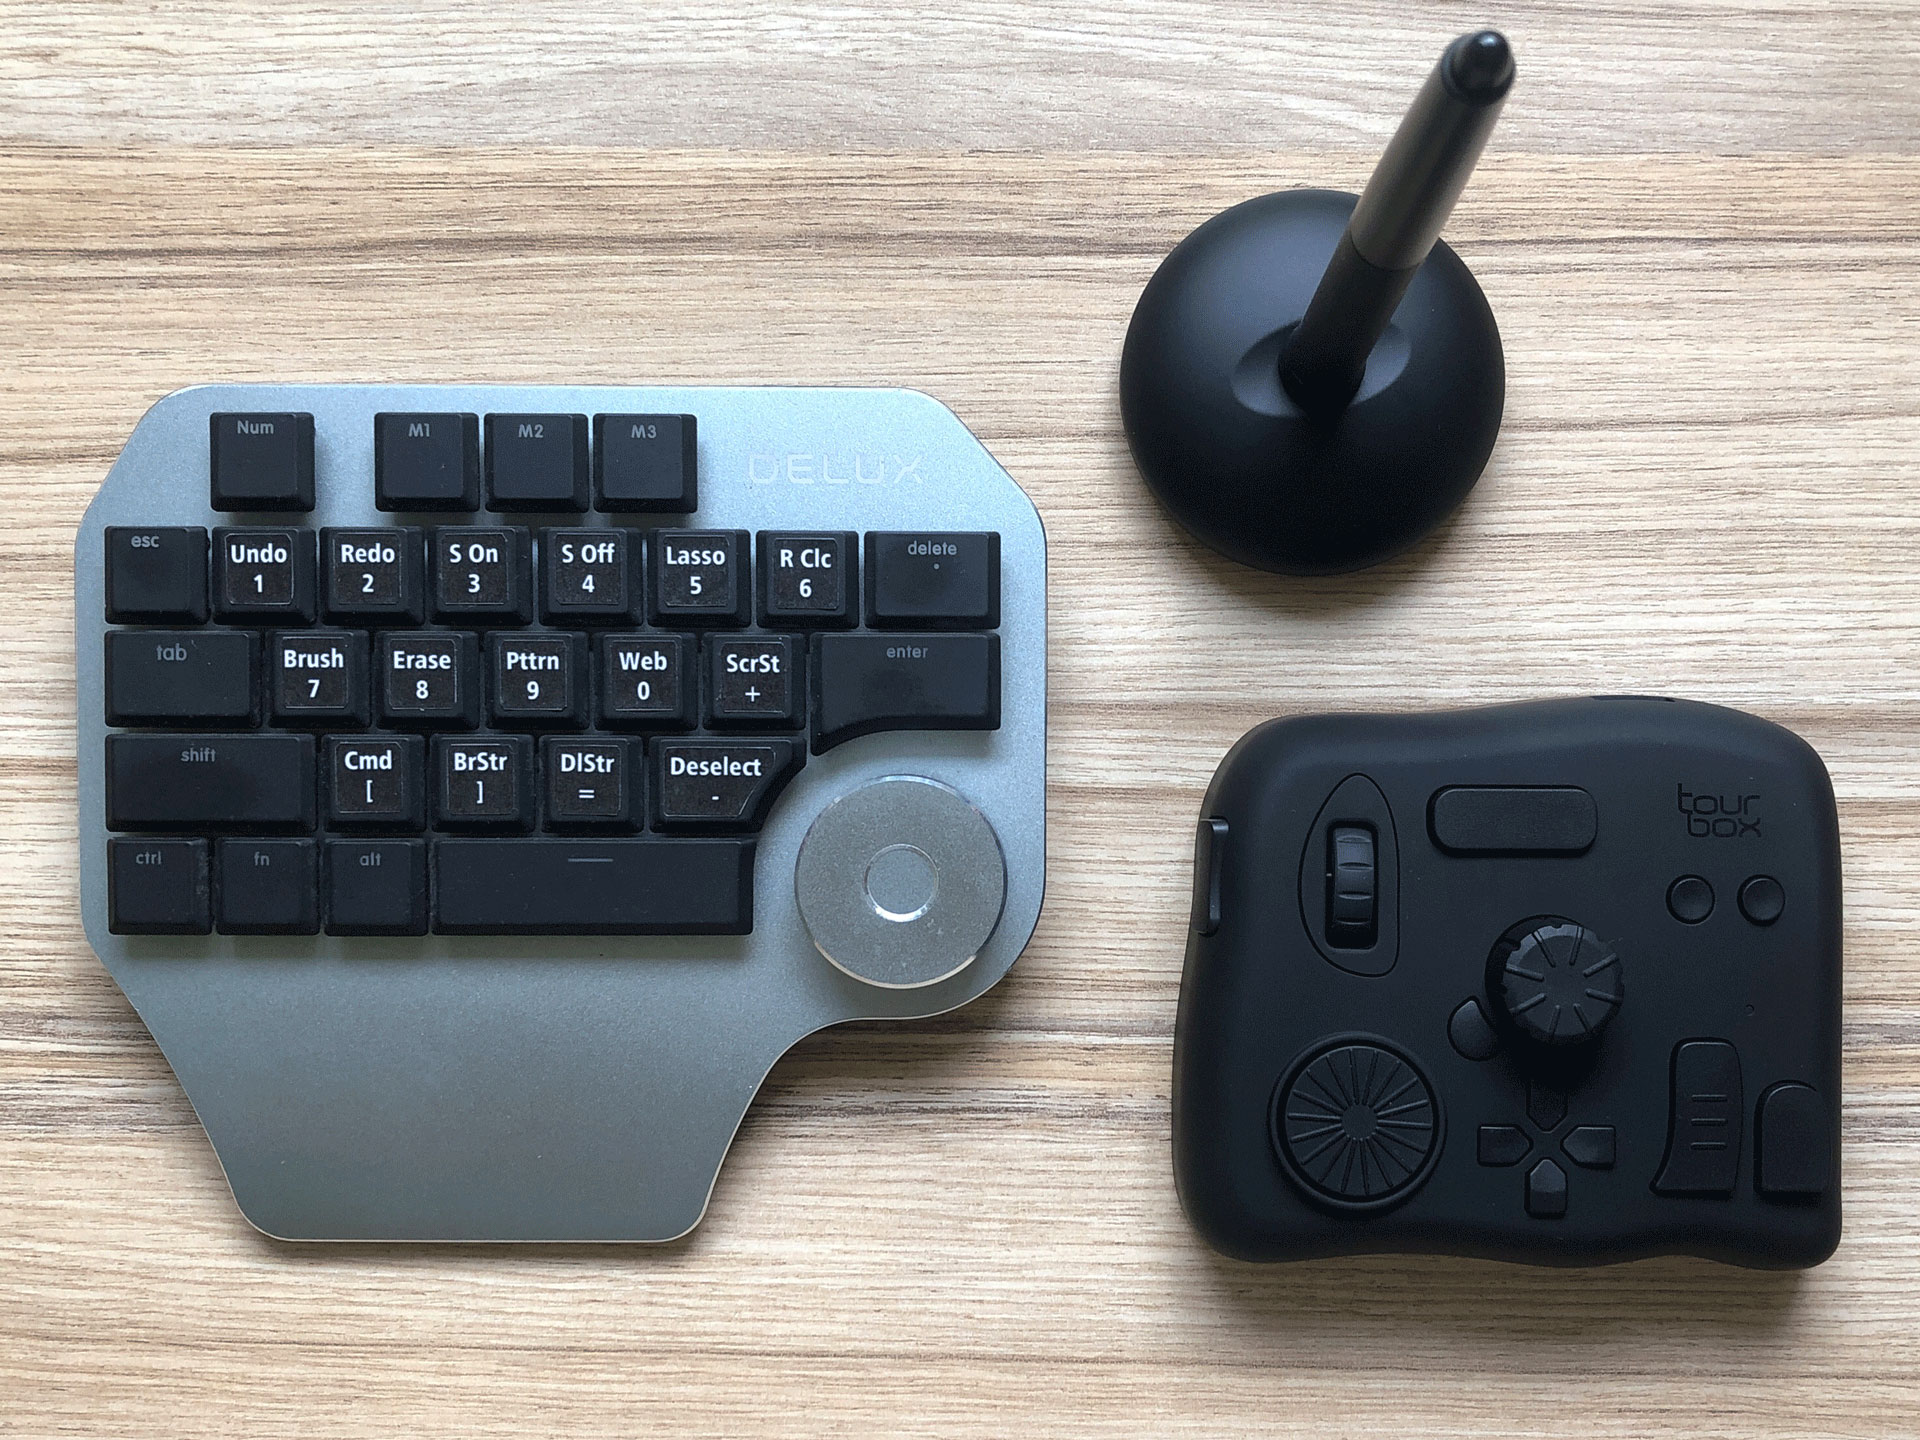
Delux T11 Designer (left) and TourBox controller (right) size comparison
We wish we could say that TourBox works right just out of the box, but unfortunately that is not the case. The creators provide a lengthy installation guide for both Mac and Windows, involving multiple steps that need to be executed in the exact order to get the controller to communicate with the computer. We didn’t experience any issues while setting up our unit but judging from the numerous angry comments on their Kickstarter site it wasn’t such a smooth sail for everyone. All and all, once you install the driver and the TourBox Console software, you need to give specific permissions in the Mac’s System Preferences allowing controller and software to communicate with each other. What is more annoying and a rather big blow in comparison with the buttery smooth operation of the Delux Designer, is that the software must be kept running in the background when using TourBox. While the Delux just works, with TourBox, one must be sure the client software is active EVERY TIME the Mac wakes up from sleep or restarts for some reason. Sometimes this process involves unplugging the device and plugging it back in… There is always hope that these installation and operational glitches will be addressed in the future, so let’s hope the developers won’t abandon their project any time soon.
Software
Setting up our favorite shortcuts in TourBox Console
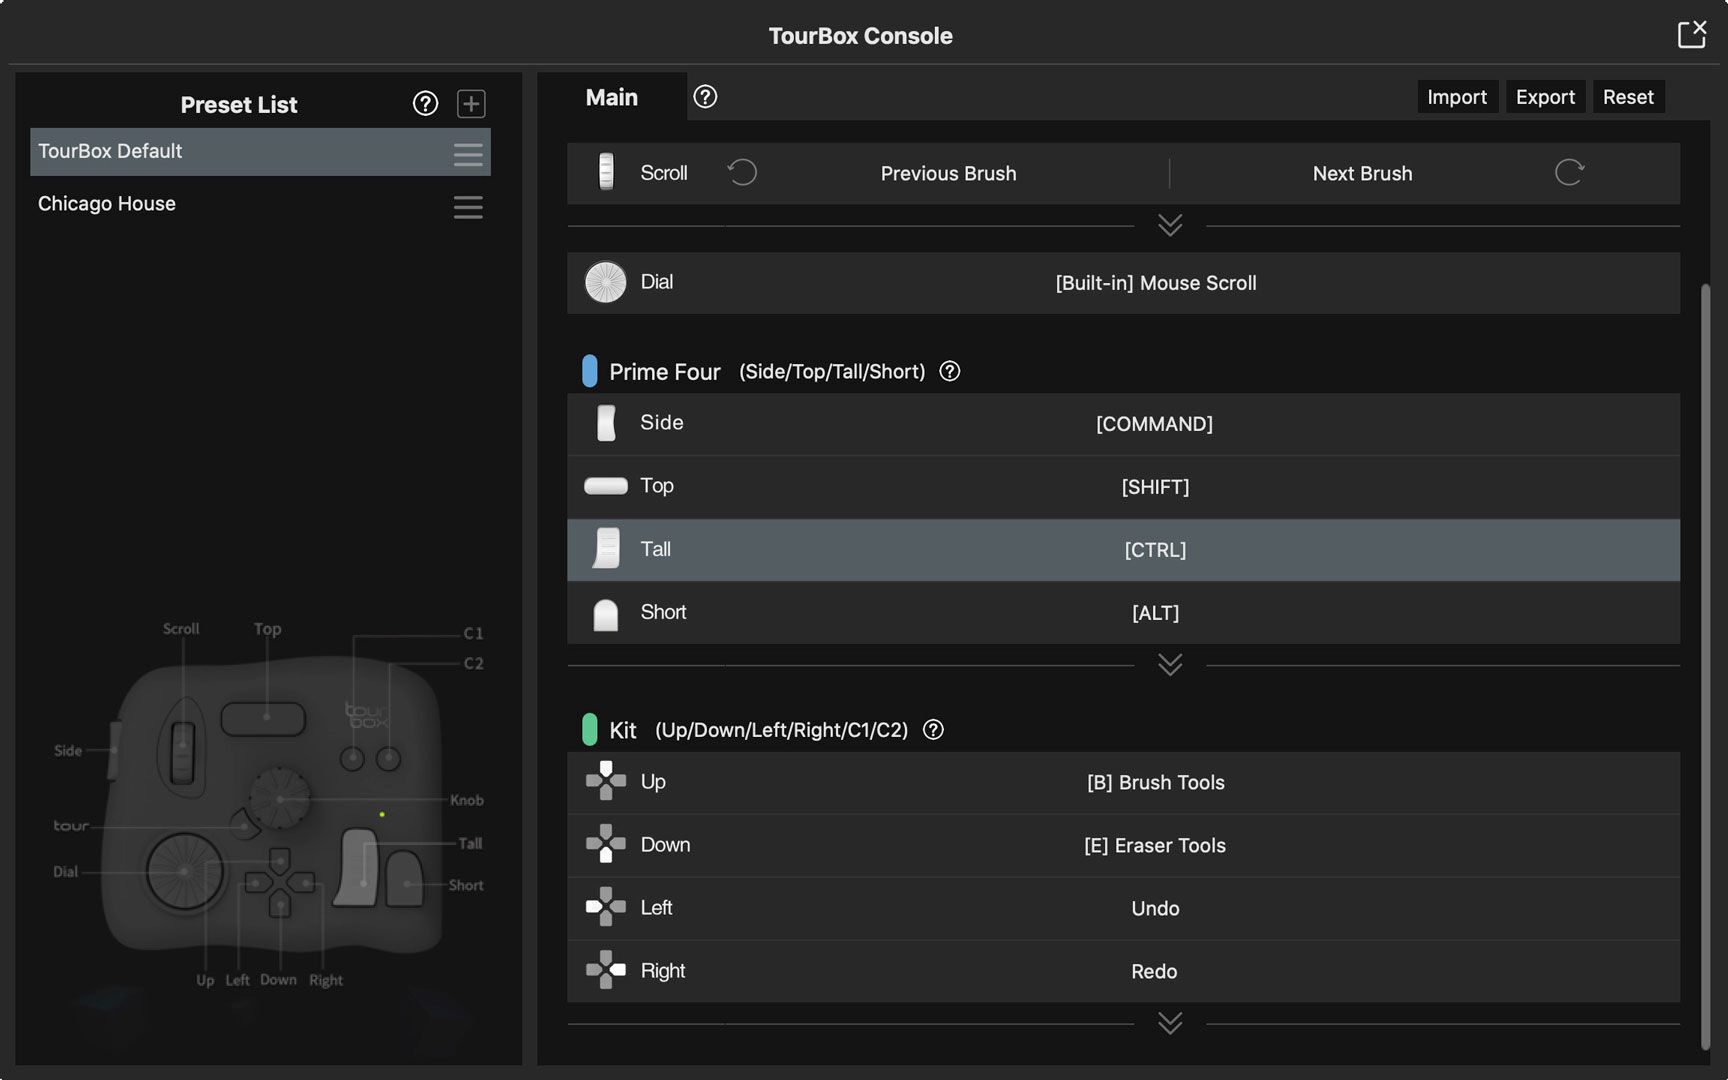
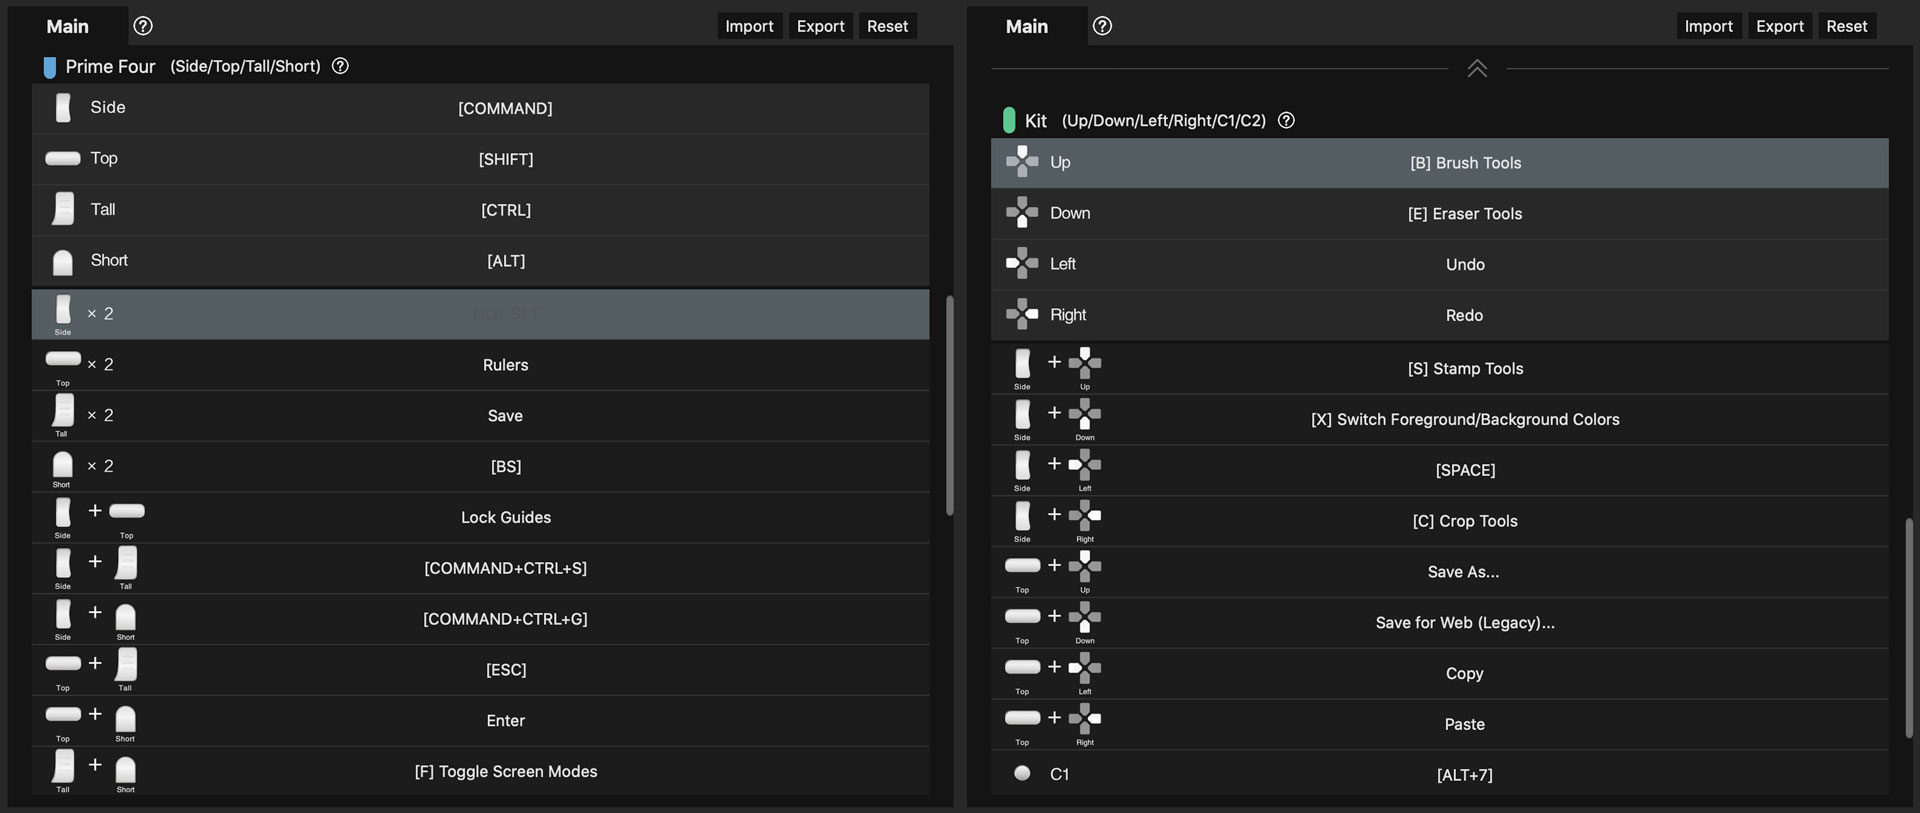
(1) TourBox Console’s main interface shows pre-calibrated commands specifically designed for Photoshop. Hovering over any dial or button highlights the relevant shortcut on the right.
(2) When adding or modifying commands, one can search and pick from the preset list of predefined shortcuts that ship with the software. A few built-in dial functions can be set through the panel on the right.
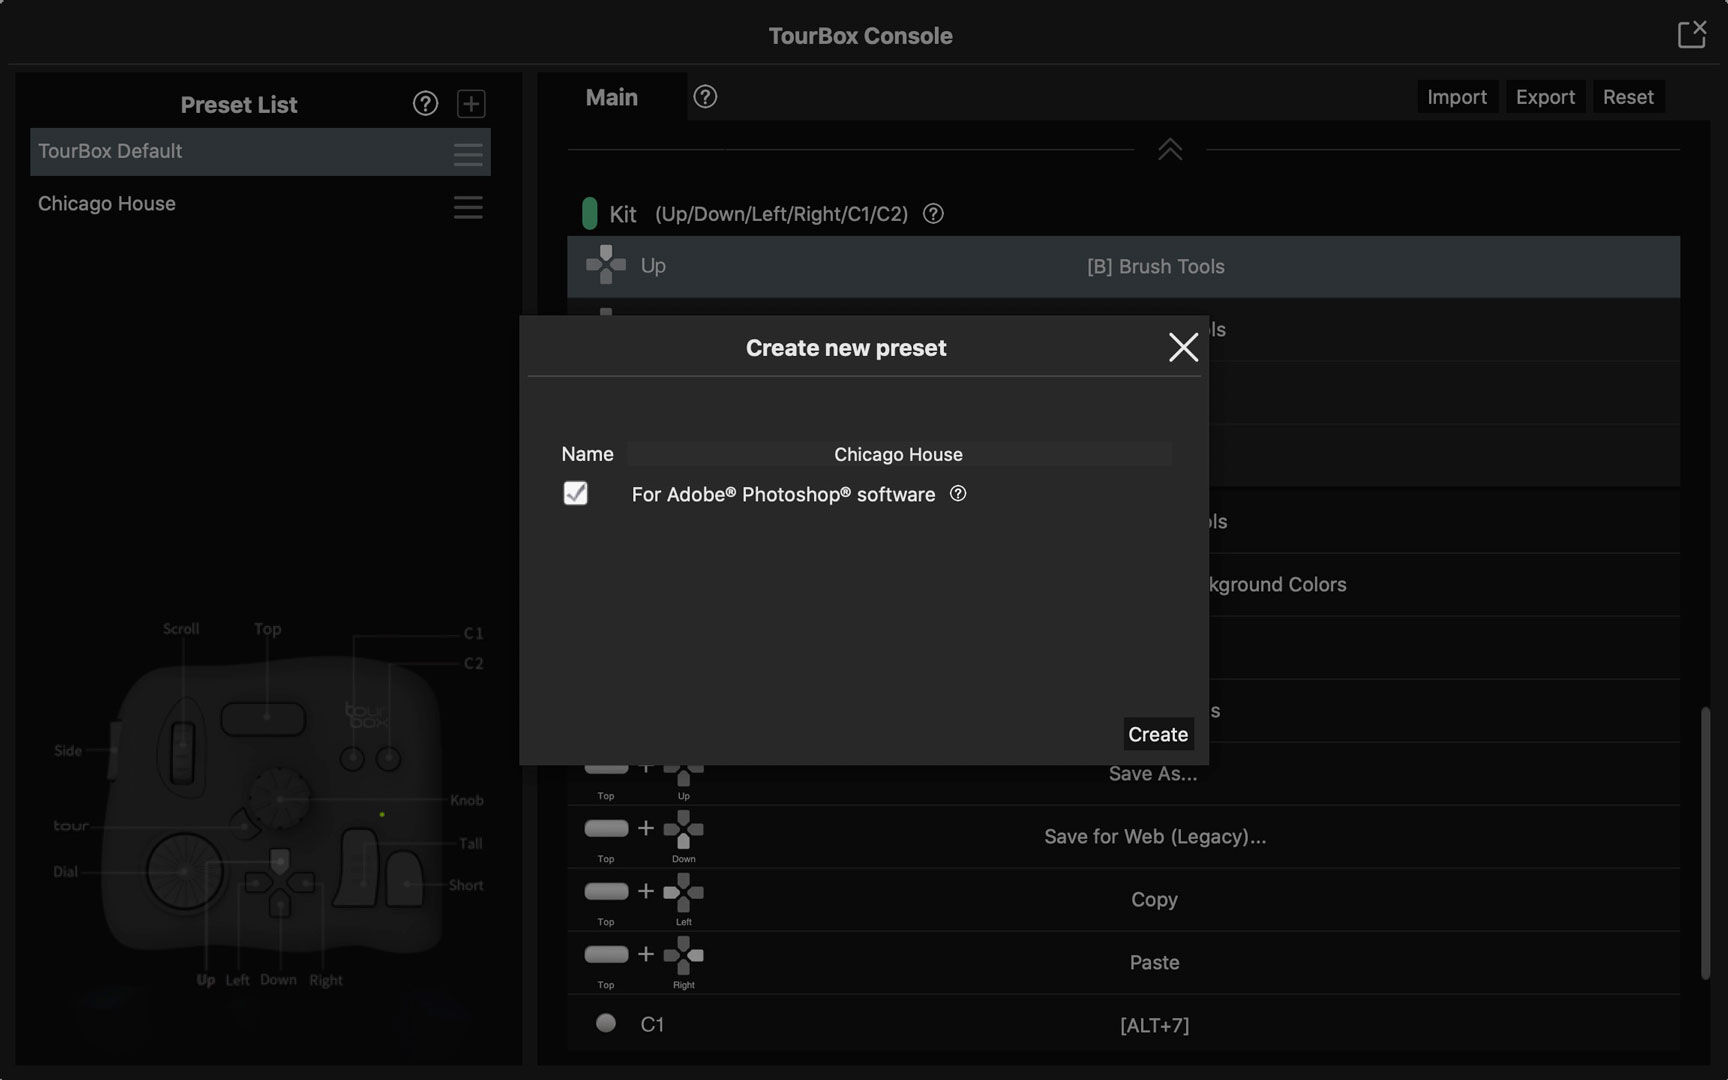
(3) Besides tweaking the default setting provided by the developers, we can create multiple sets of our own, designed for specific projects, scenarios or software other than Photoshop.
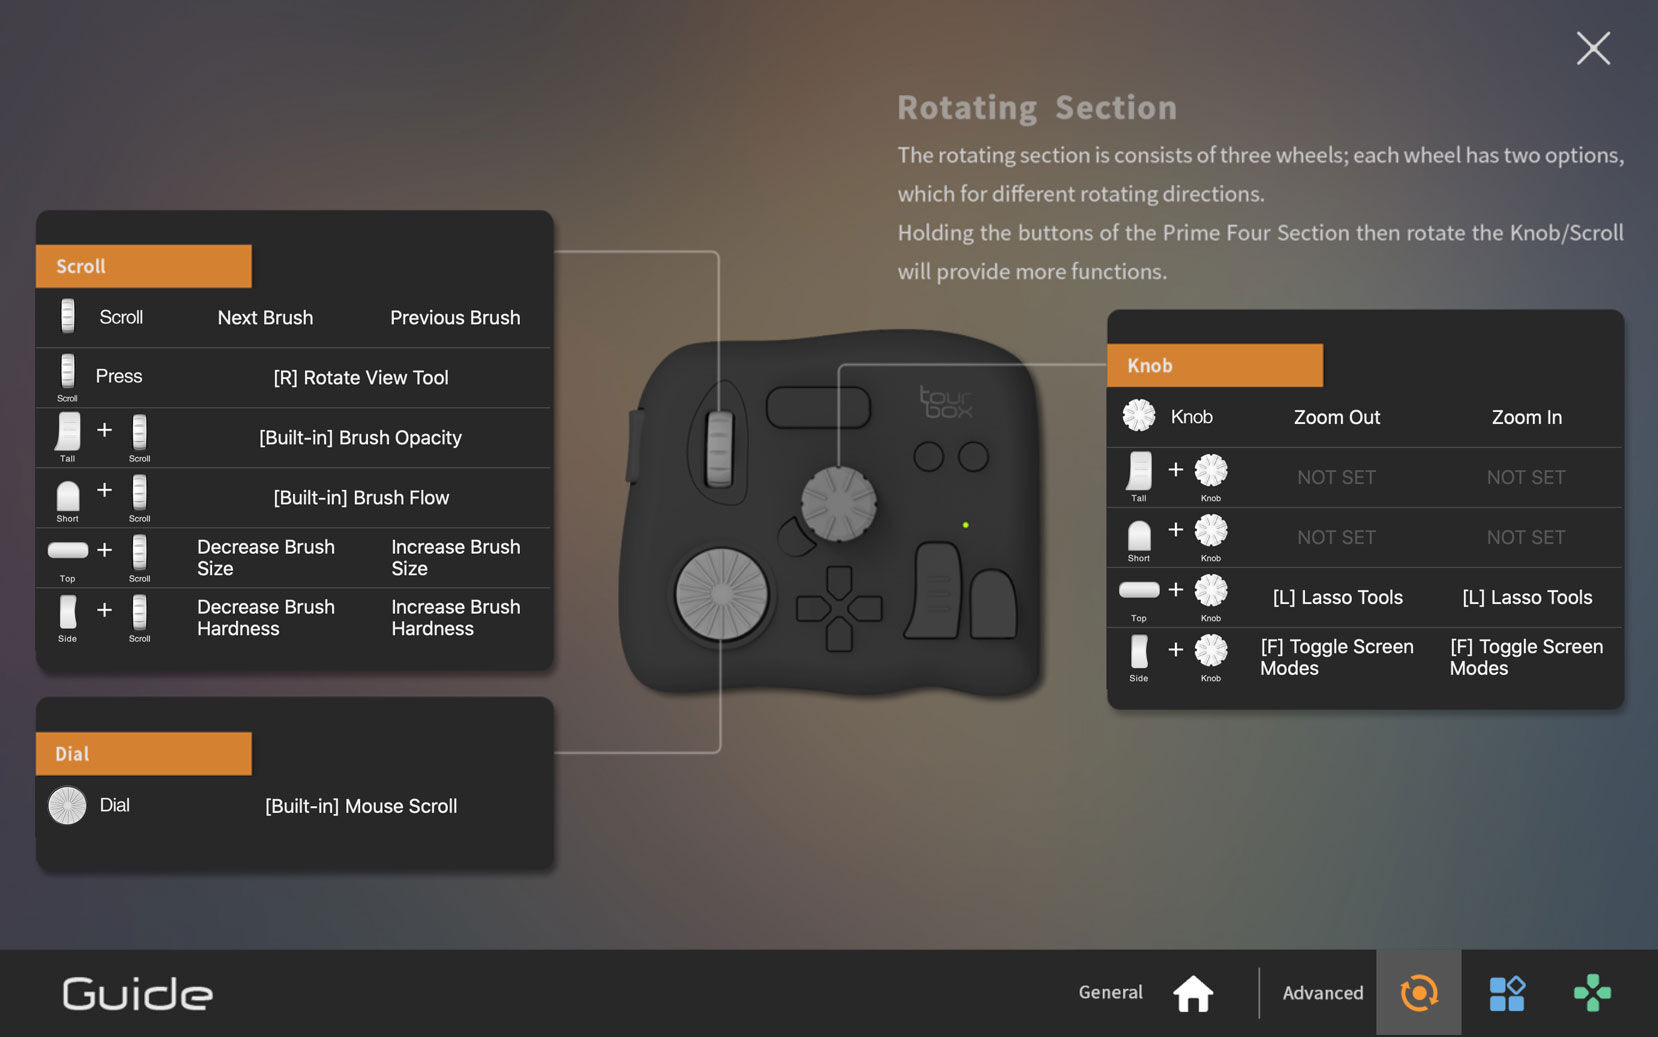
(4) The Rotating Section consists of the Knob, the Scroll and the Dial. They can be used separately or combined with other buttons to control incremental changes, such as sliders or to scroll through lists, options etc.
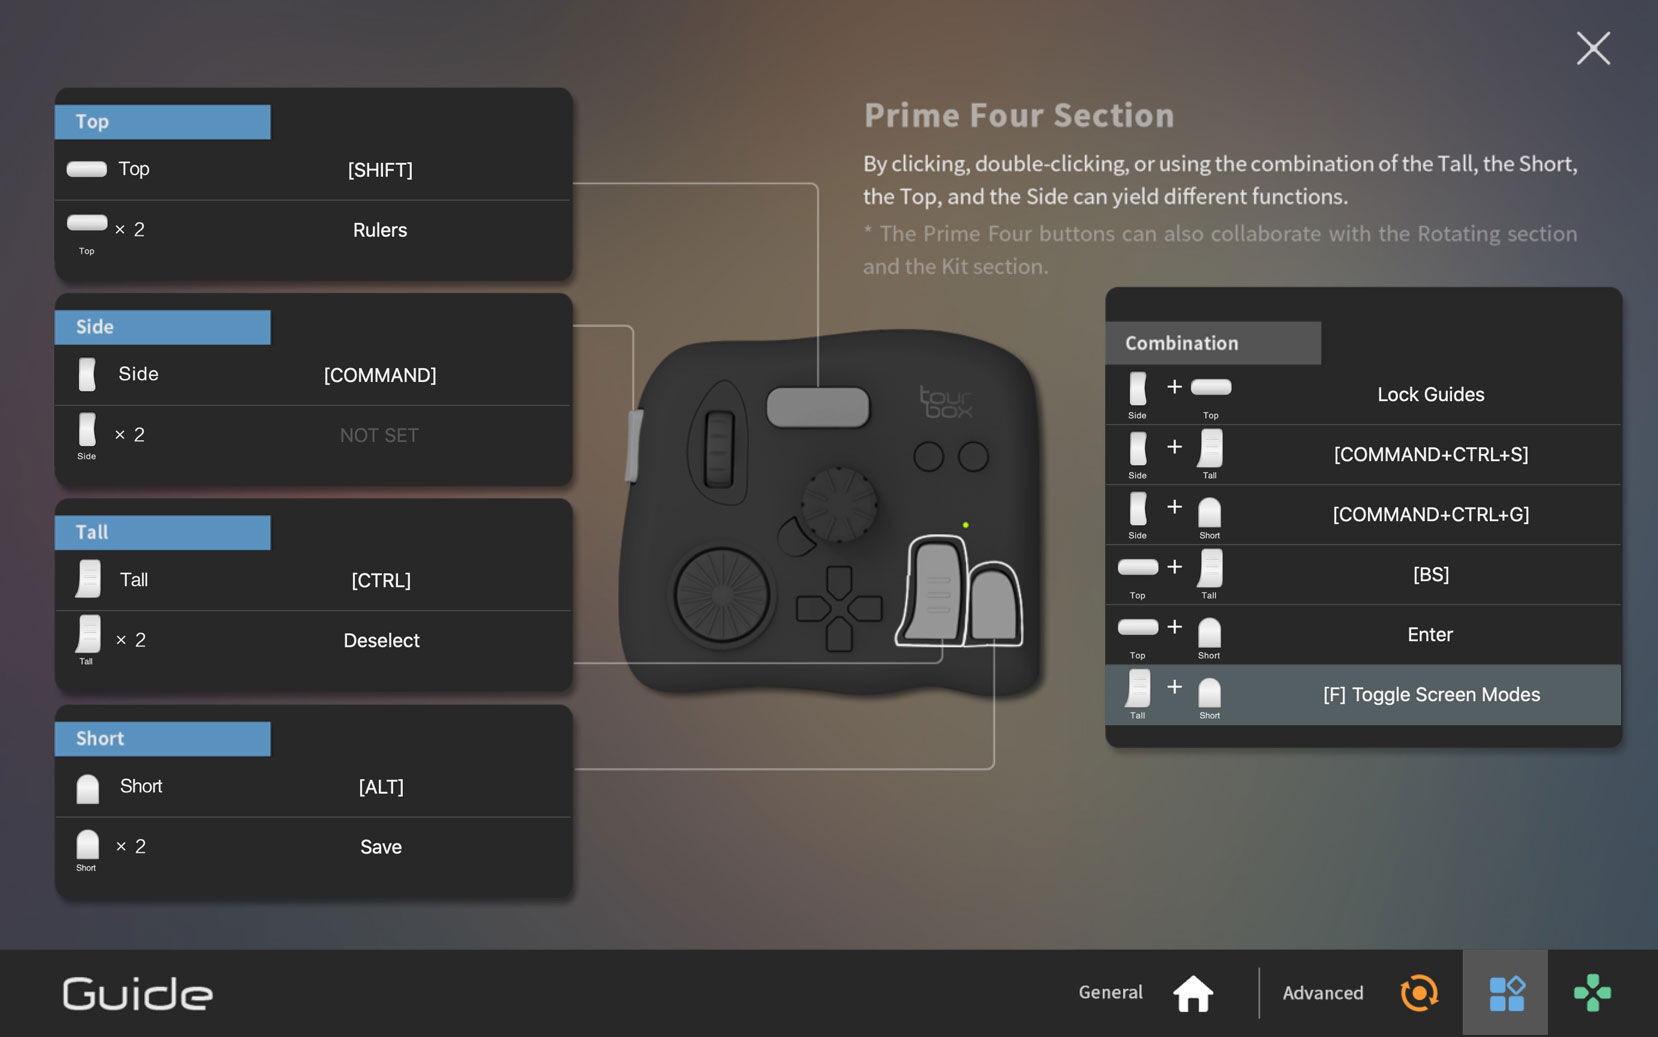
(5) The Prime Four Section consists of the Tall button, the Short button, the Top button and the Side button. Clicking, double clicking and combining these buttons can yield separate commands.
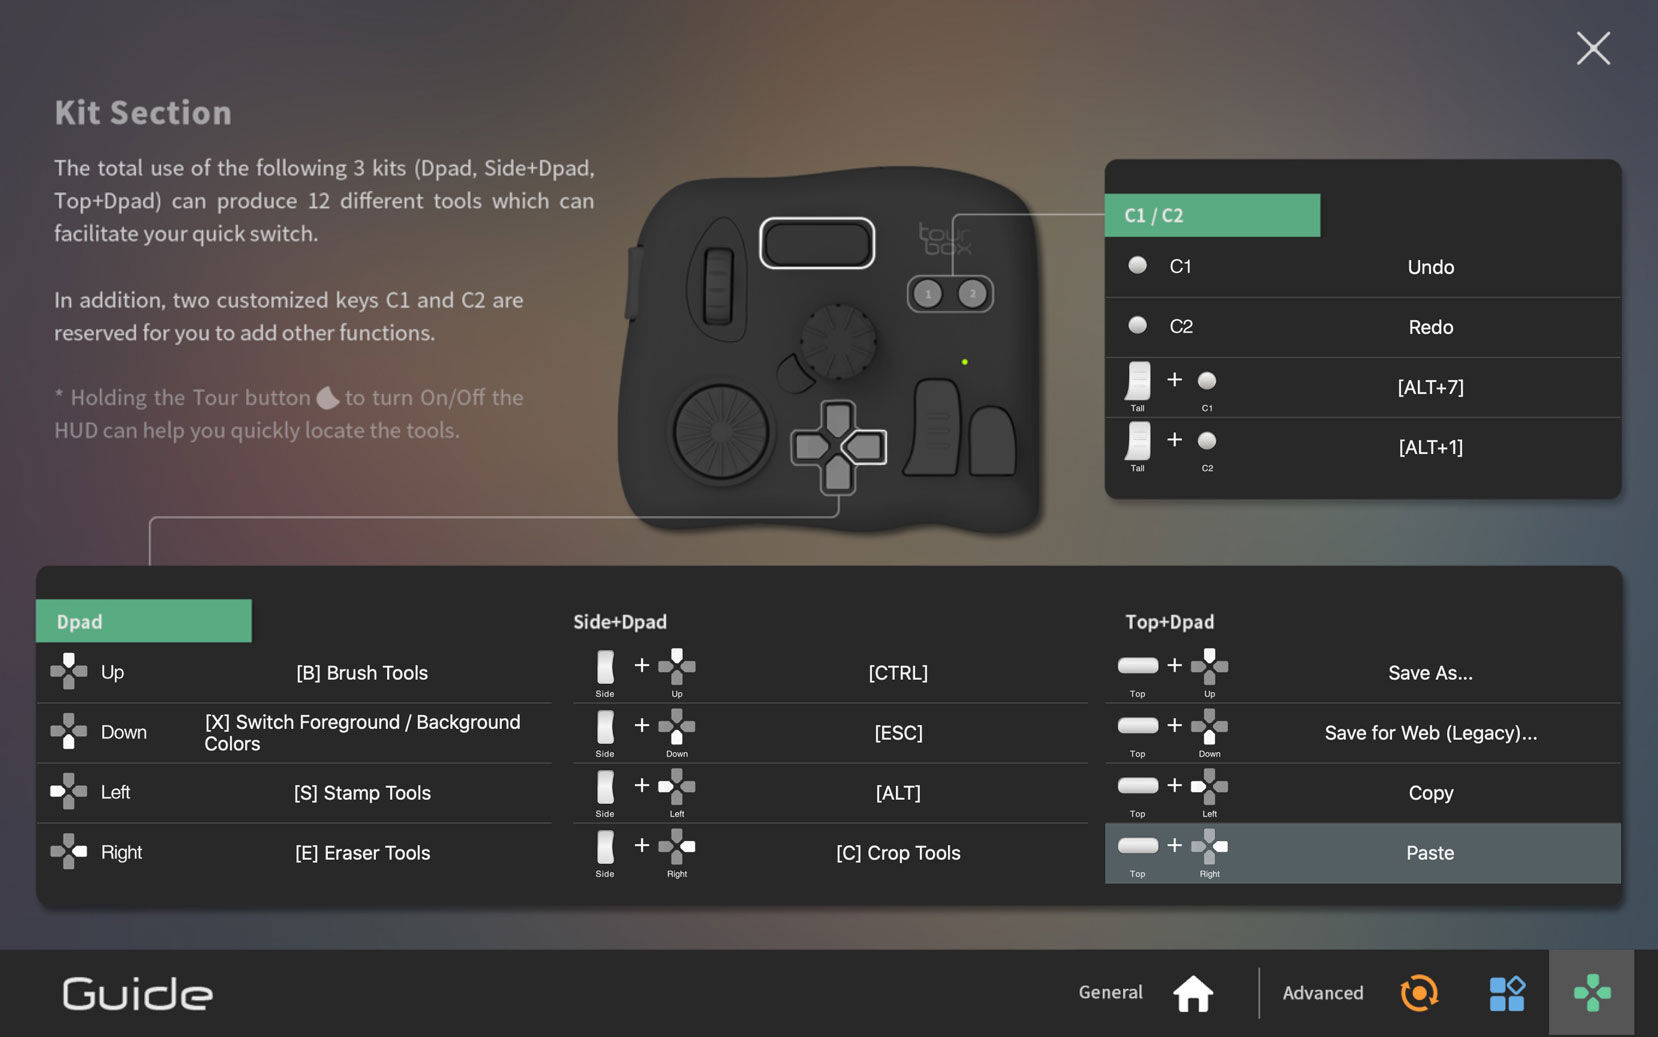
(6) The Kit Section consists of the D-pad and two separate buttons, C1 and C2. The D-pad is ideal for fast switching between the most used tools and – combined with the Top and Side buttons – can be defined for the total of 12 tools.
Luckily for us, although TourBox was marketed as a universal console that is usable for most of the creative software out there, their client software is oriented towards Photoshop users. The TourBox Console, the software interface where we set up and manage our shortcuts, ships with a plethora of preset Photoshop commands assigned to the buttons and dials. Furthermore, it contains a huge list of predefined shortcuts for easy access – again pulled from Adobe’s creative software. This makes life very easy for Photoshop users as all they need to do is type in a few letters of a certain command in the search bar to find the relevant shortcut, eliminating the need to know the button combination by heart for most cases. Life gets a little harder and more confusing when it comes to software other than Photoshop. For example, in case of a shortcut for Affinity Designer, we need to know the exact button combination to set it up. Somewhat bafflingly, there is no option to assign a custom description to our shortcut because it always gets labeled with its Photoshop equivalent as long as it’s part of the Console’s predefined list. The developers must have presumed a certain level of confusion as there is a dedicated button next to the central knob that displays an on-screen cheat-sheet whenever needed, but again, operation can be confusing at times for the above reasons.
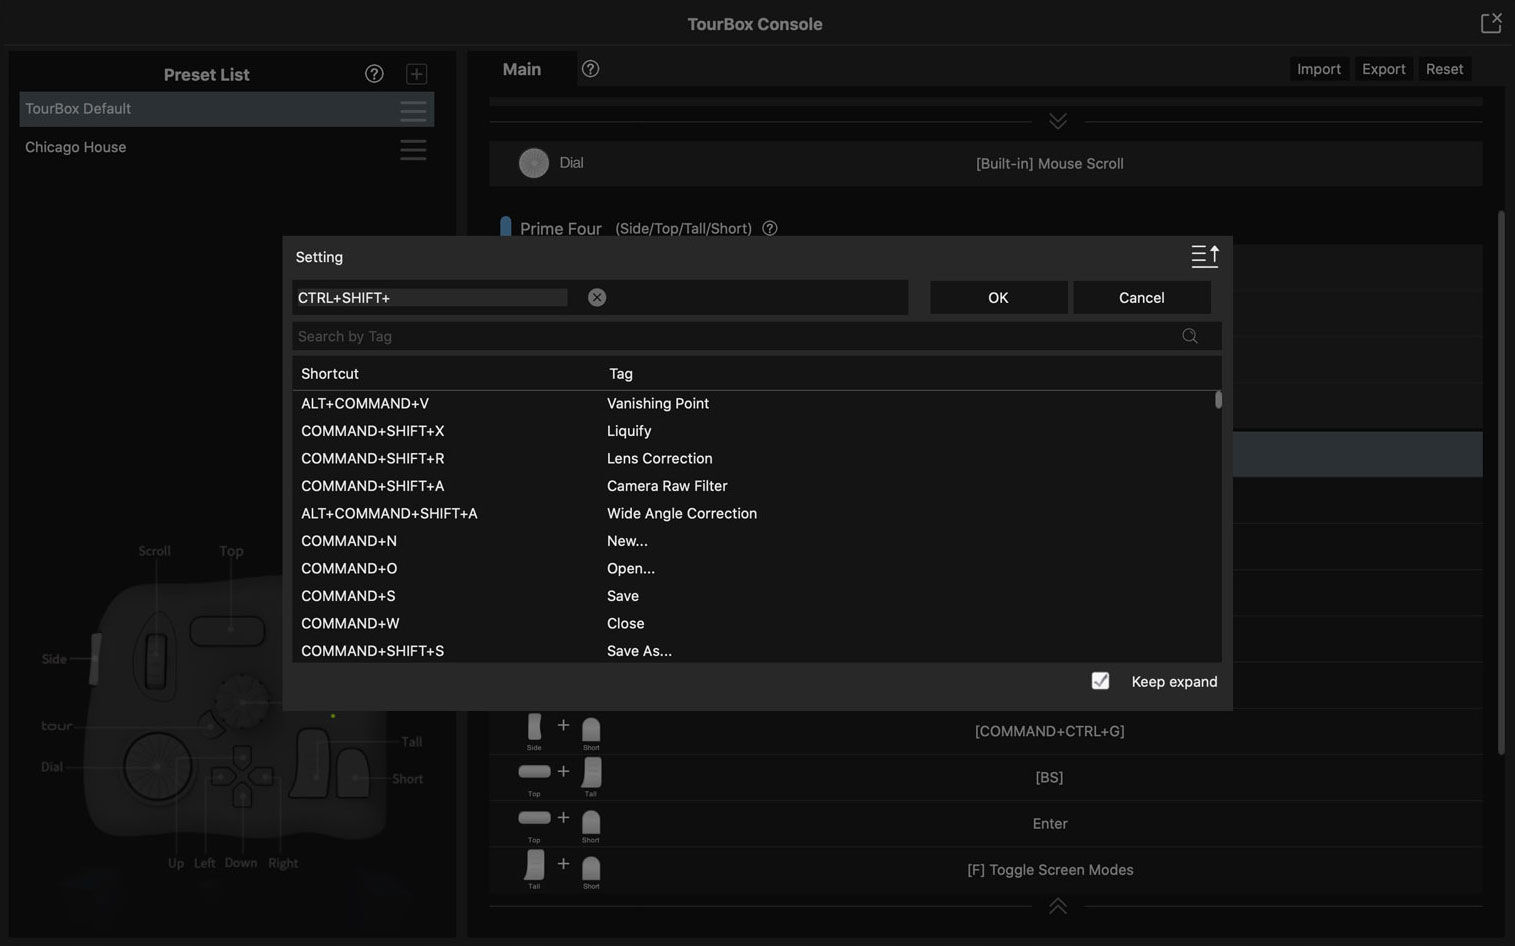
Certain button and dial combinations can be assigned through the software client to execute additional tasks.
And this brings us to our biggest concern using TourBox: one needs to be a real shortcut champion with an excellent memory to find his/her way through all the possible combinations the device has on offer. At first, we wanted to remap our most used Delux Designer buttons to TourBox, therefore we left the Prime Four Section for the modifier keys, dedicated the conveniently separated C1 and C2 to undo and redo and the central knob to zoom. The D-pad seemed the obvious choice for setting up our most used tools: Brush, Eraser, Pattern and the Curvature Pen Tool. However, we immediately ran into a naming problem as the TourBox Console doesn’t have a predefined shortcut for either of the last two. At the end, we had to accept that - although the shortcuts for Pattern and the Curvature Pen Tool can be assigned without any problem - they will be displayed as “Stamp Tools” and “Switch Foreground / Background Colors” respectively as these are the predefined descriptions of the above button combinations. As we said, you need to have a good memory to remember it all…
To conclude, the level of customization the Designer Keyboard provides can be easily achieved with the TourBox, although we still prefer the Designer’s traditional looking keyboard with its labeled keys. Using TourBox gets really exciting once you learn the basic button layout and start using the various dial-and-button combinations. In our current setup, we utilized the Scroll for shuffling through our predefined brushes as we ink, which is a real time saver when drawing sun-shadow transitions etc. Another useful dial setup is to rotate the canvas as we draw. The Knob is excellent (although a little overly sensitive) when zooming in and out. When these dials are used with the Side button they can trigger different commands, such as to change brush opacity and flow or quickly increase or decrease brush size and hardness. The combinations are almost limitless, depending on how much of your settings you can remember while you’re trying to focus on the actual drawing process. Although we often caught ourselves picking a tool or executing a command through the Photoshop interface rather than trying to remember which of the unlabeled black buttons/button combinations triggered that specific scenario, we became more appreciative of our TourBox over time.
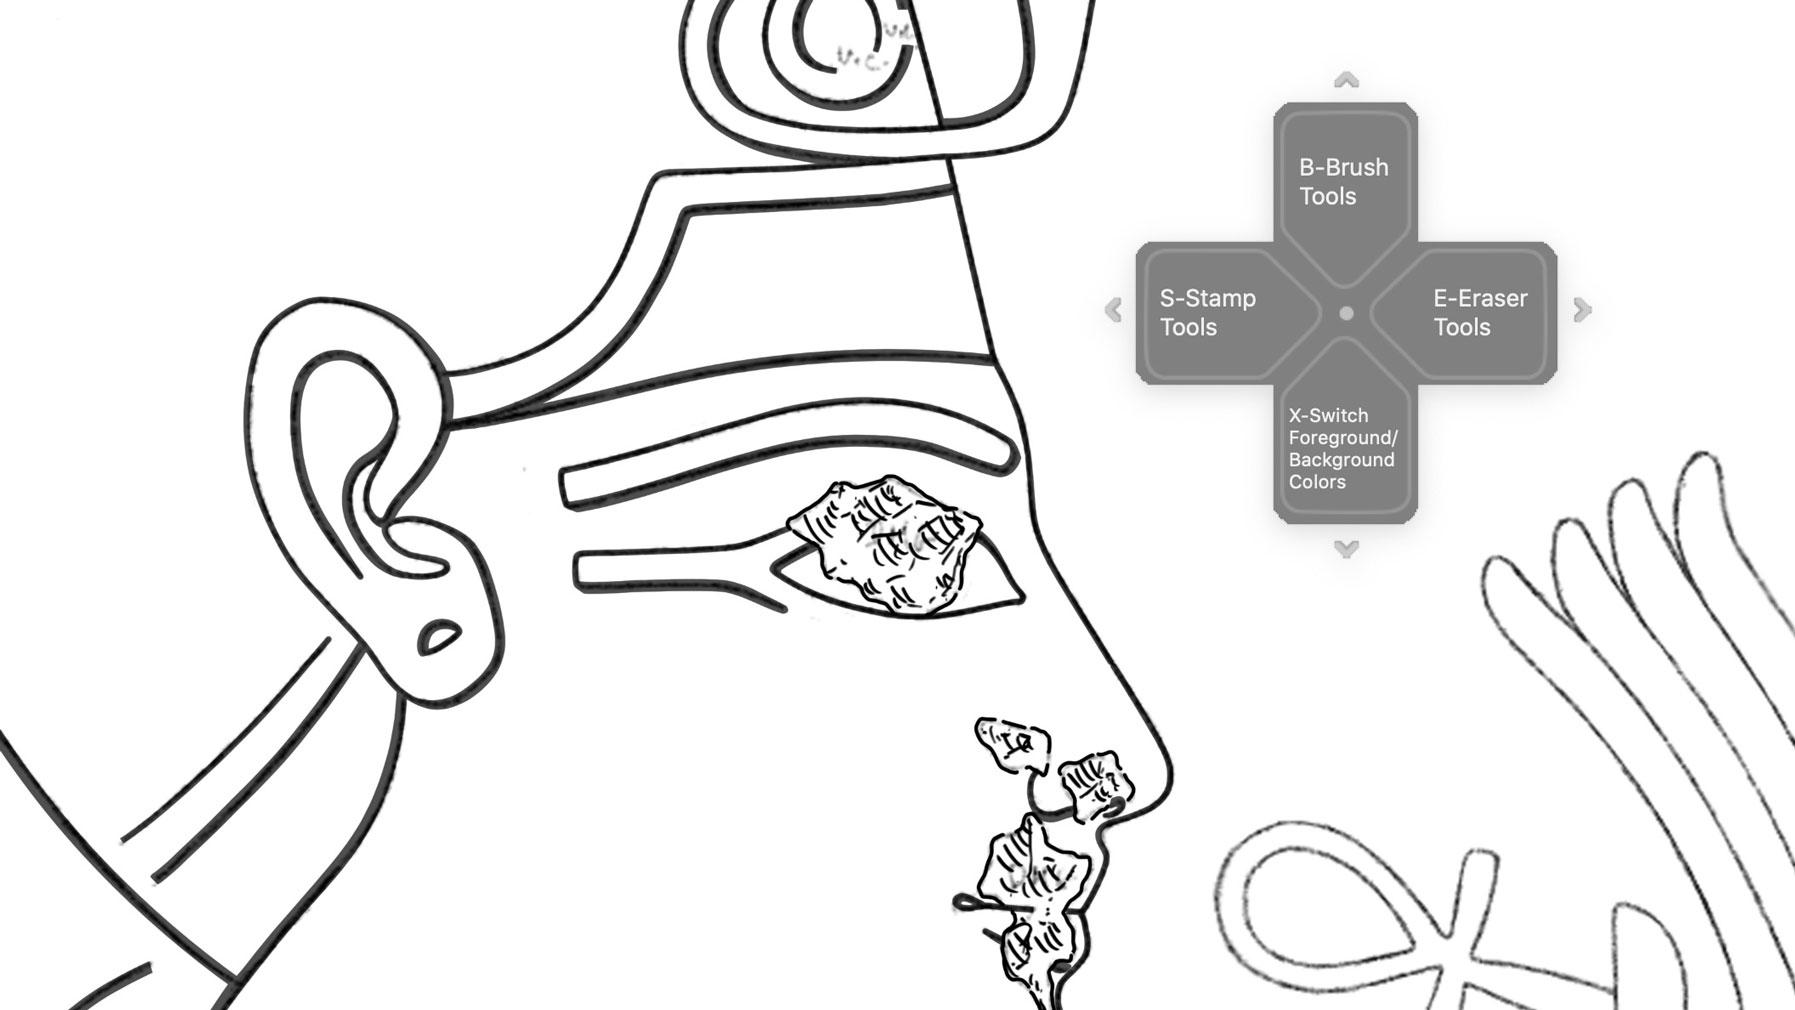
TourBox has a handy on-screen D-pad cheat-sheet, that can be called up from the Mac Menu Bar.
Drawing experience
Drawing in the studio is a deeply personal experience, where everyone has their own preferences and established workflows. Giving up on or changing old muscle memories needs a lot of convincing, especially when one deals with such a controversial device as the TourBox controller. As we said earlier, the lack of labels can cause a lot of headache at first, but the unique button/dial shapes and specifically positioned groups help memorizing their functions. While it is easy to remember what function is associated with a certain button, it takes a lot of tries (and false hits) before you’ll use double-clicks and button combinations with ease and certainty. We recommend setting up only a handful of commands at first, memorizing them, and only moving on to more complex tasks once basic operation becomes effortless. Additionally, one shouldn’t expect to find the right command/button layout at first try. In the first week or so, as we started using TourBox for inking in the studio, we kept tweaking and changing our settings.
Changing brush attributes by simple dials can be a real time-saver while editing large artworks on the go.
When it comes to button/dial setup, there are some limitations and behavioral peculiarities altering the drawing experience that you should know about.
-
Double clicks don’t always work as advertised since the buttons are very sensitive and need to be hit very fast in order to not be read as two single clicks. For this reason, we didn’t set up such function for the Side button as it almost never registered our double-click attempt.
-
With TourBox one can’t assign a macro setting (a sequence of commands) to a single button. For example, there is no single command option to delete a path and switch to the Brush tool as offered with Delux Designer.
-
When setting up additional commands for combinations of buttons, one must keep in mind that in certain cases it registers as two separate one-button command. For example, when the first button of a two-button action is set as Undo, it always executes Undo before moving on to the command.
-
A dial can also be set up as a button, executing different commands when rotated in various directions. For example, a dial used in tandem with different buttons can trigger a lot of different actions related to one specific tool.
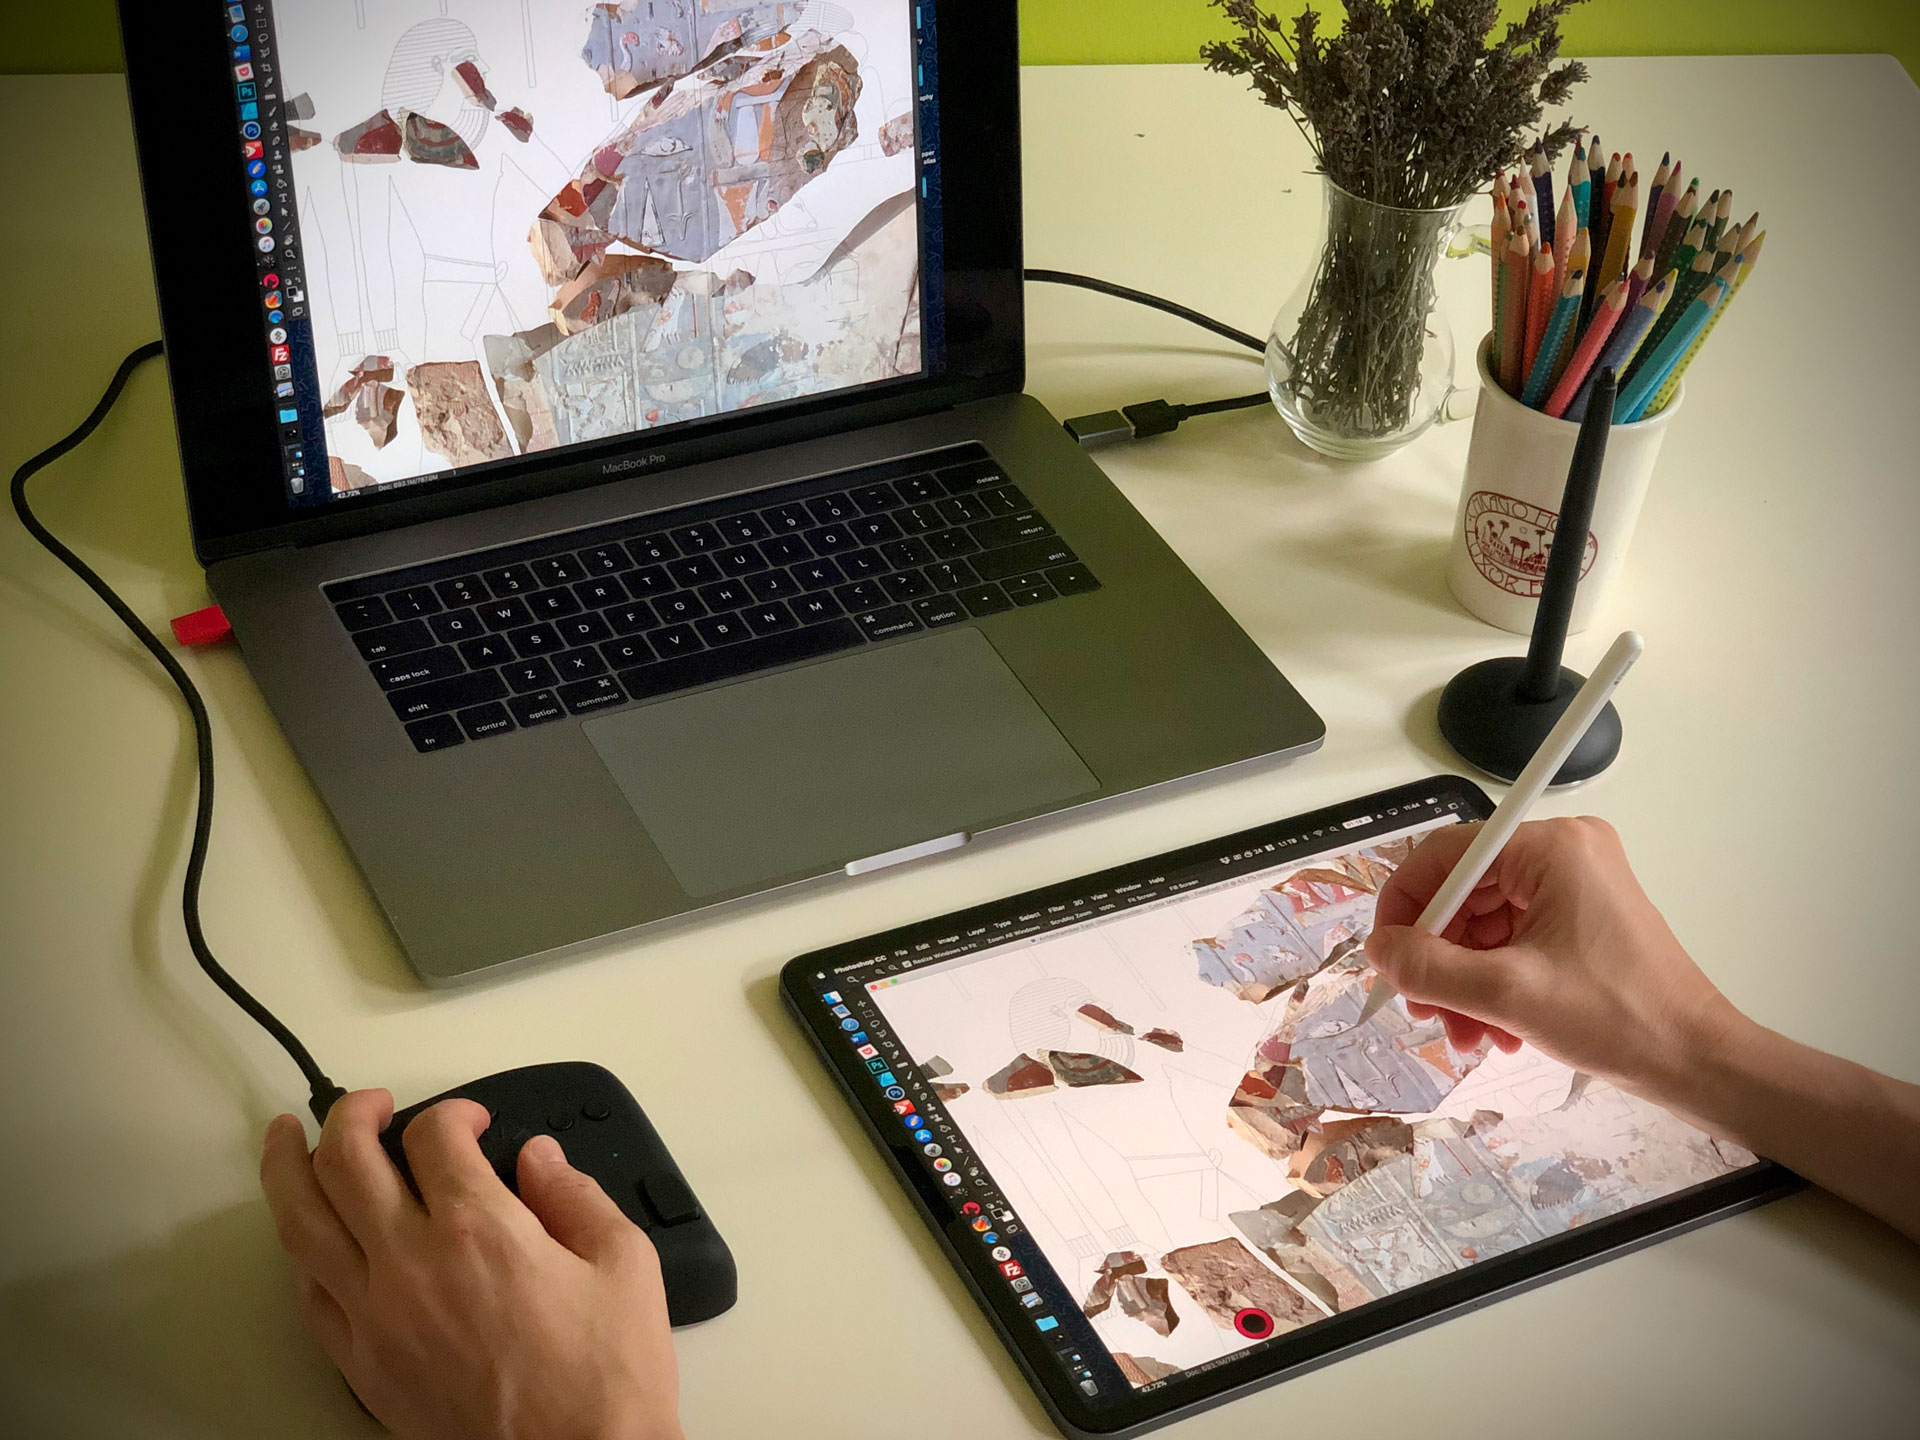
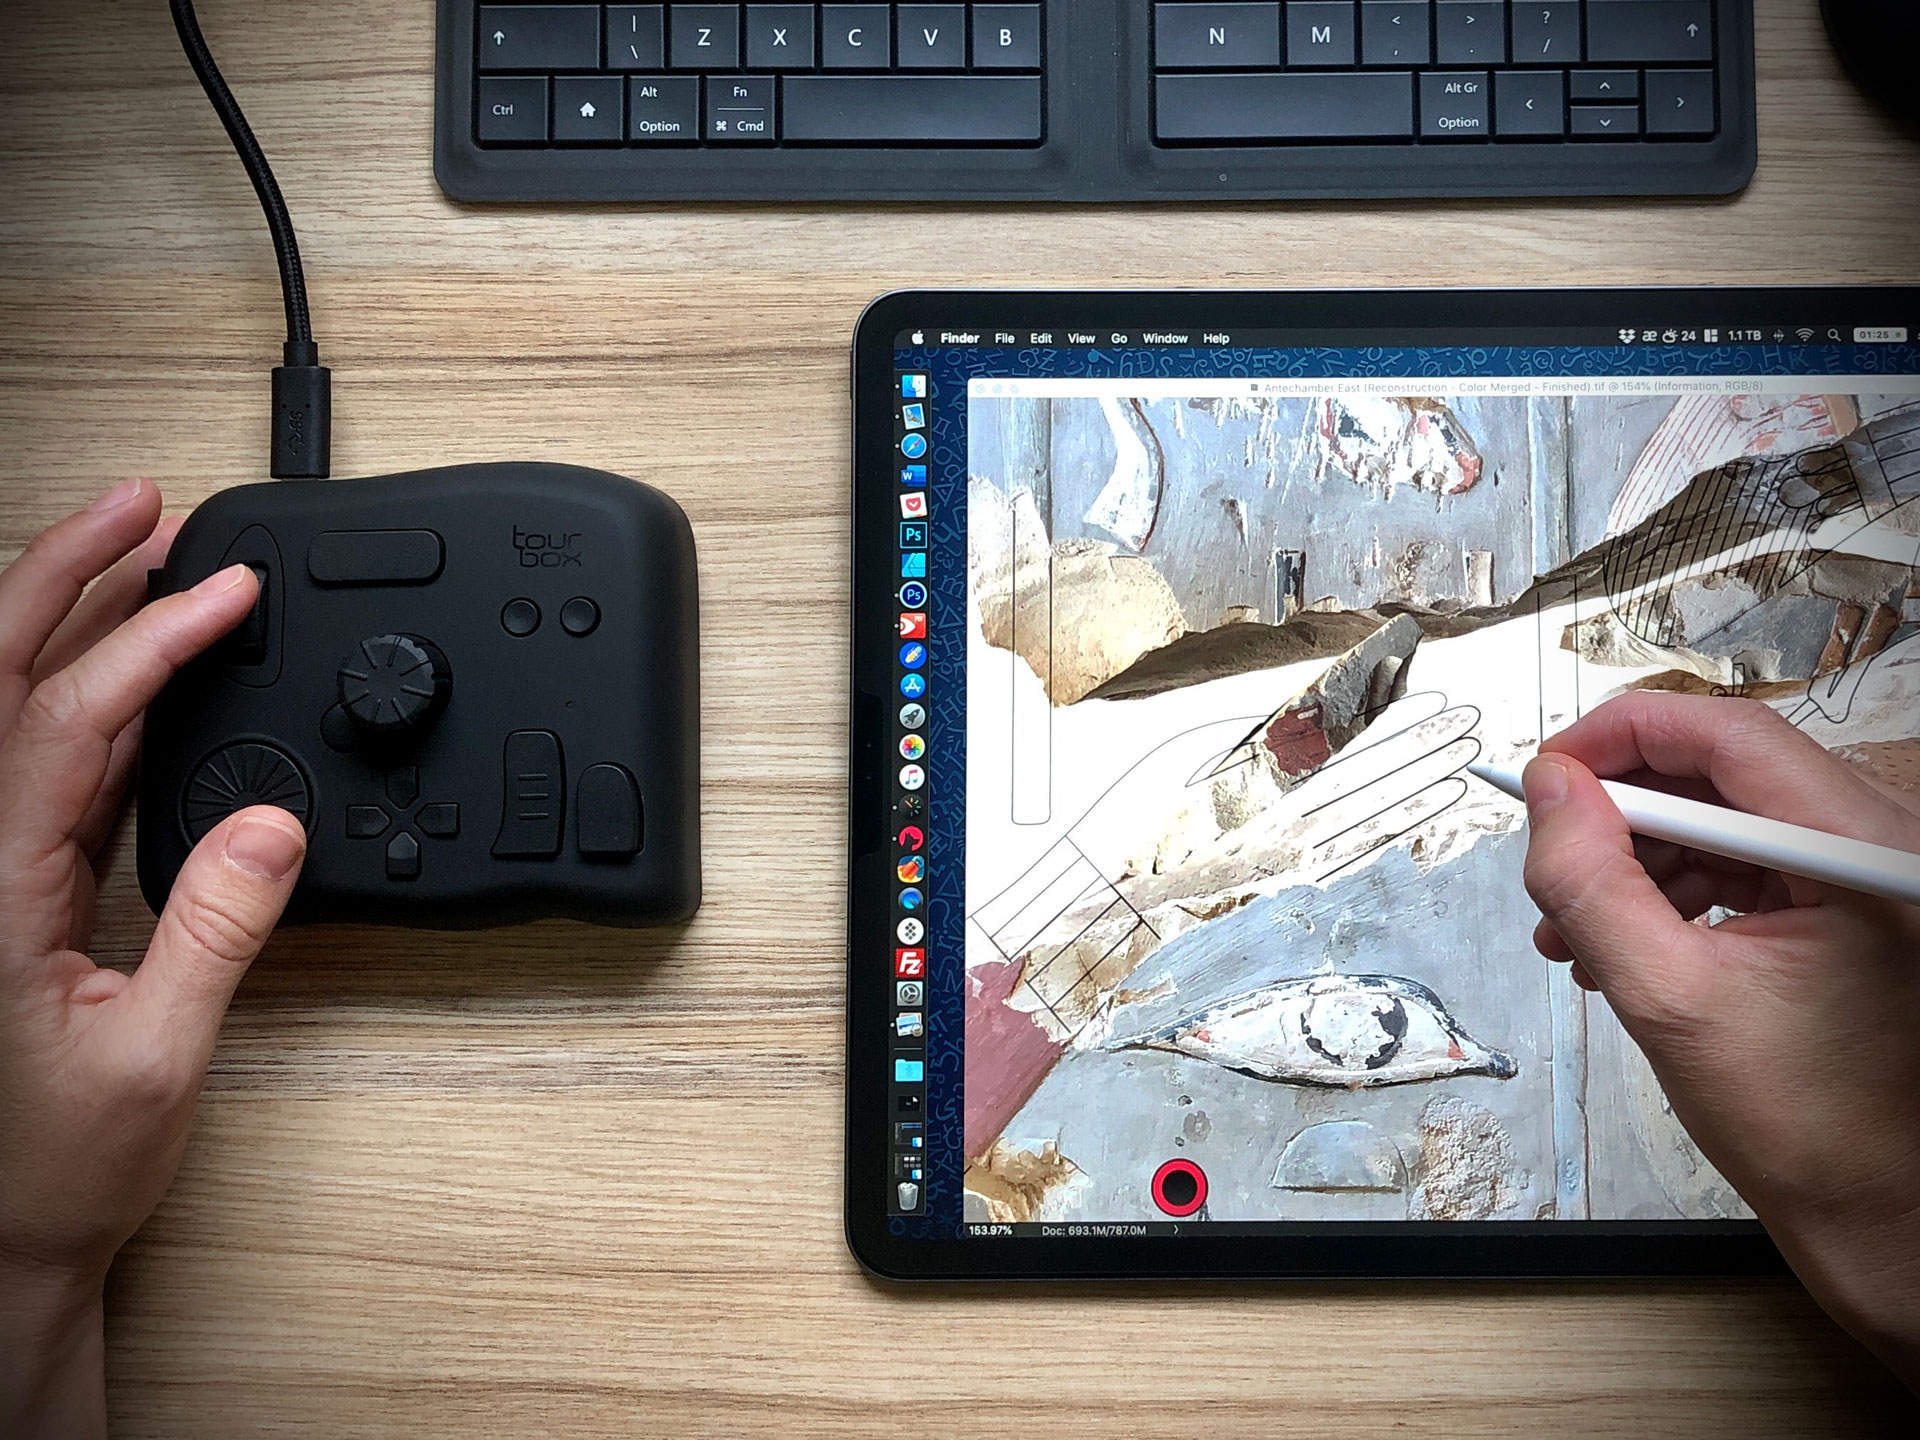
Controlling Photoshop with TourBox while tethered to the iPad provides a very powerful setup for digital inking.
Despite its typical first-generation shortcomings and glitchy software, we’d like to conclude our review on a positive note. Based on the brief time we spent with the device, we consider TourBox a worthwhile investment, especially for the current asking price of $109. It is a great option for those who value their time spent with drawing in the studio and are willing to learn to use shortcuts to speed up this process. Now that their Kickstarter campaign is over, TourBox has moved to Indiegogo, where orders are still open for a significant discount (26-50% off from the controller’s intended retail price).
0 comment(s)
Leave a comment(We'll keep your email address private)