
Photoshop one-on-one – Learn the fundamentals of using selections in our favorite content creating software
Making a selection before interacting with certain elements of a drawing is one of the most vital tasks anybody who works with visual documentation must learn. In the first installment of our new tutorial series, we’d like to explore the attributes of this seemingly simple tool that immensely speeds up our workflow, both in the field and back at the studio. Naturally, selection tools are usually associated with photo modification, becoming a necessity when one wants to erase parts of an image, change a hue, or duplicate part of an image. In this tutorial, digitalEPIGRAPHY would like to elaborate on these foundations and show how you can effectively use selections in your day-to-day epigraphic work.

Using the Lasso selection tool in Photoshop to apply a color effect over a certain hieroglyph.
Lasso Tool
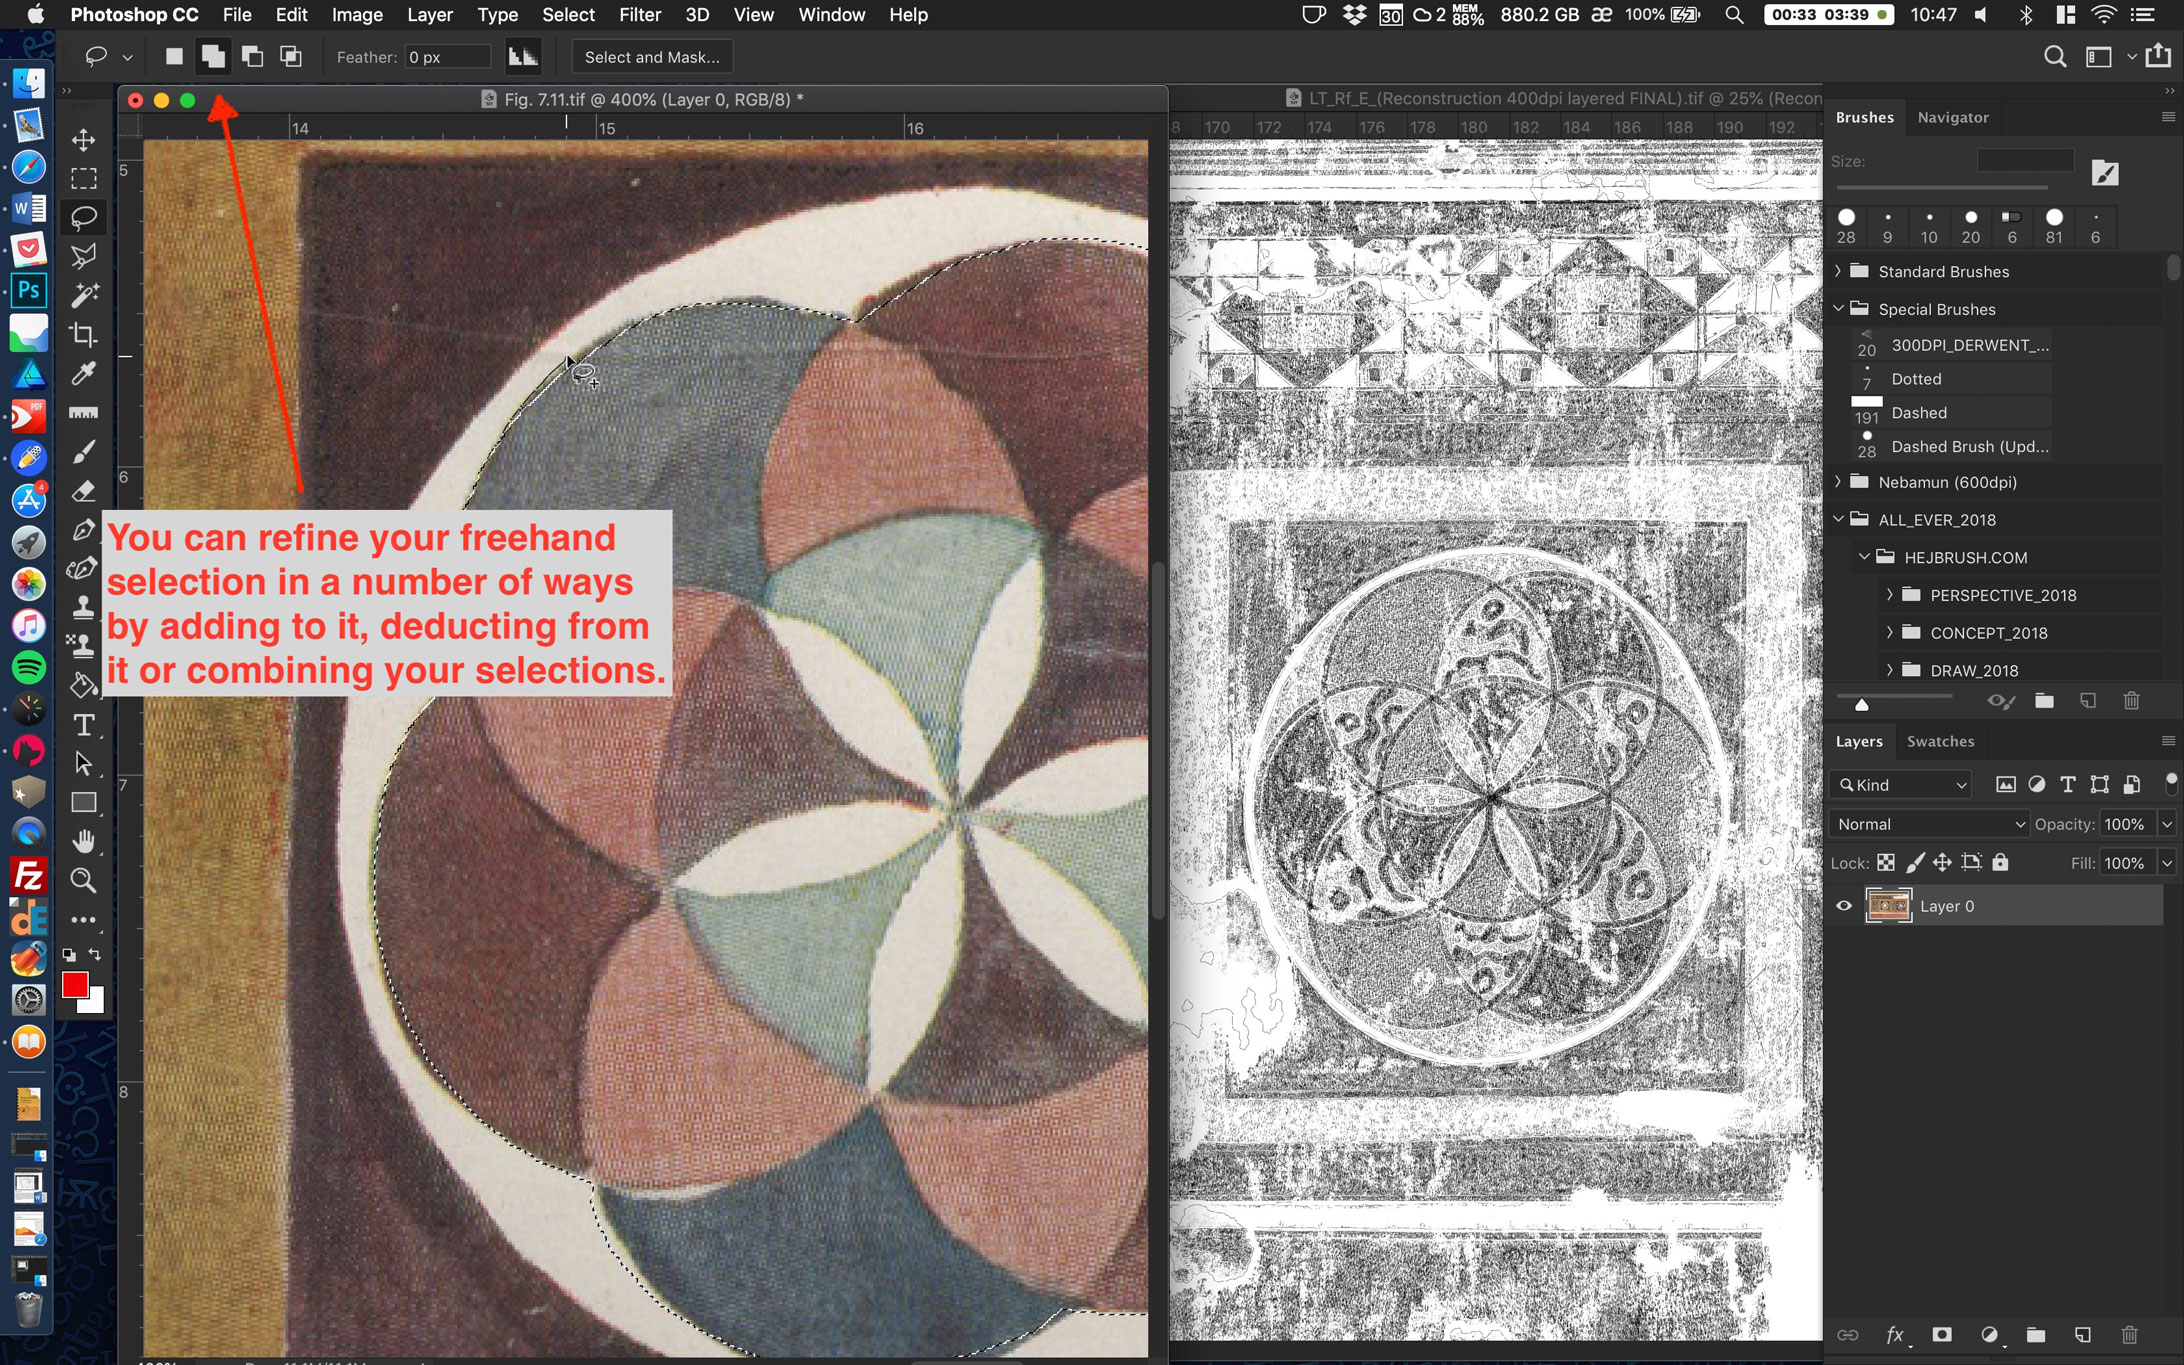
In its most basic use case, we use the Lasso tool to separate part of our drawing. Lassos offer close control, good precision and even some predictive AI when tracing around the outside of the object to be modified. Although the regular lasso is a little inaccurate, it can be applied quickly, and - assuming you use the Refine Edge tool afterwards - it can produce a good, clear selection in just a few seconds. First you need to select the regular Lasso (L) and draw around the outline of your object. You don’t need to worry about a precise tracing but make sure you follow the basic outline of the feature to be separated. Once you made your rough selection, you can refine the outlines by adding extra pixels to, subtracting from, or combining your selections. The inconvenience with Lasso is that you must rely on your free hand abilities. However, it works well for large objects that aren’t exactly square or circular. The Polygon Lasso tool is a variation of the Lasso and it is a bit easier to use as you click around your object to create points for the outline to follow. This selection, as its name suggests, is restricted to polygonal shapes.
Marquee Tool
It is the most basic selection tool and the most common way to create a quick rectangular or elliptical selection around an object. Holding the shift key while drawing Marquee selections initiate a perfect rectangle or circle.
Magnetic Lasso Tool
This is a much more precise tool than either of the above, as it follows lines and outlines, sticking to the edges like a magnet, letting us easily select contours as parts of a digitally inked feature. All you need to do is click on the first point and move the pointer along the path you wish to follow. The slower, the better. Finish the selection by connecting it to the last point, shown by a tiny symbol of an ‘o’ appearing next to the pointer.
Separating segments of a traditionally inked line drawing from its photographic background.
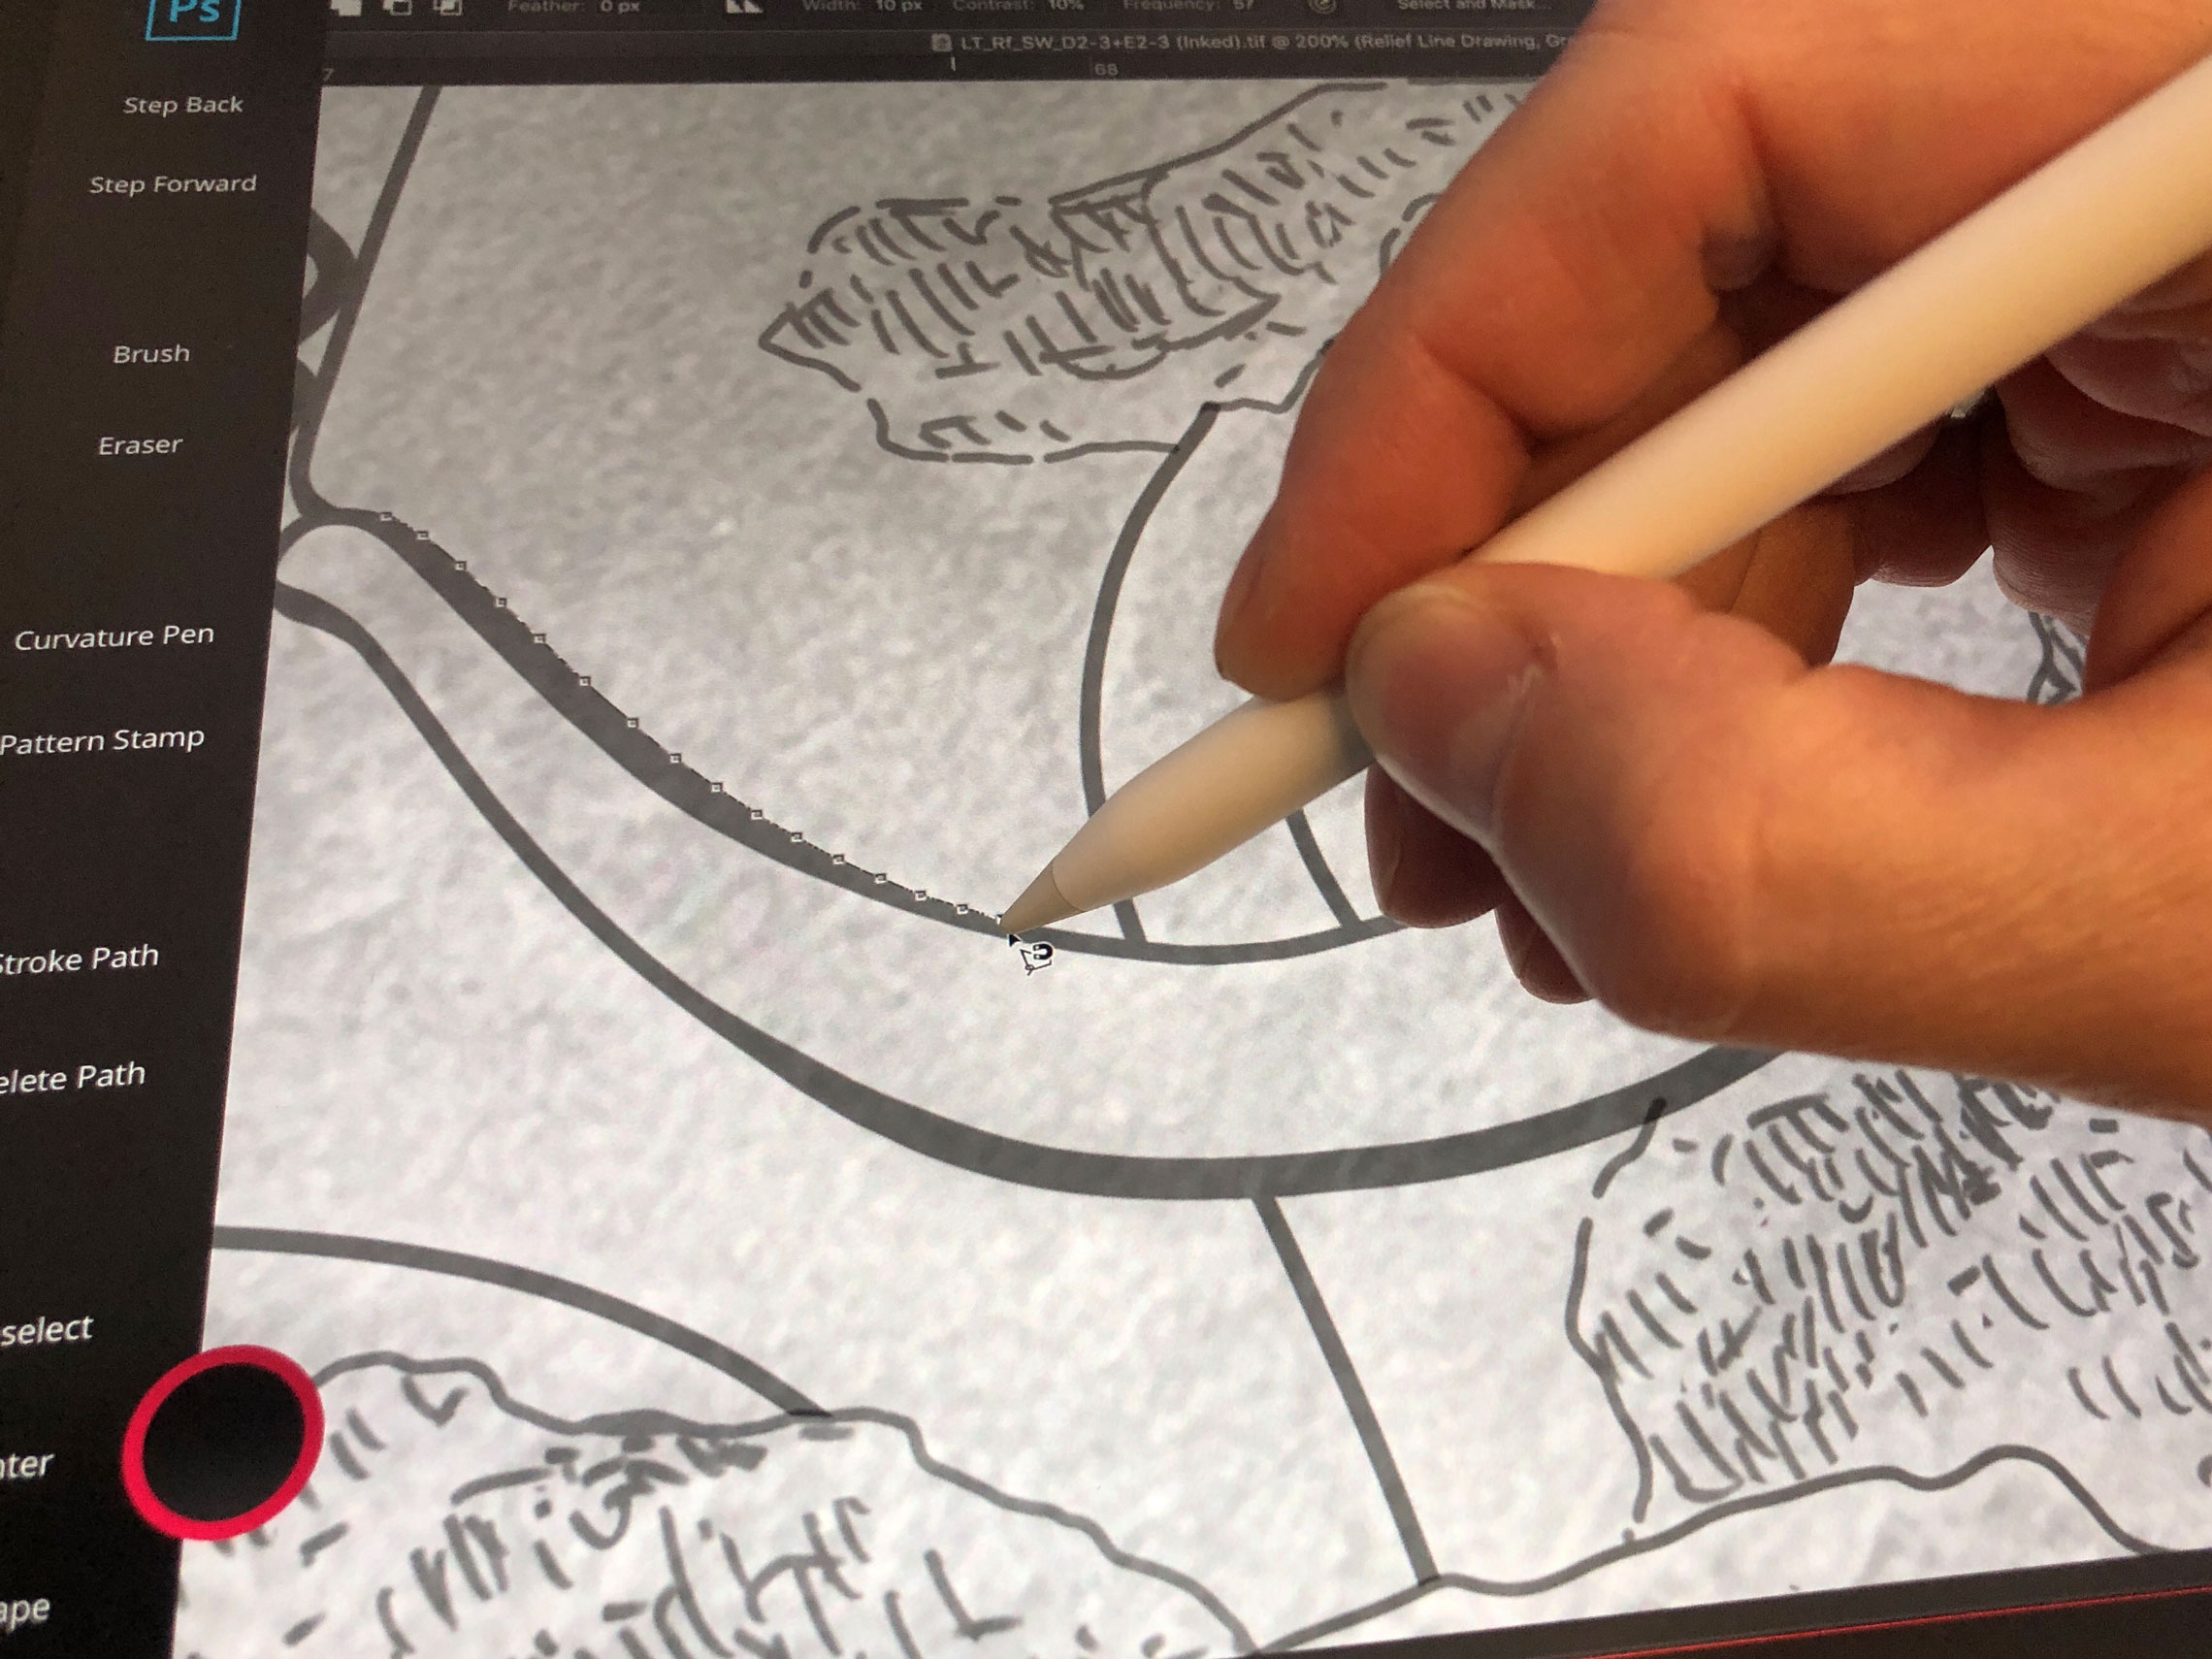
Pen Tool
Creating a selection involving the same tools we use for inking fine curves and sun-shadow transitions requires equal precision from the artist, however it has its rewards at times. Since this method can be finnicky at times, it is best to use the recently added Curvature Pen tool to create your initial path. Once completed, this path can be turned into a selection by right-clicking on the feature and choosing Make Selection.
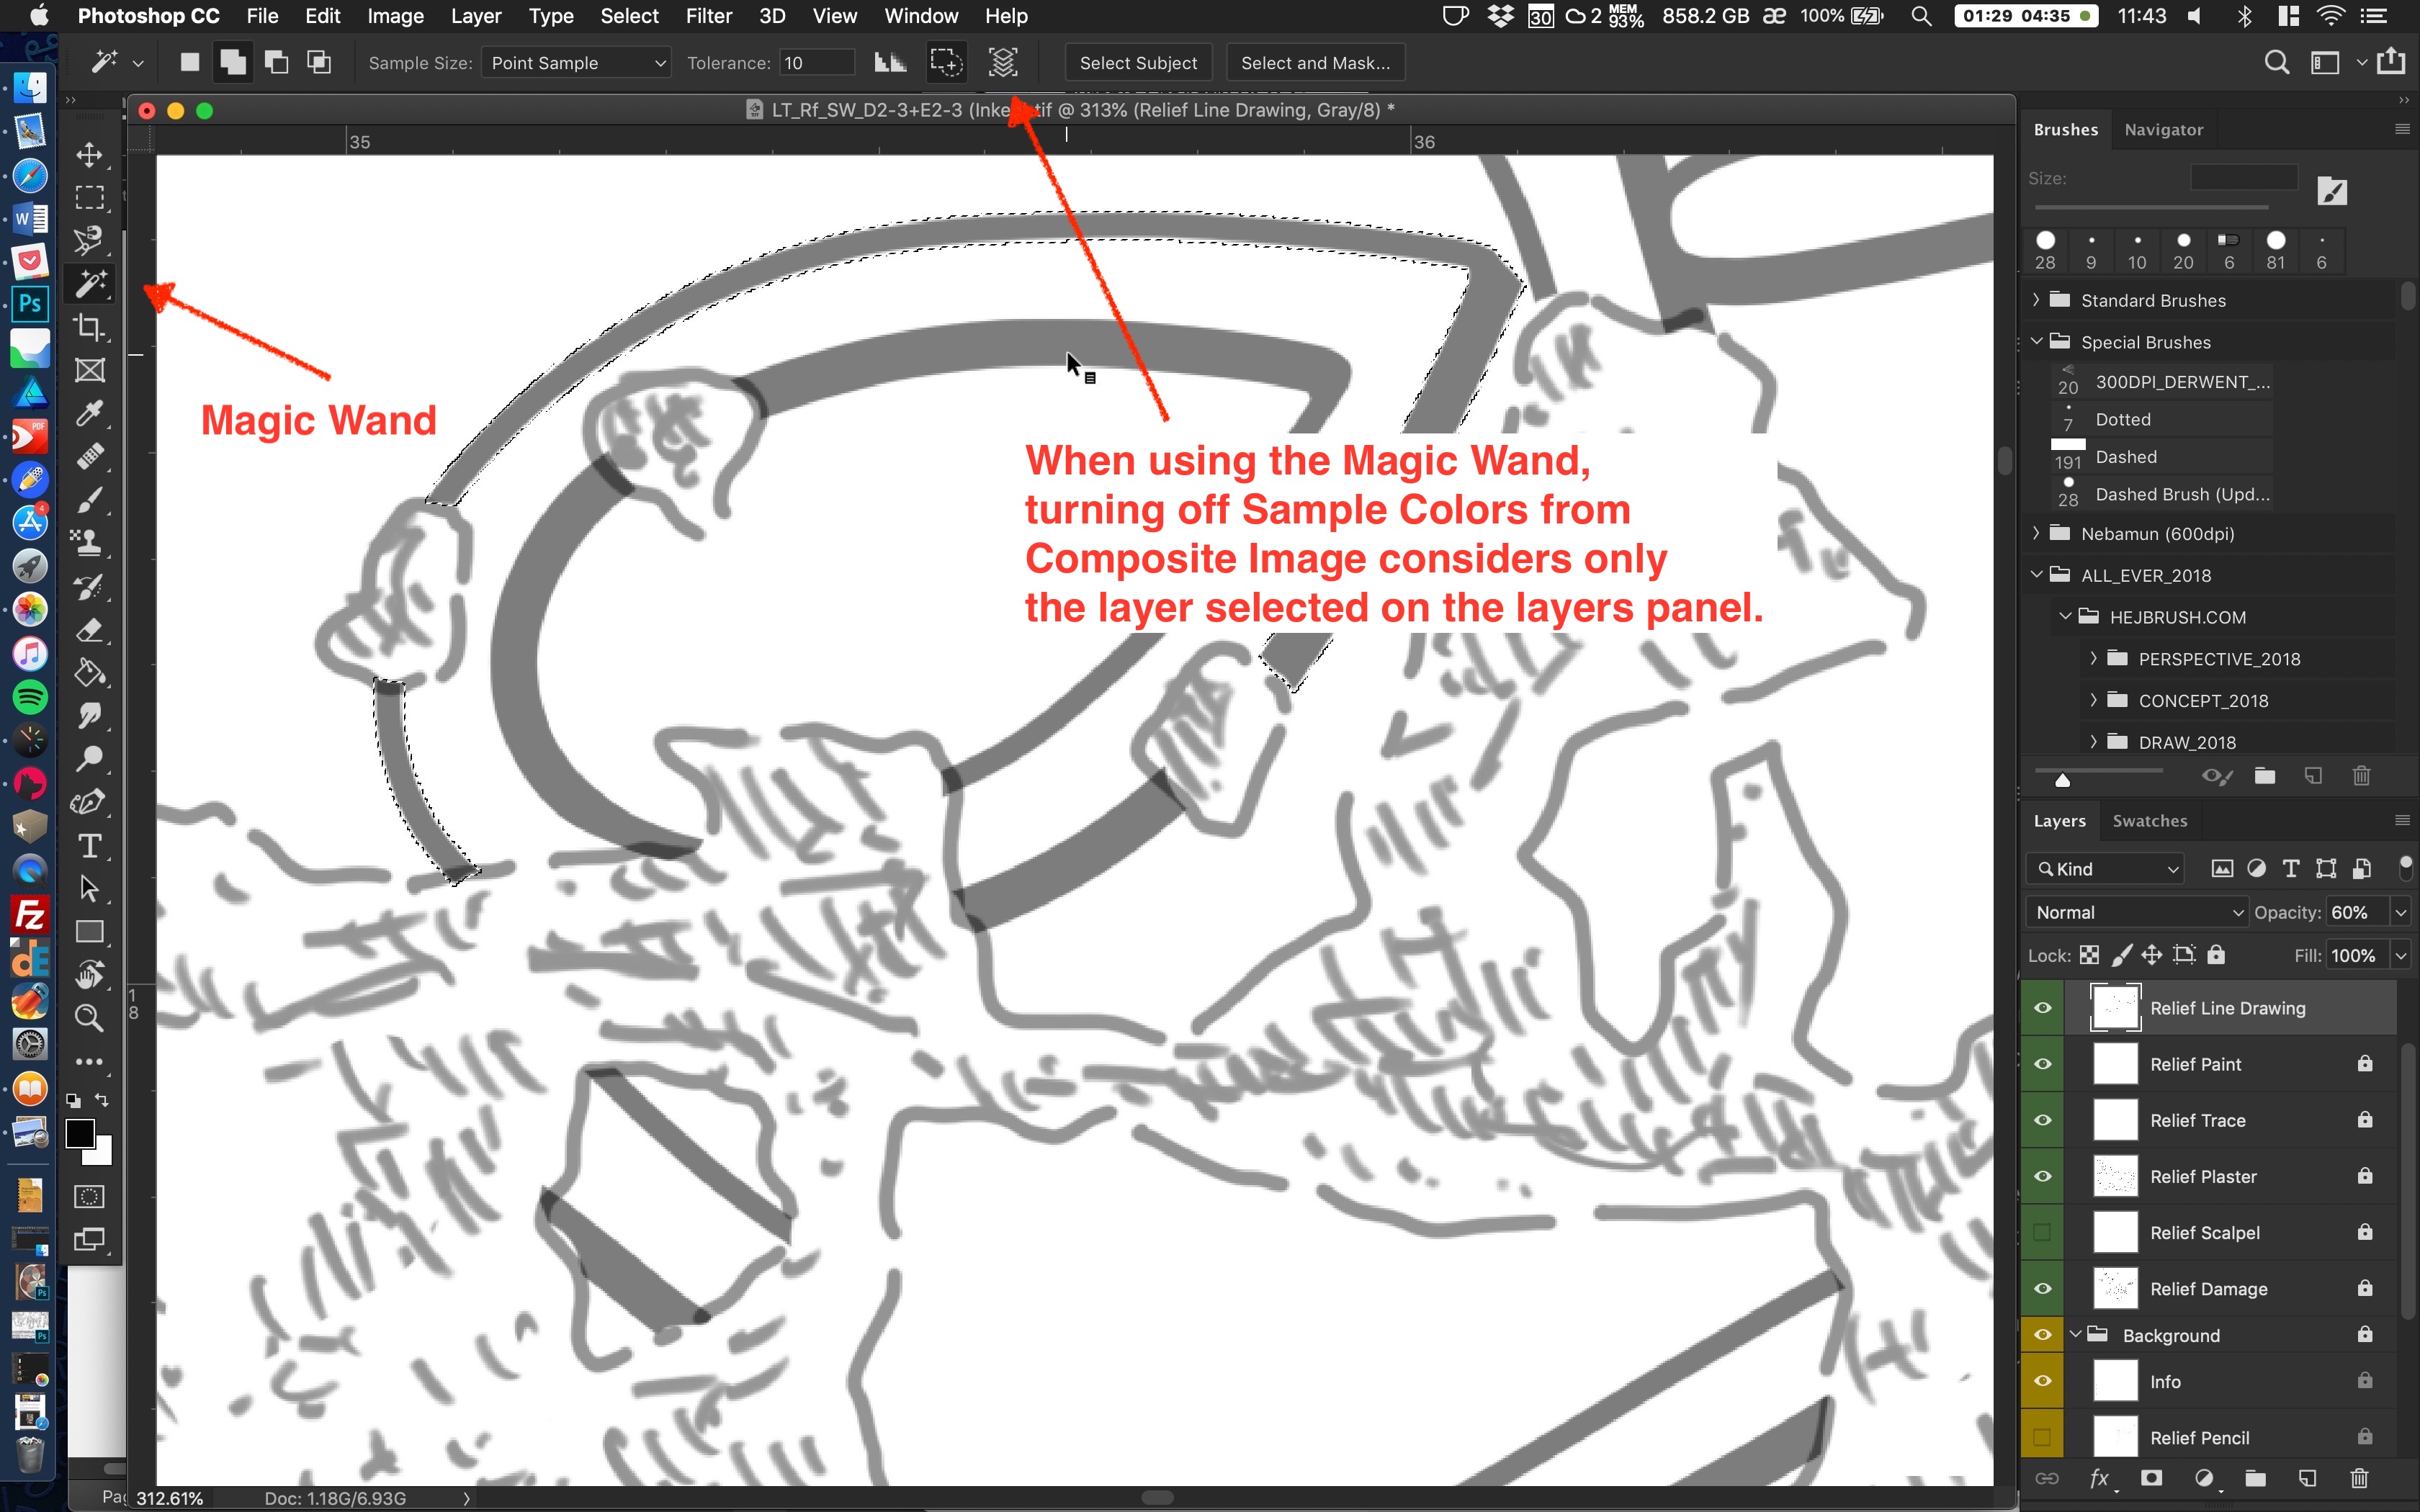
Magic Wand Tool
This is hands down the best tool to select certain features on a drawing, especially on greyscale drawings with a distinct white background providing a lot of contrast. Although Magic Wand uses color and contrast to separate complex items from each other, one can’t automatically select all the elements with the same attributes unless they are connected. For example, if you’d like to select an inked ankh with some damage braking up the line, you must click on every segment one by one to add them to your selection. Precision can be controlled by changing the tolerance value. To speed up your process you can also add or erase from your selection by holding down Alt or Shift respectively while clicking.
Quick Selection Tool
This tool works like a paintbrush and obtains edges as you paint with it. It is the easiest way to select an area on the drawing as it selects an object within its own outline, initiated by clicking within the object. The selection’s precision is based on the contrast between the object and its surrounding background. Just like with most of our selection options, we can add to (Alt + click) or detract from (Shift + click) our selection.
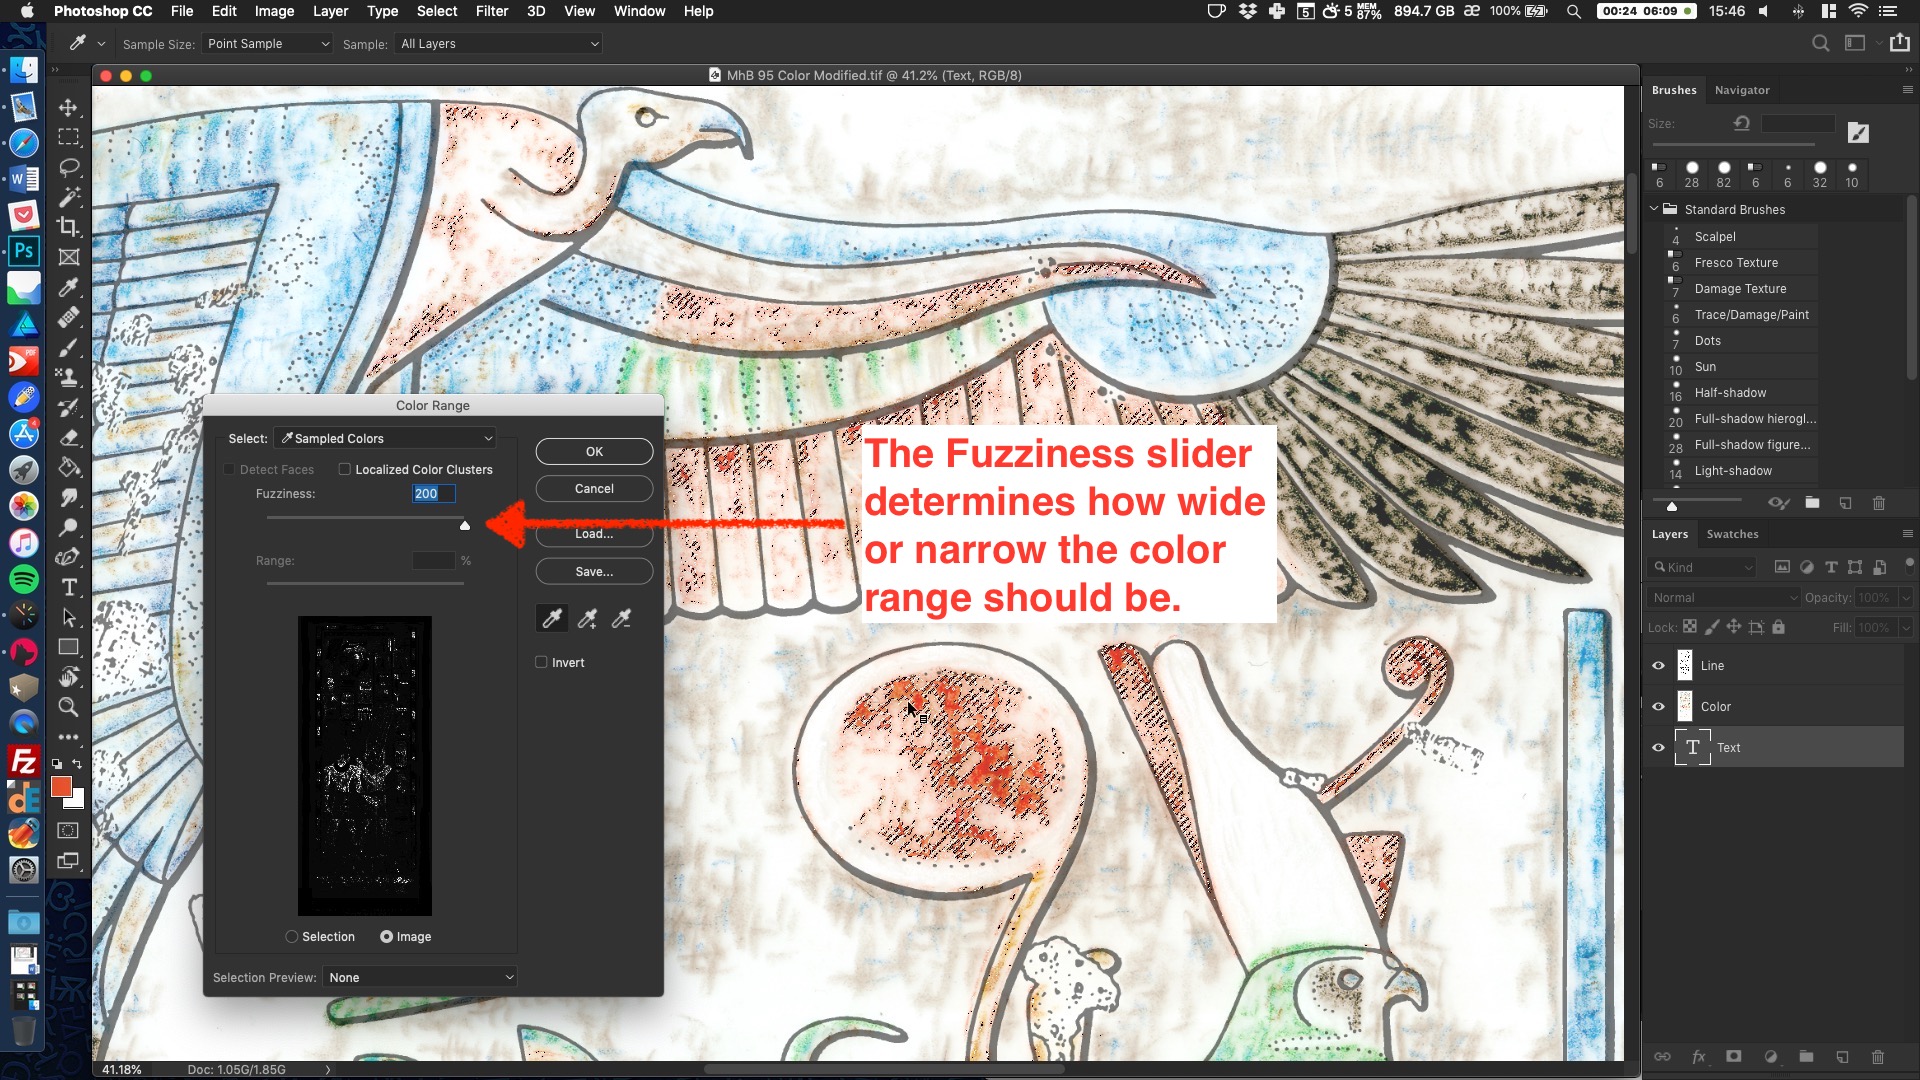
Color Range
The Color Range command selects a specified color or color range within an existing selection or an entire image. To make a color range selection, one needs to select Color Range from the Selections menu, which calls up its own settings panel. Usually the most effective way to use the tool is to click on the eyedropper with the plus, then drag over a colored area of your image to select the range of hues you’d like to select. Once selected, you can start tweaking the area, by changing hue, saturation etc., or replace an entire color range with another. This selection option can be particularly useful for modifying/unifying certain textures (either in color or grayscale) during preparatory work for publication.
Areas penciled in red designated for further modifications using Color Range selections.
Modifying a selection
As we pause for a minute while discussing the different types of selections, we should make a remark on the fact that selections themselves can be transformed in the same manner as the selected area. You can transform a selection to scale, skew or warp it by going to the Select menu and choose Transform. By doing so, the familiar handles appear around your selection, but this time these modifiers are associated with the selection instead of its content. You can either drag the bounding box to alter a selection's shape, hold Ctrl/Cmd and drag to skew the shape, or right-click inside the selected area to choose from different transformation controls, like Warp. Another useful modification that can be picked from the Selection menu is Inverse, which changes the unselected areas into selected areas, protecting the area you previously selected.
Grow and Similar
In short, Grow is a good way to ensure that what you'd like to be selected is completely covered, while Similar helps selecting additional segments of your image. In slightly more technical terms, Grow is growing your selection based on adjacent or contiguous pixels, while Similar is selecting all similar, non-adjacent pixels on the entire image. In our example the black vertical inscription has an array of different tones of grey. Using the magic wand tool will only select the grey of the same tone. However, by clicking on Select/Similar, Photoshop broadens the range of grey: instead of picking up only the initial selections, it starts adding slight variations to our selection. You can repeat the Similar command as many times as necessary and it will always find and add new shades of grey to your selection.

Turning selections into a layer mask for further enhancements by using Grow and Similar tools to select certain shades on a shabti (Drawing detail from TT 65).
Quick Mask
As you create any selection, Quick Mask can be toggled on or off by pressing "Q" on your keyboard. In Quick Mask mode you can paint a selection by using the brush tool with black to add or white to subtract from the original selection (you can use any other tools that let you add black or white). This type of selection works best for complicated areas, especially those where there is no easily defined path or outline to be selected. Although, by using this technique, you don’t really create a mask per se, the way you go about getting your selection is “mask-like.” The selections you make with the brush tool are also user-friendly in a way that they allow you to see the image underneath while you’re working, providing you with the necessary precision.
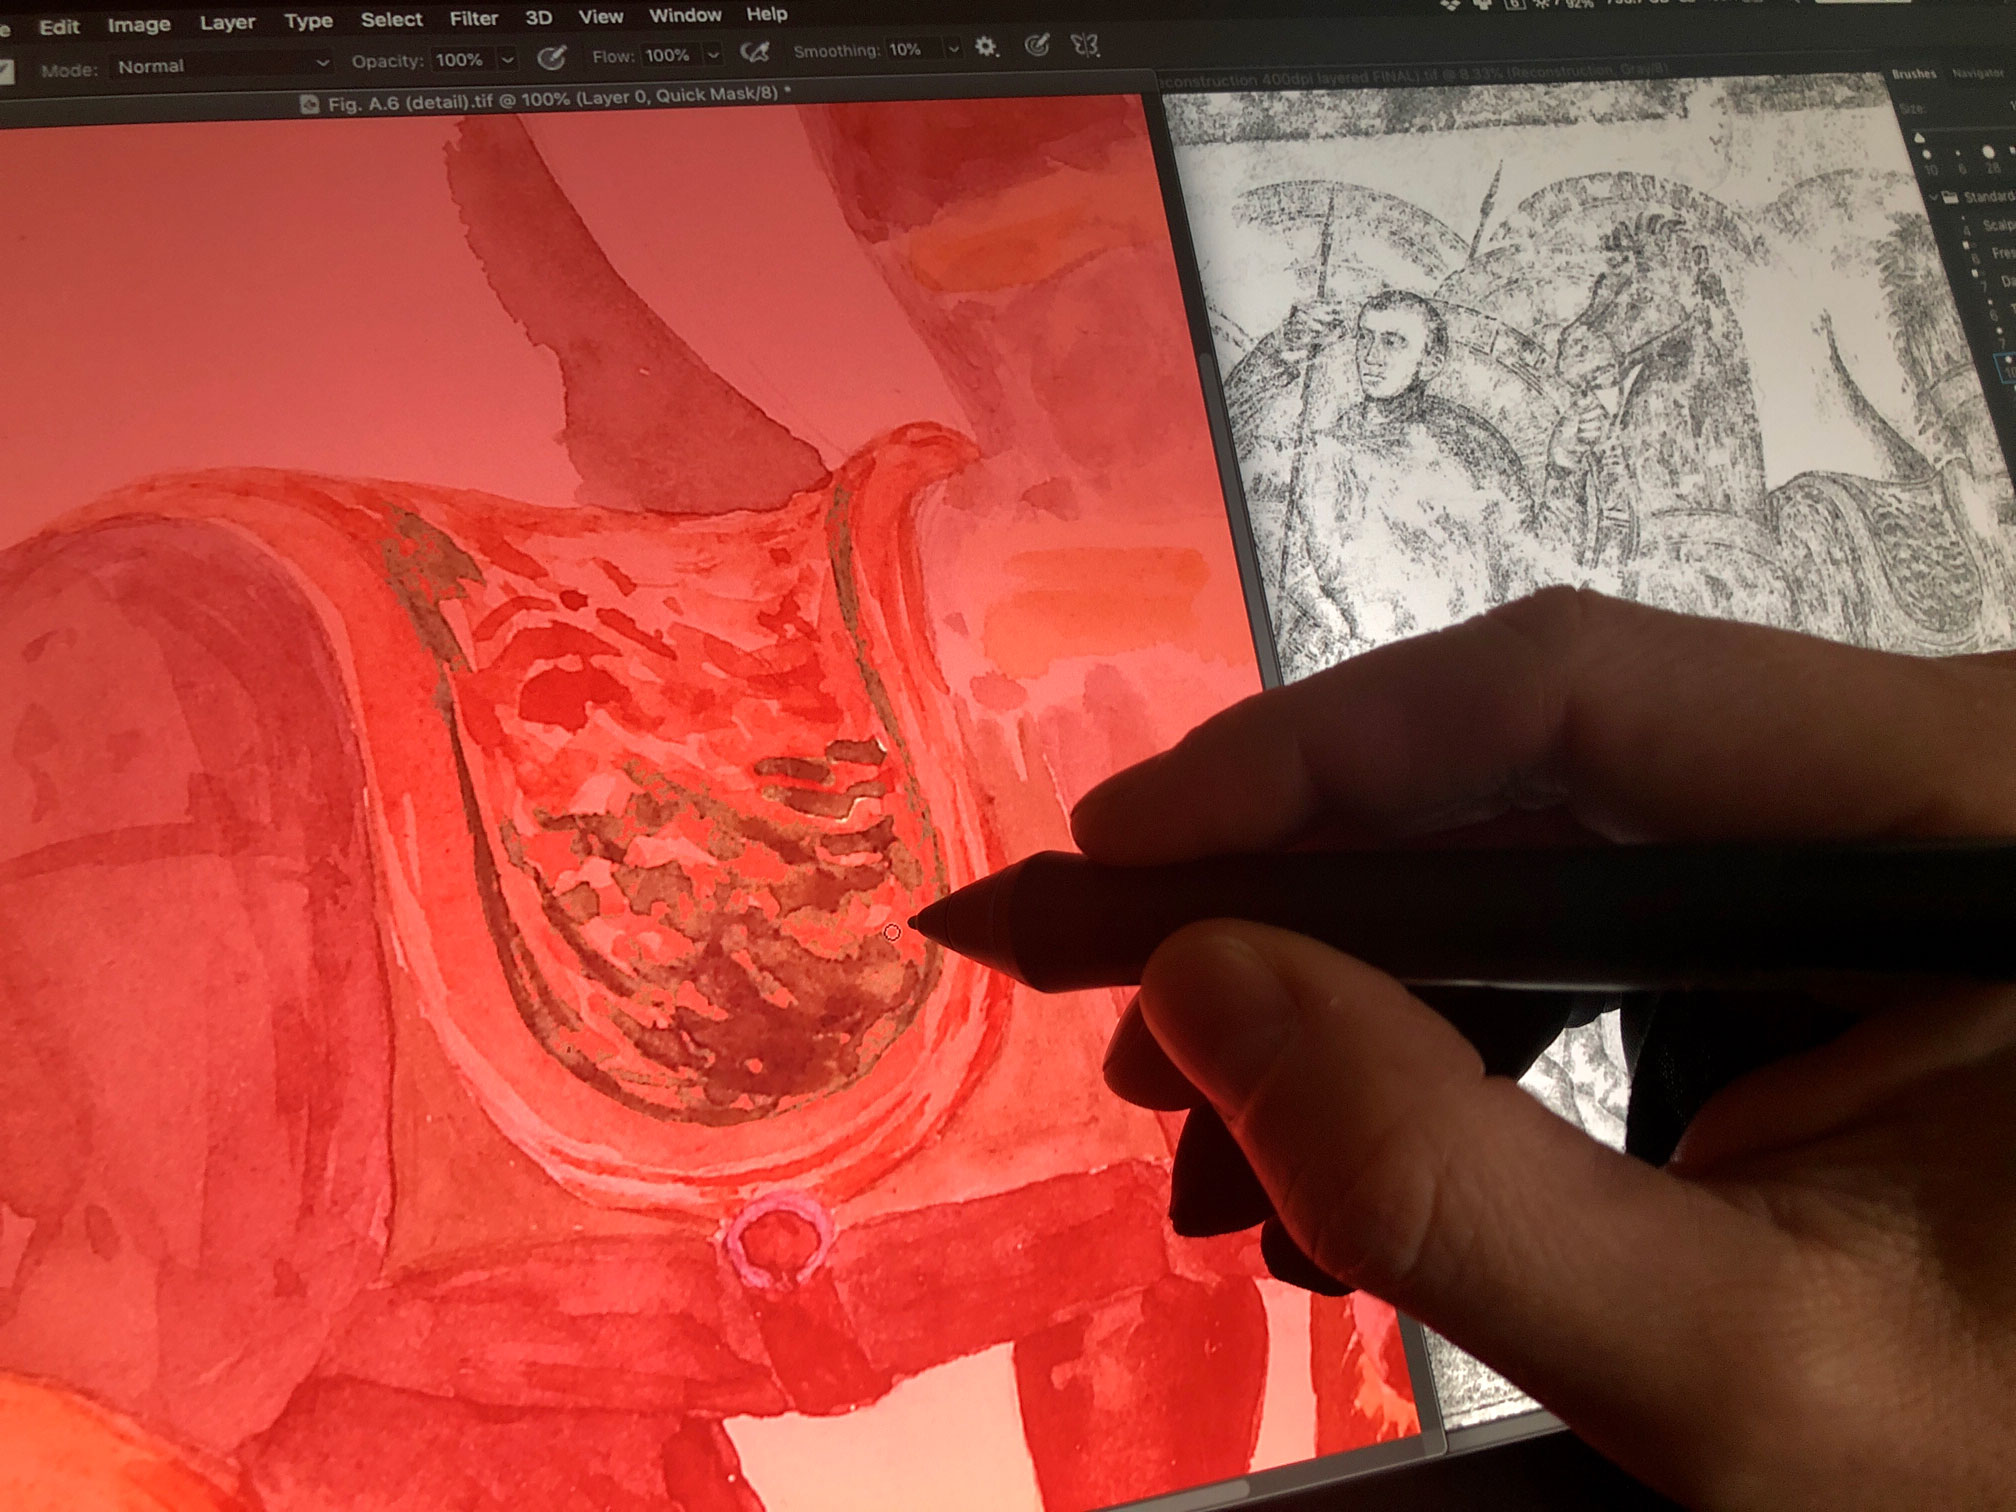
Adding specific patterns from a historic watercolor image of a saddle to the roman fresco reconstruction at Luxor temple by "painting in" the selections.
As you might have noticed, some of the selection tools we described in this tutorial become useful when changing the outlines of a certain feature, while others can be mostly used for content modification. Some of these tools speed up the penciling and inking process by offering the ability to change a line’s shape, direction, color, etc. without the need to redraw them. Other selection tools come handy when we need to treat more complex surfaces, such as greyscale and color texture layers, or when we want to enhance certain portions of our images. Either way, selections are one of the cornerstones of Photoshop editing. Whether you need to cut something out or perform any number of other tasks, creating a selection is often the starting point. There is one more selection tidbit to mention at the end of this tutorial: you can even save a selection for later use if you go to Select/Save Selection. Your selection is saved as a new Channel, so you can find it later in the Channels panel (Window/Channels) and then Ctrl/Cmd-click on it to load the shape of this channel as a selection.
0 comment(s)
Leave a comment(We'll keep your email address private)