
Assigning Certain Functions to the Pen and Hot Keys
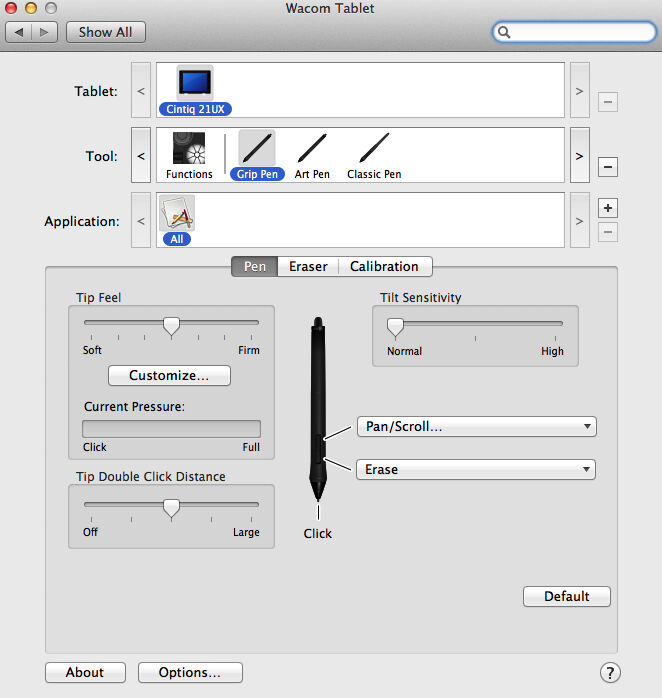
(1) The Pen Setup Window

(2) The Screen Calibration Window
(3) The Hot Keys Setup Window
As can be seen on the above screenshots, this particular tablet has been associated with three different pens (Grip, Art, and Classic Pen). Each has its own settings, so the artist is able to use different pens to perform certain tasks. When one of the pens is selected there are the following features that can be customized:
- Tip Feel - adjusts how much pressure one has to put on the tip to draw different line thicknesses. The Epigraphic Survey drawings are usually inked with preset line thicknesses, so pressure sensitivity is normally disabled when we draw in Photoshop.
- Tip Double Click Distance - can be set to “Large” if the artist feels that the buttons are too responsive when clicking.
- Tilt Sensitivity - a self-explanatory setting, once again not particularly useful for the Survey’s traditional inking process.
- Side Buttons - there are two buttons on the side of our pens that function as hot keys to perform certain commands. This particular pen is set up to either Pan/Scroll the paper by hovering over the drawing area and holding down the button at the same time or to Erase whenever necessary (this is the same as using the pen’s end button, but it is faster and more precise).
Another action we have to perform with the pen during setup is calibrating our Wacom tablet’s screen as demonstrated in the Installing Cintiq 22HD video tutorial.
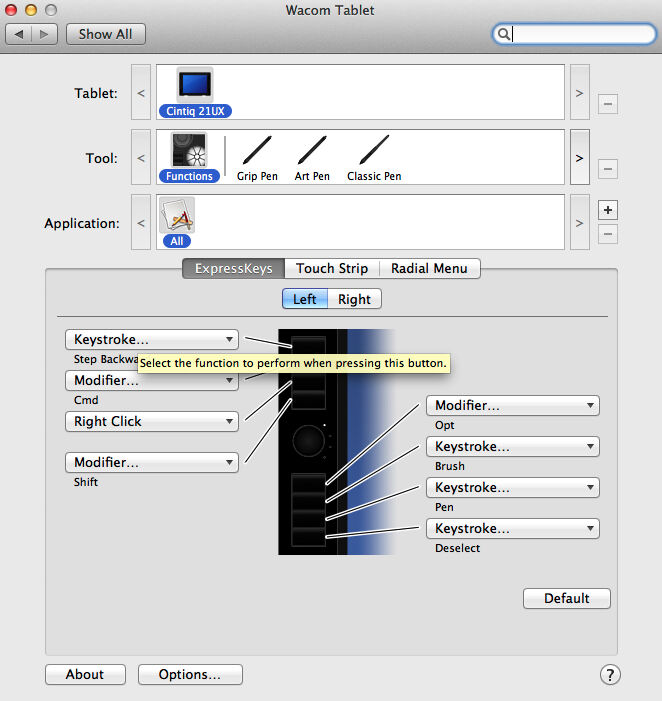
Finally, there should be some customization performed on the tablet’s button interface as well. When we click on the Functions tool, we see a picture of the left/right string of buttons with some commands already associated with them. These buttons are called Express Keys and can perform tasks associated with certain mouse clicks, Photoshop-specific action modifier buttons (Shift, Control, Option, Command).
There are some other options that are either Wacom specific (such as Pan/Scroll), or associated with computer features (Show Desktop, Switch Application, On Screen Keyboard, etc.). Each and every Express Key can potentially be disabled as well. For our drawing purposes, I would like to recommend the following setup of these buttons (the order is equivalent to the vertical row of 8 regular-sized buttons on the left side of the Cintiq 22HD model):
- Step Backward (keystroke Opt+Cmd+Z) - the most commonly used Photoshop command which cancels not just our latest modification step on the drawing (Undo), but, by repeatedly clicking on it, lets us step backwards in Photoshop’s History panel.
- Command (modifier) - every time a drawing path has to be modified, the action is executed by holding down the Command button.
- Right Click (mouse clicks) - every secondary option throughout the entire system is called up by clicking on the right mouse button (also called secondary click), so it is one of the most-used shortcuts the artist will employ during drawing.
- Shift (modifier) - mostly used for drawing straight brush lines or proportion-aware editing of objects, images, or image parts.
- Option (modifier) - when using the Clone stamp or any other location-aware action, pressing the Option button selects the sample area from which the information is taken.
- Brush (keystroke B) - one of the two most-used tools for digital inking.
- Pen (keystroke P) - the other most commonly used tool for digital inking.
- Deselect (keystroke CMD+D) - in most of the cases specific selections can be very time consuming to achieve. Once we are done and want to go back to drawing, the easiest way to deselect the area is by hitting a single button.
All of the above-mentioned shortcuts can be executed from the regular computer keyboard as well, especially if the user takes the time to learn the combinations for specific tasks. When the artist is deeply involved with drawing, however, he/she should always choose the least distracting way to interact with the software, and in our case that means dealing with Photoshop right from the tablet. Since all the buttons on the Cintiq 22HD look exactly the same, it is useful to have a sticky note reminder of each button’s actions on the actual button. Otherwise, it’s recommended to hit the Information (i) button on the tablet frame’s upper right corner, which briefly highlights the actual setup of each button.
To learn more about the context of this tutorial read the following chapter:
Chapter 3, Section 3 - Setting Up the Wacom Tablet
0 comment(s)
Leave a comment(We'll keep your email address private)